.webp)


What is Terraform CLI?
Terraform CLI is a command-line interface tool that enables you to manage Infrastructure as Code (IaC) using the HashiCorp Configuration Language (HCL). With Terraform CLI, you can define, provision, and manage infrastructure resources in a human-readable format that can be versioned, reused, and shared across teams.
Video Walk-through
Our setup
- A GitHub account (all the hands-on sections will utilize GitHub’s Codespaces so you won’t need to install anything on your machine)
Why use Terraform CLI?
Terraform CLI offers several benefits, including:
- Multi-cloud support: Terraform CLI allows you to manage resources across multiple cloud providers, such as AWS, Azure, and Google Cloud.
- Modularity: Terraform promotes the use of reusable modules, enabling you to create and share infrastructure components across projects.
- Version control: Terraform configuration files can be stored in version control systems, ensuring that changes to infrastructure are tracked and auditable.
- Track changes: You can track resource changes throughout your deployments using Terraform state file.
- Dry-runs: You can validate and preview infrastructure changes before applying them using the [.code]terraform plan[.code] and [.code]terraform apply[.code] commands.
Terraform CLI Basics
Installing Terraform CLI
To install Terraform CLI, follow the instructions for your operating system by clicking on the appropriate tab in the documentation. If you follow along with our guide using GitHub codespaces, you will have the Terraform CLI already installed for you.
Configuring Terraform CLI
Once Terraform CLI is installed, you can start configuring it by creating a new directory for your configuration and initializing the directory with the [.code]terraform init[.code] command. We will see this in action shortly.
We will use a simple example to demonstrate the Terraform CLI commands. The example pulls an NGINX docker image from Dockerhub and runs an NGINX container. Below are the three configuration files used.
main.tf
variables.tf
terraform.tfvars
outputs.tf
Essential Terraform CLI Commands
Terraform CLI offers a variety of commands for managing infrastructure resources. To view every terraform command available, you can simply run [.code]terraform[.code] or [.code]terraform -h[.code]. Here are the main commands:
terraform init: Prepare Working Directory
Let's go ahead and run [.code]terraform init[.code] to initialize our directory. The output should be:
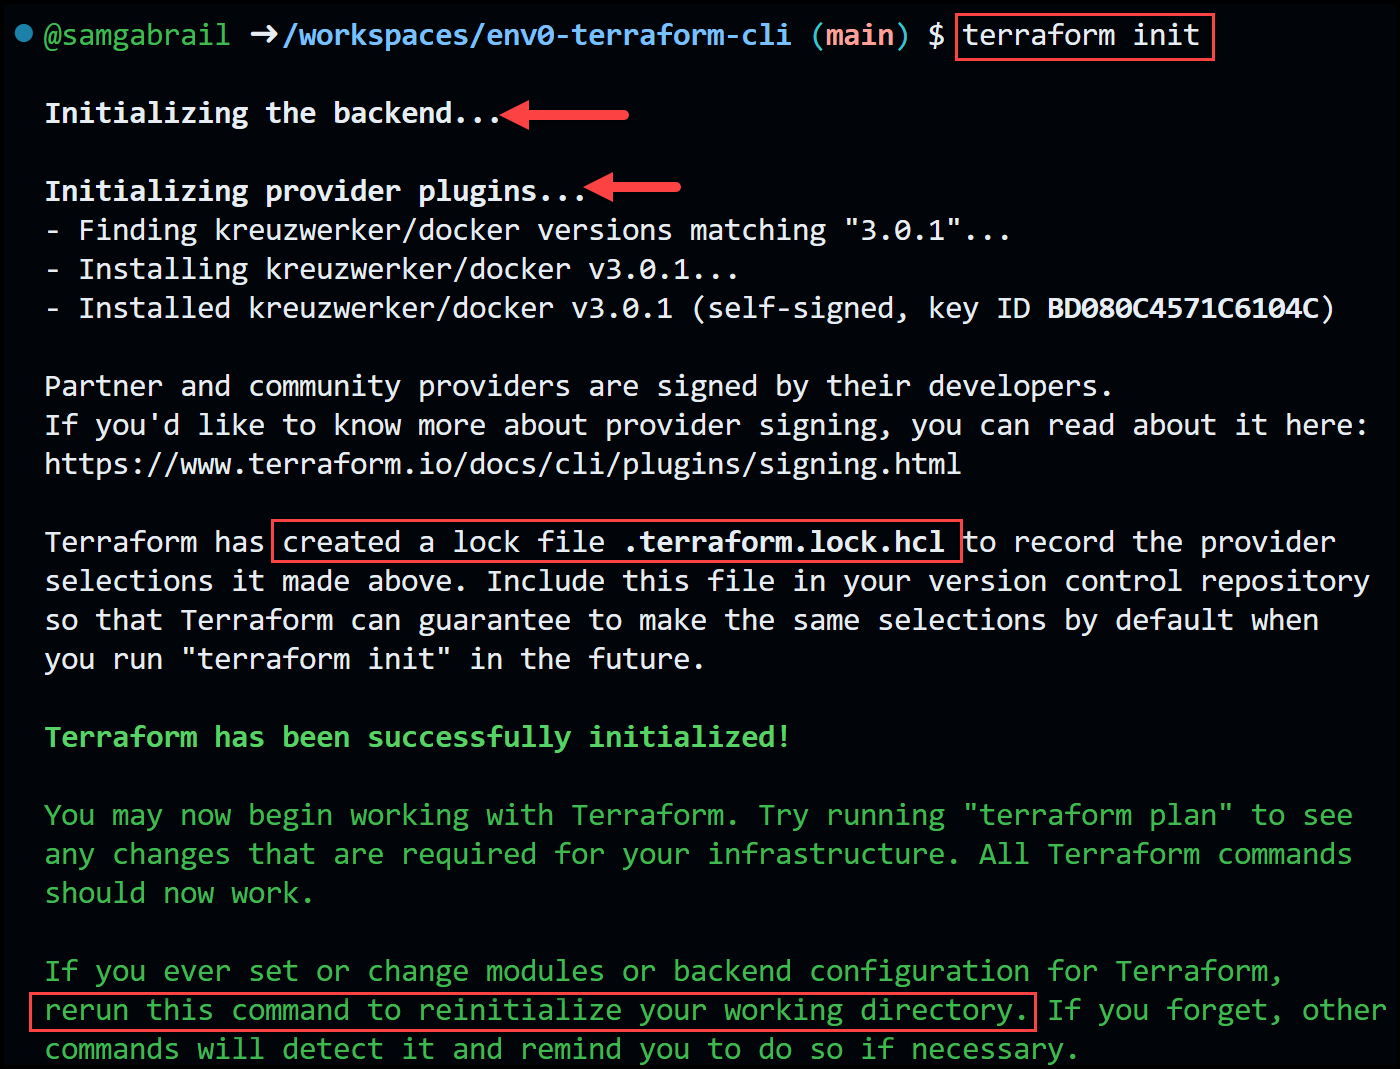
As you can see in the output of the [.code]terraform init[.code] command below are the steps it takes:
- Initializing the backend, which is where Terraform stores its state file.
- Installing the provider plugins that are required by the configuration. Terraform will download them from the Internet or from a local cache if available.
- Downloading any modules that are referenced by the configuration, either from local directories or from a remote Terraform Registry.
- Creating a lock file that records the exact versions of the providers and modules that are installed.
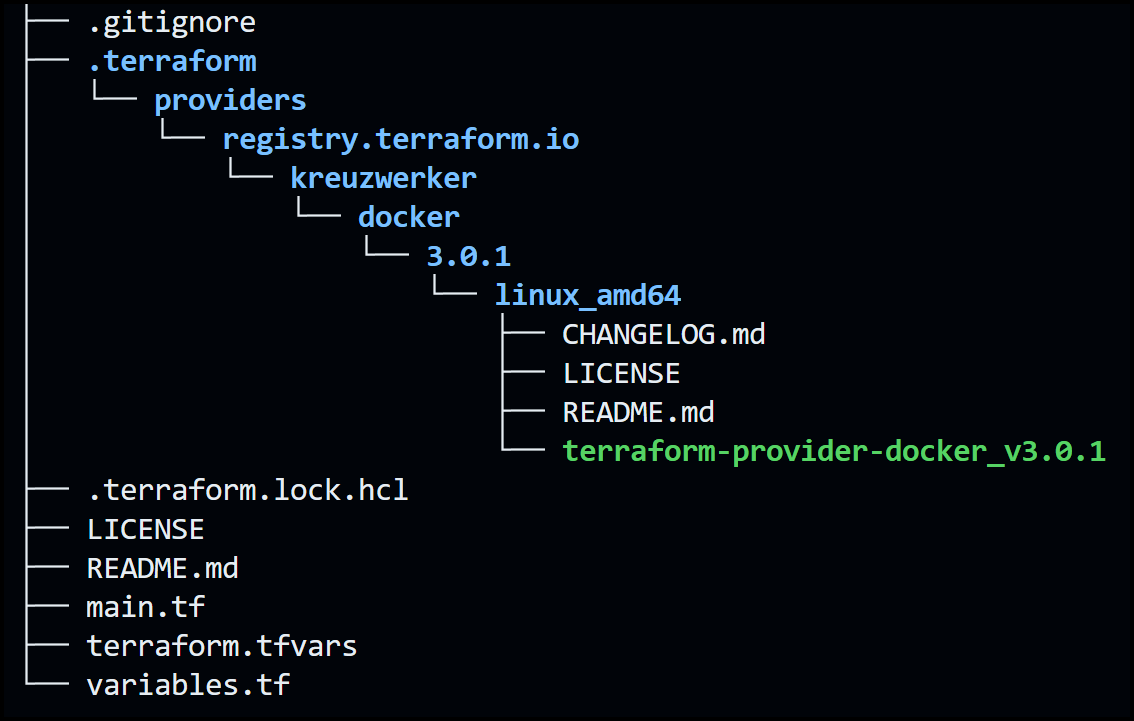
Take a look at the file structure after running [.code]terraform init[.code] . You will see that it creates a hidden directory called .terraform where it installs the providers and terraform modules.
The [.code]terraform init[.code] command also accepts some options that can modify its behavior, such as [.code]-input[.code], [.code]-lock[.code], [.code]-upgrade[.code], and [.code]-from-module[.code]. You can use these options to control how Terraform interacts with user input, state locking, provider and module upgrading, and module copying.
The [.code]-upgrade[.code] flag is the most important to mention here as it allows you to update your providers and modules to the latest compatible versions, or when the versions defined in the lock file conflict with the versions defined in the [.code]required_providers[.code] block. However, you should use this option with caution, as upgrading providers and modules may introduce breaking changes or unexpected behavior.
terraform validate: Check Your Configuration
Terraform offers the terraform validate command to check the syntax of our configuration files. Let's try it out now.
If all looks good you will get the following message:

Let's introduce an error by commenting out the resource docker_image in main.tf like this:
Now run [.code]terraform validate[.code] again and check the error message below:

You can see the error message letting us know that we referenced an undeclared resource and pointed to the offending line in the main.tf file.
It's a good practice to include the [.code]terraform validate[.code] command in CI/CD pipelines so the pipeline would fail early on if there is an issue with the Terraform syntax.
terraform plan: Show Changes to Your Infrastructure
Next, we will run the [.code]terraform plan[.code] command. This terraform command allows us to view the intent of what Terraform is about to do. It's basically a dry run.
First, remember to uncomment the resource docker_image in main.tf. The output will be:
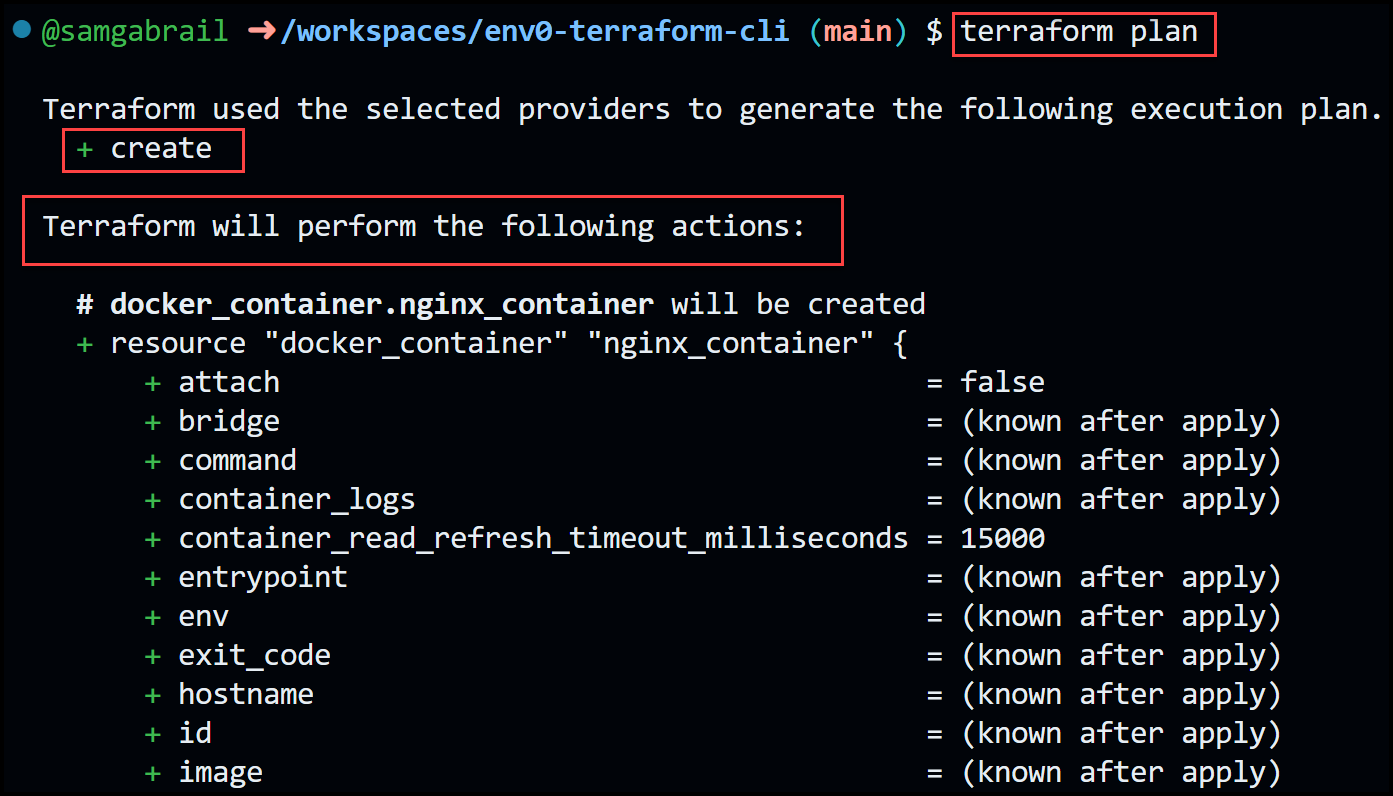
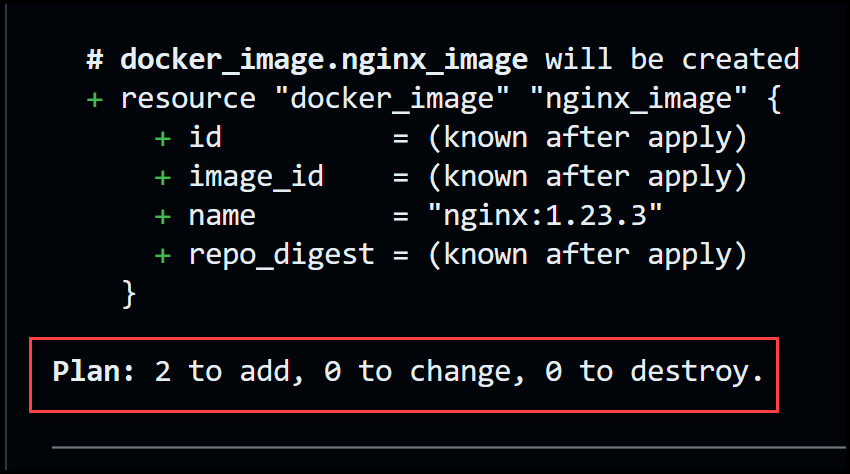
The output screenshots demonstrate how [.code]terraform plan[.code] produces an execution plan, which enables you to review the changes that Terraform will make to your infrastructure. Terraform performs the following steps by default when creating a plan:
- Updates the Terraform state with the current state of any existing remote objects.
- Identifies any differences between the current configuration and the prior state.
- Suggests a set of actions that would, if applied, make the remote objects match the configuration.
Since this is the first time to run [.code]terraform plan[.code], we only see that it plans to create two resources with nothing to change and nothing to destroy.
The [.code]terraform plan[.code] command can be useful for checking whether the proposed changes match what you expected before you apply them or share them with your team for broader review.
The terraform plan command also supports multiple flags that let you modify its behavior, such as [.code]-target[.code], [.code]-refresh-only[.code], [.code]-destroy[.code], etc. To learn more about terraform plan, check out our detailed blog post on terraform plan.
terraform apply: Apply Changes to Your Infrastructure
Once we're satisfied with what is about to get provisioned, we can go ahead and run the [.code]terraform apply[.code] command. The output will be:
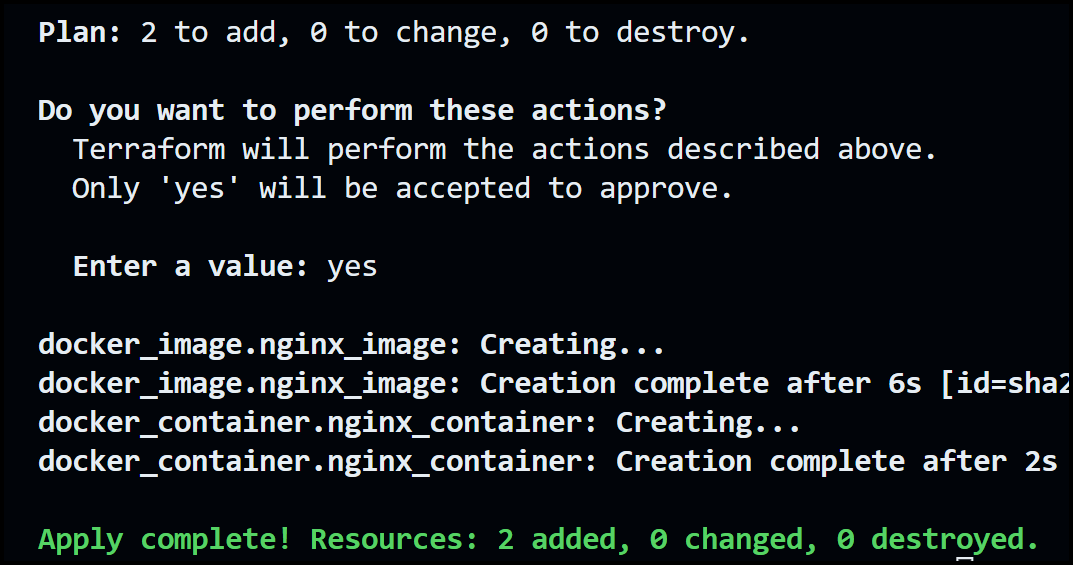
When you run [.code]terraform apply[.code], Terraform always runs [.code]terraform plan[.code] first. Then you will get a prompt to accept the changes. You need to enter yes and as shown in the screenshot above, Terraform will create the resources requested in the configuration files.
Now you can see our NGINX container running on port 8090 and we're greeted with the standard NGINX welcome page shown below.

To summarize, when you run [.code]terraform apply[.code], Terraform will:
- Lock your project’s state, so that no other instances of Terraform will attempt to modify your state or apply changes to your resources.
- Create a plan, and wait for you to approve it. Alternatively, you can provide a saved plan file , in which case Terraform will not prompt for approval.
- Execute the steps defined in the plan using the providers you installed when you initialized your configuration.
- Update the state file with the new state of the resources and output values.
You can use the [.code]terraform apply -auto-approve[.code] option to skip the prompt which is helpful in CI/CD pipelines. However, a peer review approval step needs to be taken upstream.
You can also use other options to modify the behavior of the apply command, such as [.code]-lock[.code], [.code]-parallelism[.code], [.code]-destroy[.code], etc.
The Terraform State File
The terraform state file is a file that Terraform uses to store information about your managed infrastructure and configuration. This state file keeps track of resources created by your configuration and maps them to real-world resources.
It is written in JSON format and it records the identity of remote objects against a particular resource instance, and then potentially updates or deletes that object in response to future configuration changes.
The terraform local state file is saved by default in a local file named terraform.tfstate at the root of your project. However, you can also use a remote state stored in something like an S3 Bucket, which is important to do when collaborating with a team.
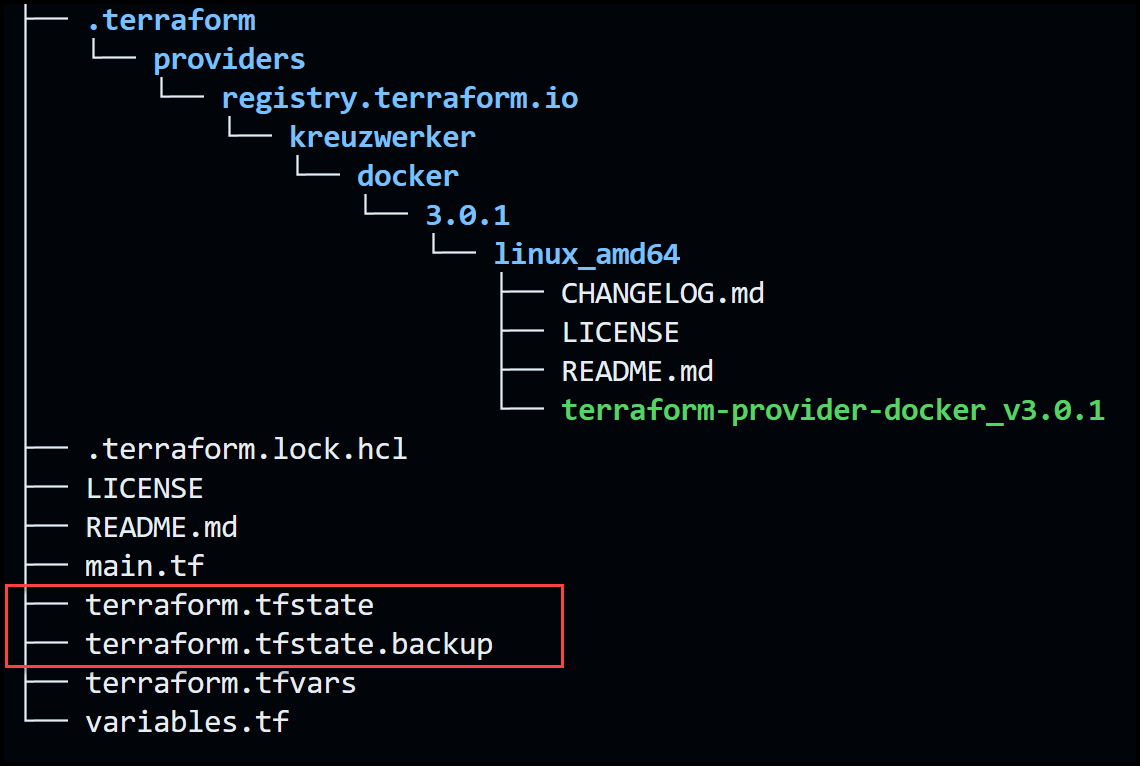
Below is our file structure after running the [.code]terraform apply[.code] command. Notice two new files appear: terraform.tfstate and terraform.tfstate.backup
Here is a portion of the terraform.tfstate file:
…truncated
The terraform.tfstate.backup file is used to show a previous version of the state file in case we need to revert back to it.
terraform destroy: Remove Infrastructure Resources
A handy terraform command used when you need to build an environment for testing and to tear it down after is the [.code]terraform destroy[.code] command. Let's go ahead and try it out.
The output will be:
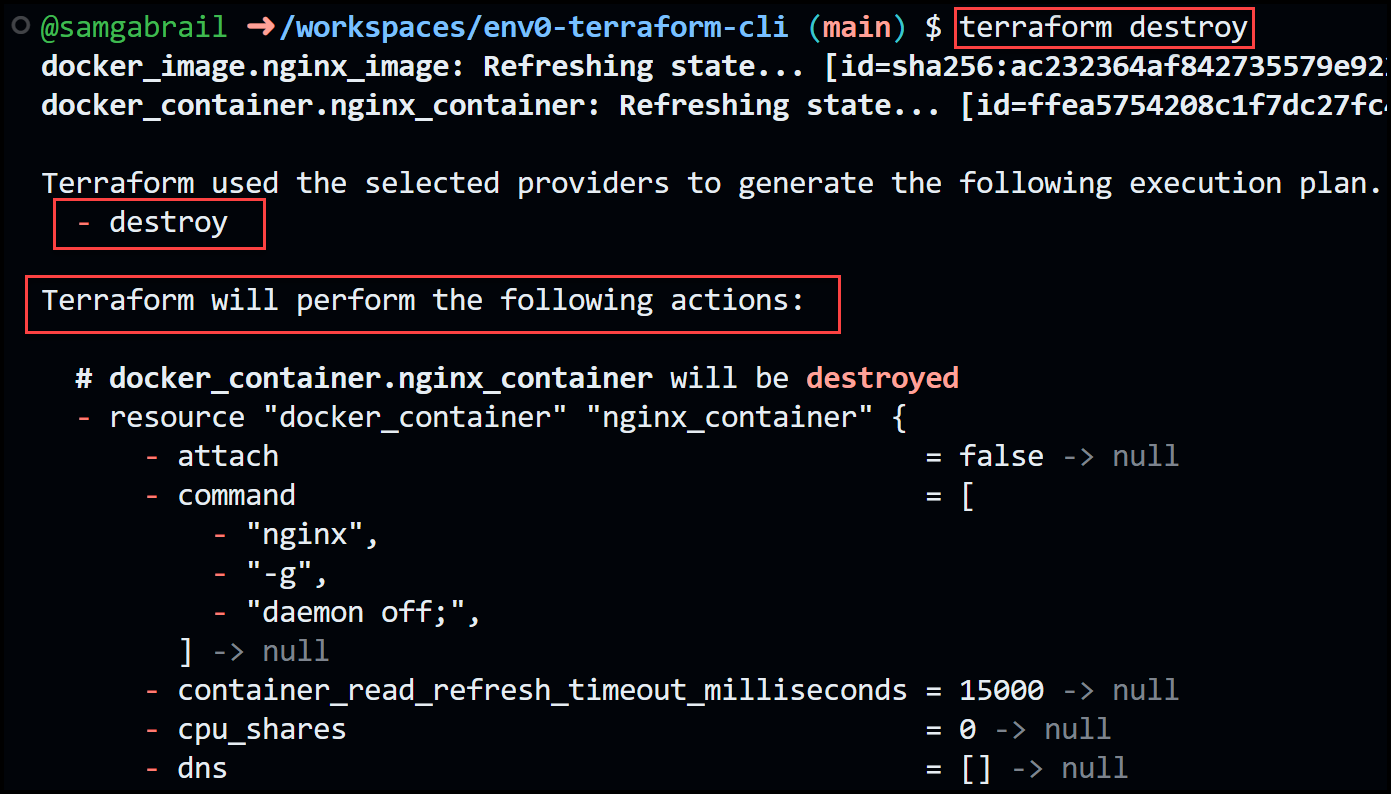
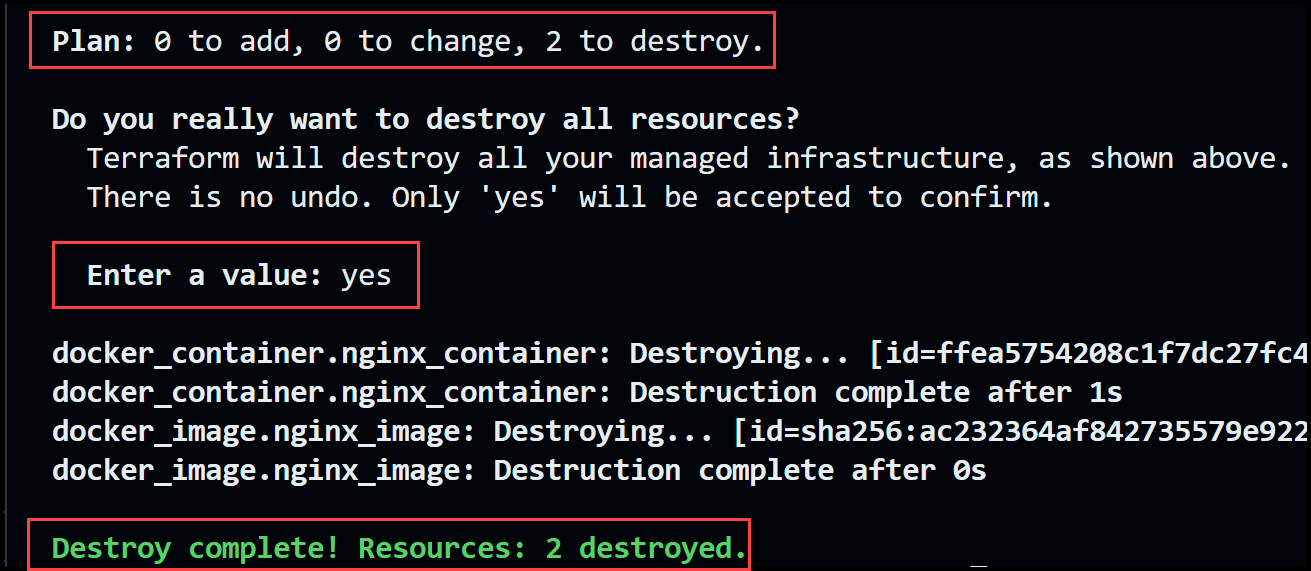
The [.code]terraform destroy[.code] command is the inverse of terraform apply in that it terminates all the resources specified in your Terraform state file. It does not destroy resources running elsewhere that are not managed by the current Terraform project.
When you run [.code]terraform destroy[.code], Terraform will:
- Lock your project’s state, so that no other instances of Terraform will attempt to modify your state or apply changes to your resources.
- Create a plan to destroy all remote objects, and wait for you to approve it.
- Execute the steps defined in the plan using the providers you installed when you initialized your configuration.
- Update the state file with the new state of the resources and output values.
You can use the [.code]-auto-approve[.code] option to skip interactive approval of the plan, but it's definitely not recommended in a production environment. You can also use the command [.code]terraform apply -destroy[.code] with similar results. This command is helpful in CI/CD pipelines.
terraform console: Experiment with Expressions and Functions
The [.code]terraform console[.code] command provides an interactive console for evaluating and experimenting with expressions. You can use it to test interpolations before using them in configurations and to interact with any values currently saved in the state. The terraform console command does not modify your state, configuration files, or resources.
When you run [.code]terraform console[.code], Terraform will:
- Read the Terraform configuration in the current working directory and the Terraform state file from the configured backend so that interpolations can be tested against both the values in the configuration and the state file.
- Lock your project's state, so that no other instances of Terraform will attempt to modify your state or apply changes to your resources.
- Open an interactive command-line console where you can enter expressions and see their results.
Let's try it out.
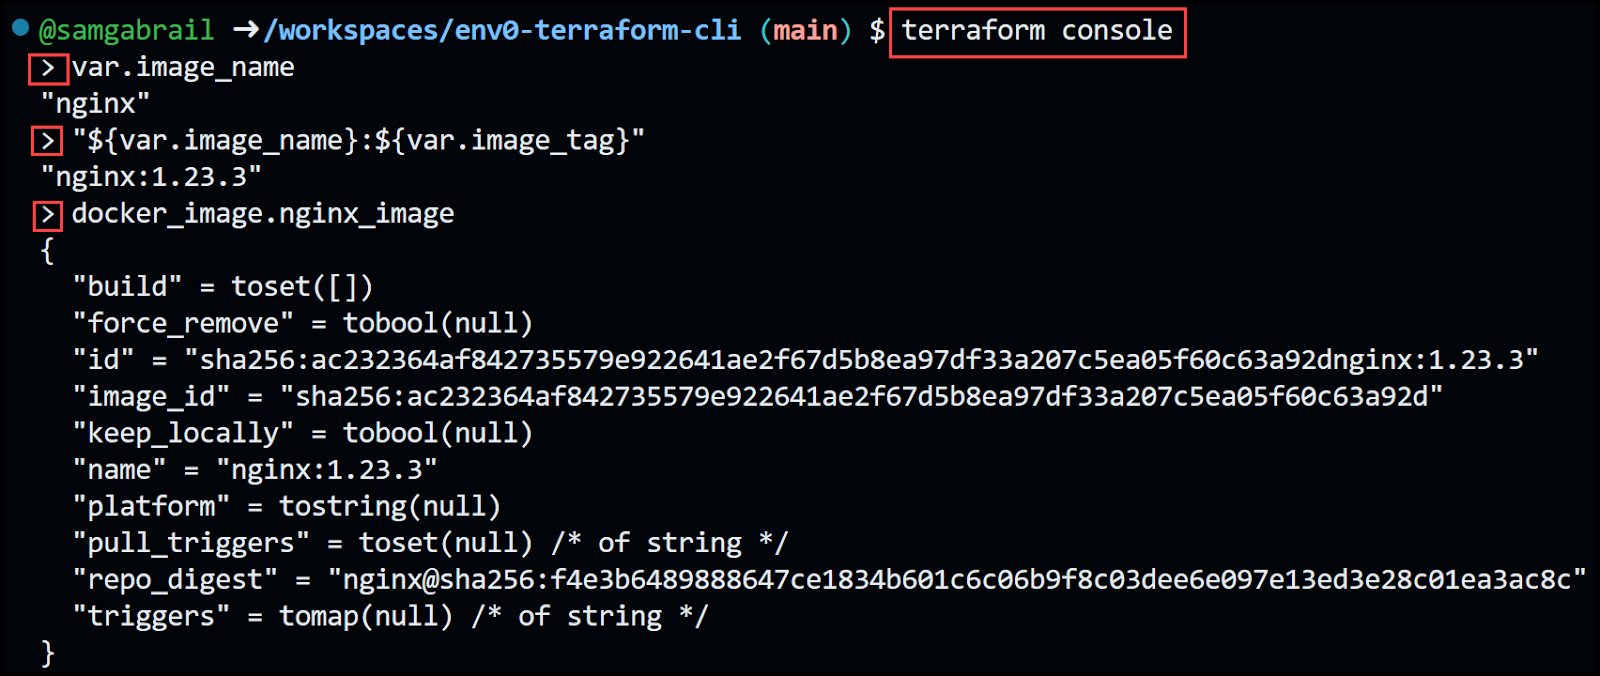
To close the console, enter the [.code]exit[.code] command or press Control-C or Control-D.
terraform fmt: Format Your Terraform Code
The [.code]terraform fmt[.code] command is very useful to format our configuration files.
When you run [.code]terraform fmt[.code], Terraform will:
- Scan the current directory for configuration files by default, or scan a specific directory or file if you provide a target argument. You can also use the -recursive option to process all files in subdirectories.
- Rewrite terraform configuration files in place.
- List the files containing formatting inconsistencies, unless you use the [.code]-list=false[.code] option.
- Display diffs of formatting changes, if you use the [.code]-diff[.code] option.
terraform taint: Mark Resource Instance as Partially Functional
The [.code]terraform taint[.code] command informs Terraform that a particular object has become degraded or damaged. Terraform represents this by marking the object as "tainted" in the Terraform state, and Terraform will propose to replace it in the next plan you create.
The terraform taint command can be useful for:
- Forcing Terraform to recreate an object even though there are no configuration changes that would require it.
- Handling situations where an object may become damaged or degraded in a way that Terraform cannot automatically detect.
- Testing the behavior of your configuration when an object is replaced.
When you run [.code]terraform taint[.code], Terraform will:
- Lock your project's state, so that no other instances of Terraform will attempt to modify your state or apply changes to your resources.
- Mark the specified object as tainted in the state file.
- Exit with a 'zero' status if successful, or a 'non-zero' status if an error.
Important: This command is deprecated. The recommendation is to use the [.code]-replace[.code] option with [.code]terraform plan[.code] and [.code]apply[.code] instead. Using the [.code]-replace[.code] option gives you more visibility into the impact of the change before you apply it. With [.code]taint[.code] command, you risk having another person run a new plan on your tainted object without your knowledge of the outcomes.
terraform workspace: Manage Workspaces
The [.code]terraform workspace[.code] command is used to manage workspaces. Workspaces are named containers for Terraform state that allow you to isolate and switch between different configurations and environments.
This command has several subcommands:
- [.code]new[.code] - Used to create a new workspace with a given name.
- [.code]select [.code]- Chooses a different workspace to use for further operations.
- [.code]list[.code] - Lists all existing workspaces.
- [.code]show[.code] - Shows the name of the current workspace.
- [.code]delete[.code] - Deletes an existing workspace.
You can use the [.code]terraform workspace[.code] to organize your Terraform projects into multiple logical environments, such as development, staging, and production.
You can also use workspaces to manage multiple instances of the same configuration with different variables or providers.
Notice our file structure below. Terraform creates a new folder called terraform.tfstate.d and a folder per workspace. Each workspace folder contains its own state file.

Additional Terraform Commands
We’ve gone through the main Terraform CLI commands, however, there are more. Below is the rest of the available commands as of Terraform version 1.5.0.
Best Practices for Using Terraform CLI
To get the most out of Terraform CLI, follow these best practices:
- Use a consistent format, style, and code structure
- Separate Terraform configuration files based on their purpose
- Use shared modules to promote reusability and modularity
- Keep your Terraform version up-to-date
- Enable version control and backup for your Terraform state files
- Use workspaces to manage multiple environments
Advanced Terraform CLI Usage
For advanced Terraform CLI usage, consider exploring:
- Remote backends for storing and managing your Terraform state. Take a look at env0's remote backend.
- Modules for creating reusable infrastructure components and storing them in a private module registry for your organization. Check out env0's module registry.
- Terragrunt for managing multiple environments with the same configuration files and applying the Do Not Repeat (DRY) principle.
- Role-based access controls (RBAC) and policy enforcement for security, compliance, and cost management. Check out this article from env0 on How to Implement Fine-grained Role-Based Access Control for Your Infrastructure as Code with Custom RBAC Roles.
Conclusion
In this blog post, we saw how to use the various Terraform CLI commands available to us today. We also discussed some best practices and explored advanced Terraform CLI usage.
By following these best practices and usage patterns, you can effectively manage your infrastructure resources across your hybrid cloud environments.