.webp)


Terraform is a popular tool used by DevOps engineers for codifying cloud resources. One of the foundational Terraform commands at the heart of Terraform is terraform init. This command is what sets the stage for all the subsequent operations that you perform with Terraform. It prepares a new or existing directory for Terraform usage by creating initial files, loading any remote state, downloading modules, and installing provider plugins.
Video Walk-through
Our setup
Let’s take a look at our setup.
Requirements
- A GitHub account
Understanding the terraform init Command
To delve deeper into the terraform init command, it's crucial to recognize its role in the Terraform ecosystem. In the lifecycle of a Terraform project, the terraform init command is the first command that you need to run in your terminal after writing a new Terraform configuration or cloning an existing one from a repository in your version control system.
When you run terraform init, it inspects the Terraform code you've written and determines the infrastructure provider you intend to interact with. Whether it's Amazon Web Services (AWS), Google Cloud Platform (GCP), Microsoft Azure, or any other, terraform init will automatically download the corresponding provider plugin required to interact with your infrastructure provider.
As mentioned before, terraform init is the first step when using Terraform. There are many Terraform CLI commands and you can check our blog post on What is Terraform CLI?
However, the three basic steps for using Terraform as shown in the image below are:
- Terraform init: initializes a working directory and downloads the necessary provider plugins and modules and setting up the backend for storing your infrastructure's state
- Terraform plan: creates a dry-run, determining what actions are necessary to achieve the desired state defined in the Terraform configuration files
- Terraform apply: applies the changes required to reach the desired state of the configuration, thereby creating, modifying, or deleting the infrastructure resources as necessary.
The Role of Backend
In Terraform, the backend refers to the data store where Terraform keeps its state files. State files hold metadata about the resources Terraform manages, making it an integral part of any Terraform project. When you run terraform init, one of the things it does is initialize the backend.
Terraform can leverage multiple types of backends, including local (where the state is stored on your local file system) and a remote backend (where the state is stored on a remote server). Remote backends like Terraform Cloud, AWS S3, Google Cloud Storage, env0, or others are useful when you want to store the state file remotely for security, share the state with a team, or keep the state file version controlled.
The Role of Provider Plugins
The terraform init command also downloads the required provider plugins. Providers are a logical abstraction of an upstream API and act as a bridge between Terraform and the outside world. They are what allow Terraform to manage a wide variety of resources across multiple platforms.
For example, to create an AWS S3 bucket or an EC2 instance, Terraform needs to interact with AWS's API. This interaction is facilitated by the AWS provider plugin. When you run the terraform init command, Terraform will inspect your code, identify the required providers, and download the necessary plugins.
Use Vault as an Example
We're going to use HashiCorp Vault as our example and use the Terraform Vault provider.
Terraform Configuration Files
Our repository structure looks like this:
Since we're using HashiCorp Vault in our example. So you'll need to start Vault in a new terminal window with this command:
Please note that this is running Vault as a dev server for our demo and is not to be used in production.
Run terraform init
Now open a new terminal tab and initialize terraform.
Output:
Notice what Terraform did:
- Used the backend config to initialize the local backend
- Downloaded and installed the 3.17.0 version of our hashicorp/vault provider
- Created a lock file called .terraform.lock.hcl
The .terraform Folder
Also, notice that a new .terraform folder was generated with the following content:
The .terraform directory is a crucial component in a Terraform workspace, which gets created when you run the terraform init command. This directory contains data that Terraform generates as it initializes the workspace, including provider plugins and modules. For instance, the provider plugins that Terraform downloads based on the provider blocks in your configuration are stored in this directory. Similarly, if your configuration uses modules from remote sources, Terraform downloads them into the .terraform directory.
It's worth noting that this directory is not meant to be manually altered; Terraform manages the contents of this directory automatically. Typically, the .terraform directory is not committed to version control systems as it contains machine-specific details and can be recreated by running terraform init. Instead, the .terraform.lock.hcl file, which ensures consistent provider versions, should be committed to your version control system. Let's now take a look at the Terraform lock file.
The Terraform Dependency Lock File (.terraform.lock.hcl)
Notice a new file was created called .terraform.lock.hcl.
This Terraform dependency lock file is a critical component introduced in Terraform 0.14 to enhance the dependability of Terraform operations. This lock file records the exact versions of each provider used in your infrastructure setup, ensuring that the same provider versions are used each time your infrastructure is applied. The lock file is created or updated automatically by running terraform init and should be committed to your version control system so that it is shared among all team members and across different environments. This helps to maintain consistency and prevent unexpected changes due to provider updates. The lock file is human-readable but is not intended to be manually edited, as it includes precise details such as version numbers, package hashes, and source addresses.
Here is the content of this file:
Run Terraform Plan
Let's first provide the vault token for Terraform to access Vault. Run the command below to set the VAULT_TOKEN environment variable.
Now let's run terraform plan:
Terraform plan gives you a dry-run of the changes that Terraform is about to make. Below is the summary.

Run Terraform Apply
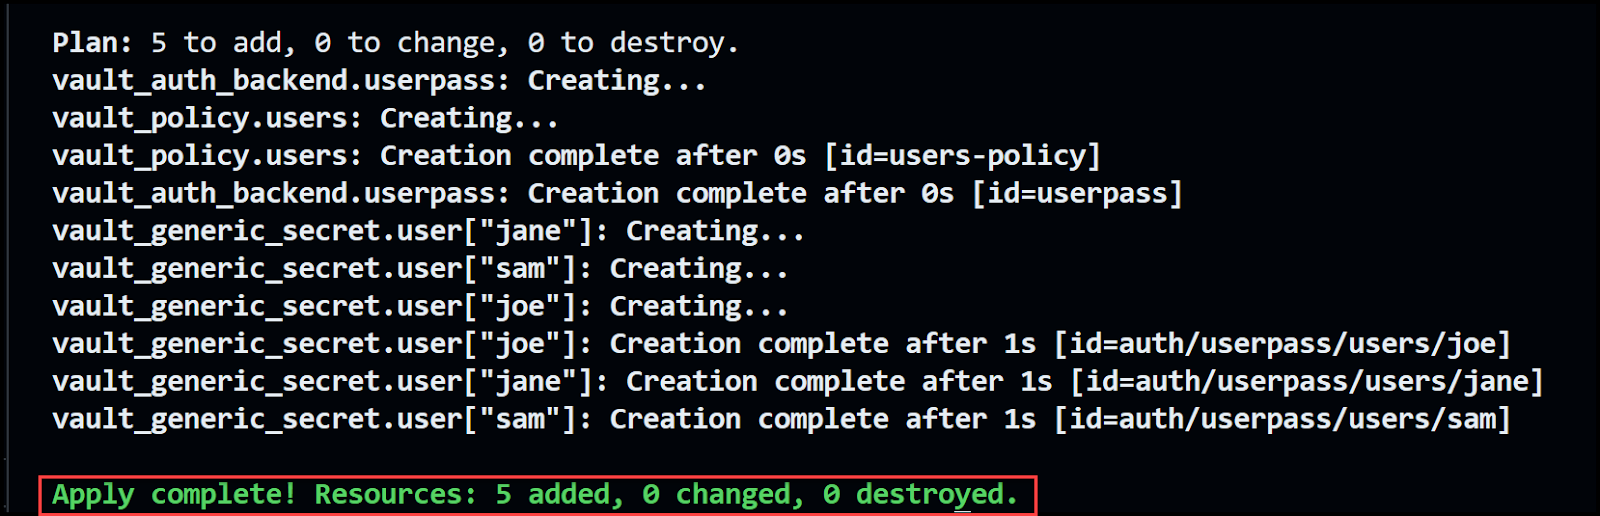
Run terraform apply to commit the changes. When you get the prompt asking for confirmation, type yes.
If all goes well, you'll get a message saying that Terraform has successfully applied the changes as shown below.
Login to Vault
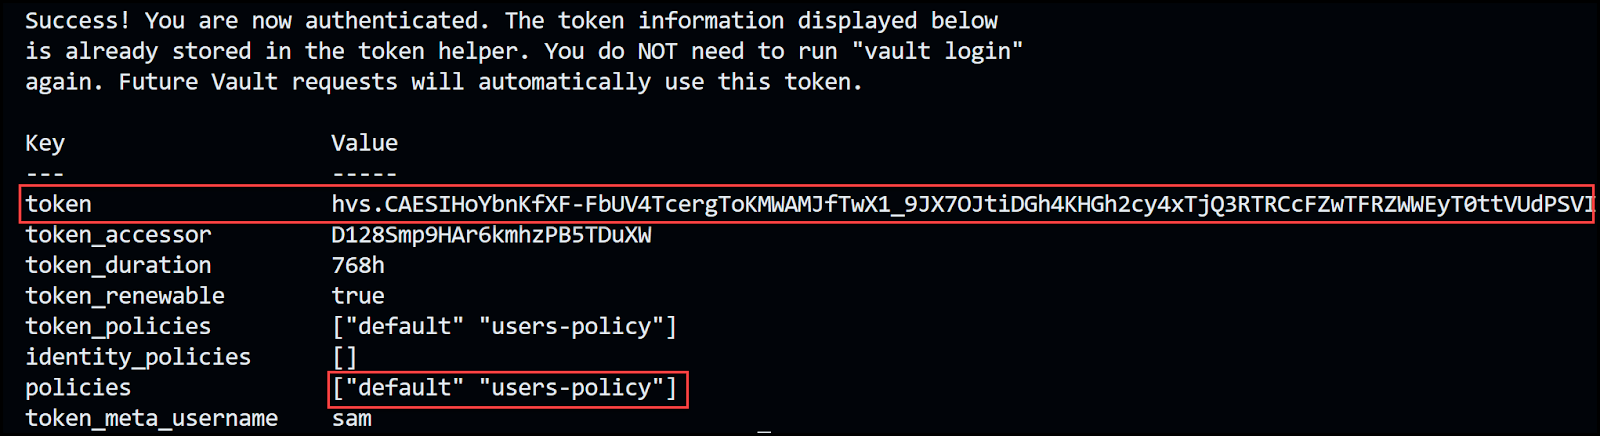
You can now log into Vault with any of the 3 users' credentials. Let's use Sam's:
Open a new terminal window and run the following:
Output:
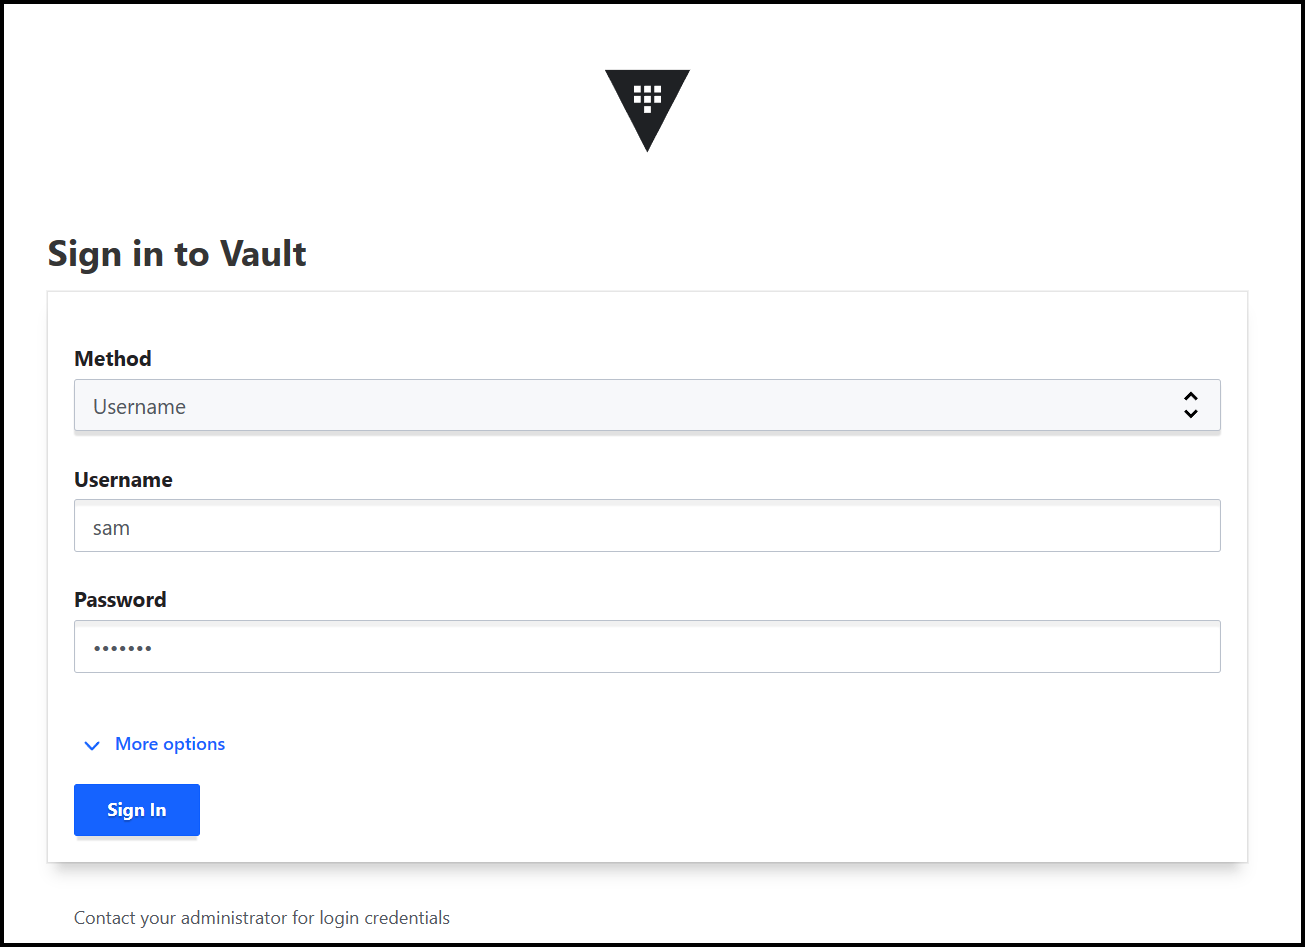
You can also use the Vault UI to sign in. Make sure to select the username Method, then enter the username and password.
Refactor for Modules
Let's now refactor our code to create a module for the users. The point of this example is to show you the need to re-run the terraform init command to initialize the module. Any time you add a provider or module, you will need to re-run the terraform init command.
In the main.tf file, comment the following:
and uncomment the module block below:
Now try running terraform plan and notice the error message.

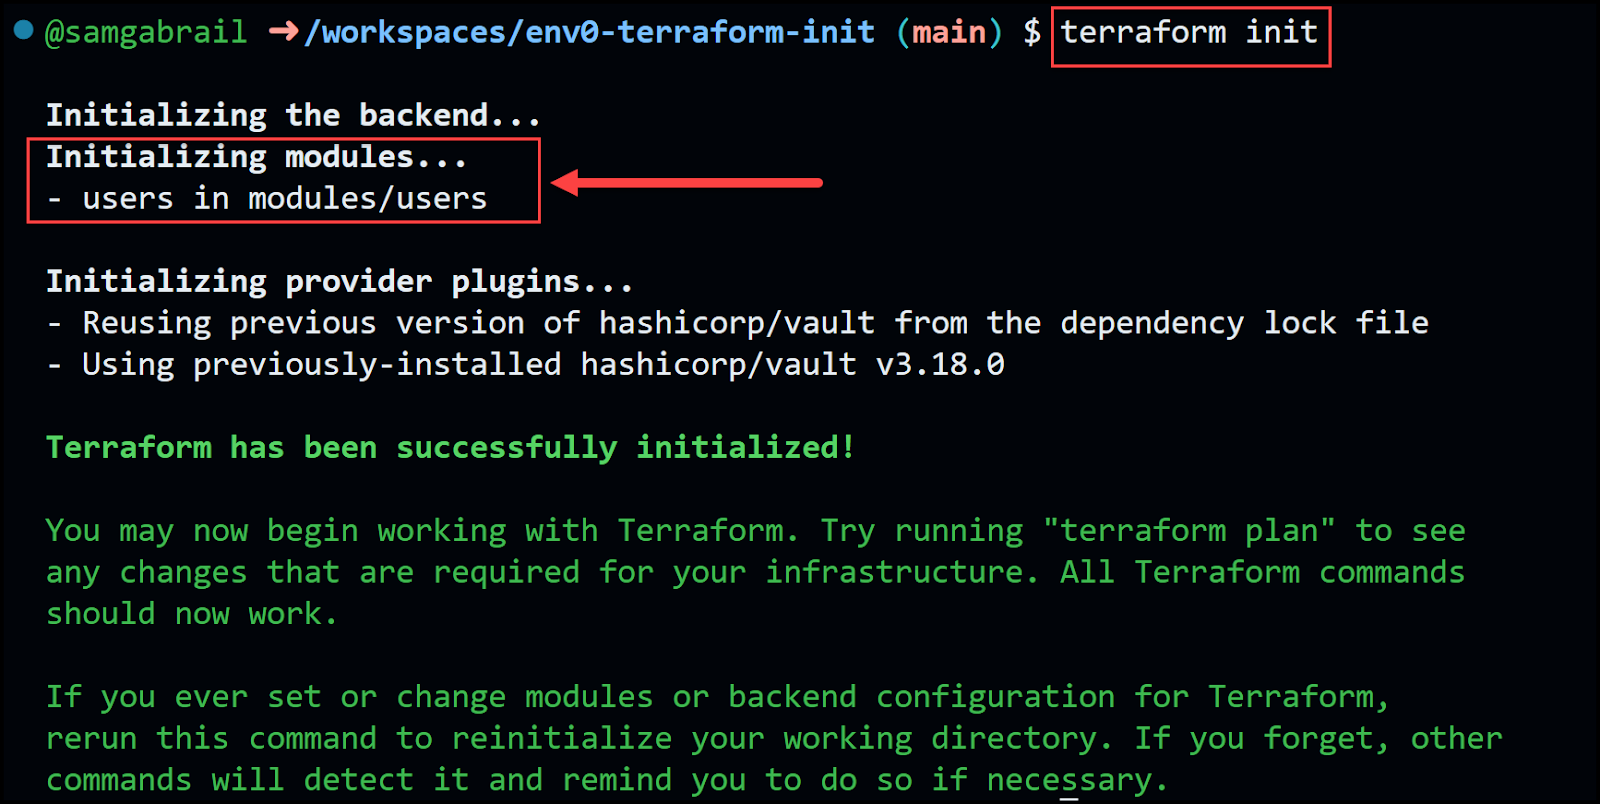
Go ahead and re-run the terraform init command again and notice the message below showing the modules/users getting initialized.
Finally run terraform plan and terraform apply. Now we've re-factored our code to use a child module to our root module.
Upgrade/Downgrade Provider or Module Version
Let's see how to override the .terraform.lock.hcl file to upgrade or downgrade a provider or child modules version. In our example, we'll upgrade the Vault provider version from 3.17.0 to 3.18.0.
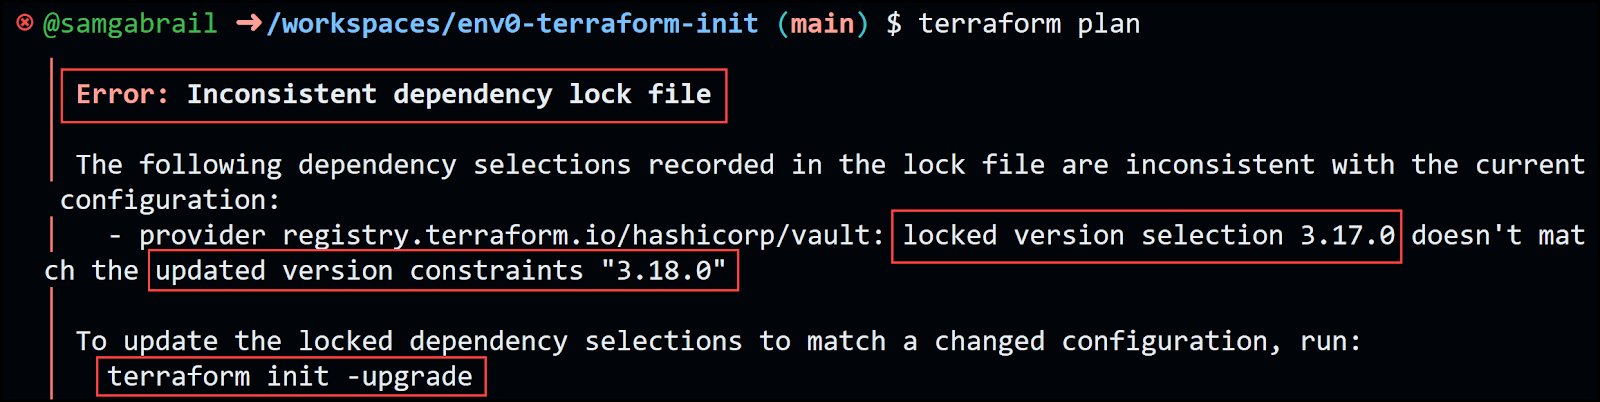
In the main.tf file, change the version to 3.18.0 as shown below.
Now try to run terraform plan and notice the error message below indicating the need to use terraform init -upgrade.
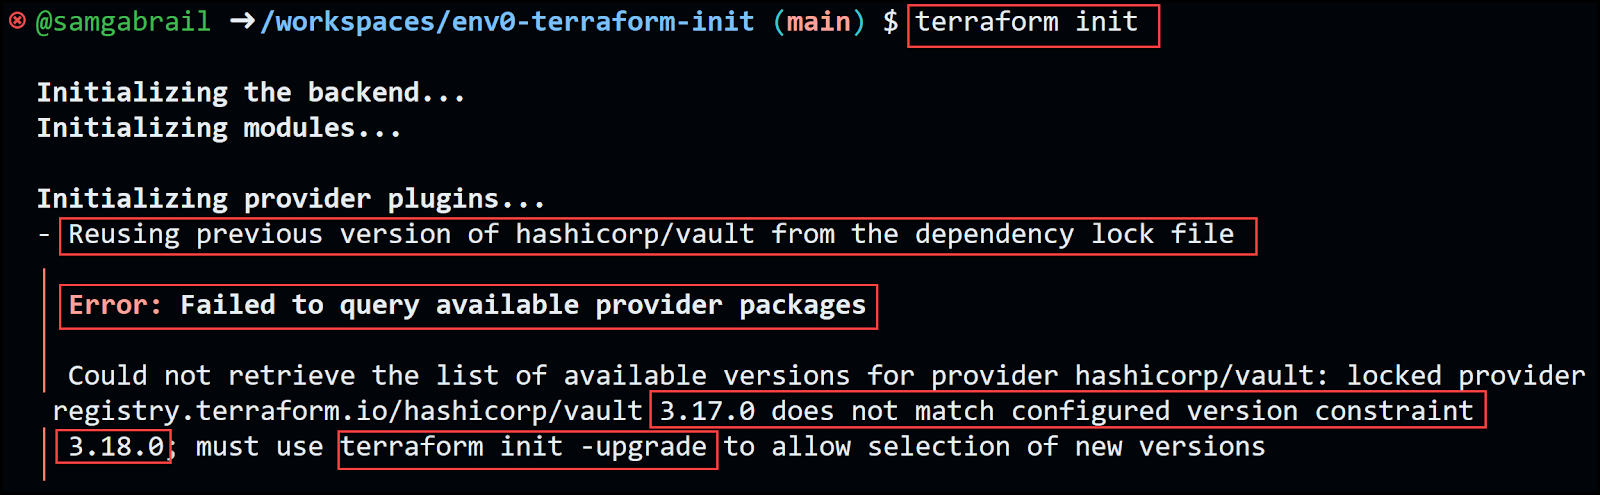
If you try to run terraform init without the -upgrade option, you'll get the message below.
Go ahead and run terraform init -upgrade.
Idempotency and Automation for terraform init
Running the command terraform init is always a safe operation. It doesn't alter the configuration or lead to the destruction of any resources. When executed multiple times, it simply refreshes the working directory to reflect any updates made in the configuration. Notably, it's necessary to run terraform init if there are modifications to the configuration, such as the introduction of a new provider block or a shift in the backend storage location.
When implementing automation, it's a recommended best practice to initiate the process with a terraform init stage. This ensures that all modules, providers, and the backend are consistently updated in accordance with the specifications in your configuration files.
Terraform Init Options and Usage
Basic terraform init Usage
The most basic usage of terraform init is to navigate to your project directory in your terminal or command line and type terraform init. This first command will initialize your working directory and download the necessary provider plugins.
Specifying Custom Backend Configuration
You can also customize your backend configuration. This is particularly useful when you need to specify a remote location for your state file. Custom backend configuration can be specified directly within the Terraform configuration file (typically main.tf) or provided dynamically at initialization.
Plugin and Modules Download Options
terraform init is intelligent enough to automatically download the necessary provider plugins. However, this automatic download process can be controlled using various options. For the plugin installation for instance, using the -plugin-dir option, you can specify a directory from which to load the plugins, thereby skipping the automatic download.
Likewise, if your configuration uses modules, terraform init will automatically download them. You can also control this behavior using the -get option (default: true). This option controls whether Terraform will download and install modules in the "root module". The "root module" is the directory containing the Terraform configuration files where the terraform init command is run. When -get=true, Terraform will download and install modules referenced by the root module. If -get=false, Terraform will not download or install root modules. If there are required modules that aren't downloaded, Terraform operations may fail.
Reconfiguring Backends
Reconfiguring backends is an essential operation when you need to change the location where your Terraform state data is stored. This operation is often required when transitioning between different stages of your project (like from development to production), switching cloud providers, or moving between different storage systems.
The terraform init command facilitates this transition. When you modify the backend configuration in your Terraform files, the next run of terraform init will detect the change and help you reconfigure it. By default, Terraform will ask if you want to migrate the state from the old backend to the new one.
In situations where you want to start afresh and ignore the existing configuration, you can use the -reconfigure option. This option disregards the existing backend configuration and initializes the new backend.
Here's an example where we switch from a local backend to an Amazon S3 bucket:
1. Update your Terraform configuration to use the S3 backend:
2. Run terraform init -reconfigure:
In this example, Terraform will forget about the old backend and initialize the new S3 backend. Note that the -reconfigure option discards any existing state. If you want to keep your state and migrate it to the new backend, you should not use -reconfigure.
It's important to be cautious when reconfiguring backends, as incorrect configurations can lead to data loss. Always ensure to backup your state files before performing such operations.
Backend Migration
Migrating backends in Terraform involves moving the state data from one backend to another. This is typically required when you need to change the location where your Terraform state data is stored, for example, when moving from local storage to a cloud storage service.
The terraform init command assists with this migration. When you update the backend configuration in your Terraform files and run `terraform init`, Terraform will recognize that the backend configuration has changed. It will then prompt you to confirm whether you would like to migrate your state data to the new backend.
Here's an example where we migrate state data from a local backend to an Amazon S3 bucket:
1. First, your Terraform configuration might not specify a backend, in which case the default local backend is used just as in our example:
The state is stored in a local file named terraform.tfstate.
2. Update your Terraform configuration in the main.tf file to use the S3 backend and specify an existing S3 bucket and key path.
3. Run terraform init but first make sure to use environment variables for your AWS credentials:
Terraform will recognize that the backend configuration has changed. It will ask if you want to migrate your existing state to the new backend. You'll get a message similar to the one below.
If you enter yes, Terraform will upload the local state to the S3 bucket. If you enter no, Terraform will initialize the new backend with an empty state.
Remember to be careful when migrating backends, as improper migrations can lead to state inconsistencies or data loss. Always backup your state files before performing these operations.
Common Issues and Troubleshooting
Failed Initialization
Terraform initialization can fail due to several reasons. Here are a few examples:
- Backend configuration errors: If the backend is not properly configured in your Terraform files, terraform init will fail. This could be due to incorrect parameters, missing credentials, or unsupported backend types. It's important to double-check the backend configuration and make sure it matches the expected format and values.
- Incompatible Terraform versions: If you're using a version of Terraform that is not compatible with your configuration or providers, terraform init may fail. This can occur if you're using new features or syntax that are not supported in the Terraform version you're using. Always ensure that your Terraform version is up-to-date and compatible with your configuration and providers.
- Access permission issues: If Terraform doesn't have the necessary permissions to access the backend or download provider plugins, the initialization will fail. This could be due to file system permissions, network permissions, or cloud permissions depending on your setup. Ensure that Terraform has the right permissions to perform its operations.
- Outdated or unsupported provider plugins: If you're using an outdated or unsupported provider, terraform init may fail when trying to download or use the provider. Make sure to use the latest supported versions of your providers, and keep them up-to-date to take advantage of bug fixes and improvements.
- Provider authentication failures: If you're using a provider that requires authentication (like AWS or Google Cloud), and the credentials are not set up correctly, `terraform init` can fail when it tries to set up the provider. Double-check your provider's authentication setup, and ensure that the necessary credentials are correctly provided.
- Network Connectivity Problems: Especially during the provider plugin download. In this case, verifying your internet connection and retrying the command can resolve the issue.
Remember, the error message provided by Terraform during a failed initialization often gives a good indication of what went wrong and should be the first place to look when diagnosing the issue.
Backend and Provider Compatibility
Compatibility between the backend and the provider is another area where issues might arise. Always ensure that you're using compatible versions of Terraform and your providers to avoid such problems.
The backend and provider components of Terraform are critical for its operation. The backend is responsible for storing the state of your infrastructure and for running operations, while providers enable Terraform to interact with various service APIs (like AWS, GCP, Azure, etc.).
Each of these components—Terraform itself, the backend, and the providers—have their own versions. They are developed independently and therefore have separate release schedules. This means that new features, bug fixes, or changes in one component may not be compatible with older versions of the other components.
For instance, a new version of a provider might use features or behaviors that are only available in a newer version of Terraform, or a new backend might require features that are not available in older providers.
Furthermore, certain providers and backends might only support specific versions of Terraform. If you're using an older version of Terraform with a provider or backend that only supports newer versions, you might encounter errors or unexpected behavior. Conversely, using a newer version of Terraform with a provider or backend that only supports older versions can also lead to problems.
Therefore, it's crucial to ensure compatibility between the versions of Terraform, the backend, and the providers you're using. This typically involves checking the documentation for each component to see which versions are compatible and updating your components as necessary.
Migrating State Between Backends
The migration of states between backends needs to be approached with caution as improper handling can lead to discrepancies. It's best to follow the recommended steps for migration and always maintain a backup of your state file before attempting any migration. It's also recommended to use a remote backend such as env0 to centralize and secure your terraform state files.
Terraform Init Best Practices
Let's wrap up our discussion with these best practices for using the terraform init command.
- Regularly update your provider plugins to the latest versions to benefit from new features and enhancements.
- Always ensure your backend is secure to safeguard your state file.
- In team environments, prefer using remote backends to foster better collaboration.
- Gain a comprehensive understanding of the role and functionality of `terraform init` to maximize the utility of Terraform.
Conclusion
Understanding the core command terraform init is essential to harness the full potential of Terraform, a powerful tool in Infrastructure as Code (IaC) practices. This command not only prepares your working directory for further actions but also addresses key concepts such as backend initialization, provider plugins, and even workspace management. Remember, the importance of terraform init extends to troubleshooting common issues and implementing best practices, which ultimately allows for a smoother, more efficient infrastructure management process.
As you continue your journey with Terraform, keep exploring its extensive functionality, and stay updated with its continuous evolution. With hands-on practice and theoretical knowledge, you can effectively manage and provision your infrastructure using Terraform, empowering you to deliver more robust and reliable applications. Happy Terraforming!