.webp)


The world of Infrastructure-as-Code (IaC) has evolved by leaps and bounds. With a growing number of IaC tools available, DevOps teams often find themselves weighing the pros and cons of popular choices that pits Pulumi vs Terraform and others.
In this blog, I’ll take a deep dive into the features, similarities, differences, and real-world use cases of Terraform and Pulumi. Specifically, I’m going to focus on the following:
- Comparison of Pulumi and Terraform: I’ll cover features, language flexibility, and community support.
- Languages: Terraform utilizes its own HCL while Pulumi supports multiple common programming languages. I will review how these differences in approach to state management can make one more suitable than the other.
- Real-world examples: I’ll demonstrate how both tools can be used for managing cloud infrastructure across multiple platforms securely.
So, buckle up as we explore the fascinating world of Pulumi and Terraform.
Video Walkthrough
My Setup
- A GitHub account: I’ll use GitHub Codespaces with all necessary tools installed for you.
Understanding Infrastructure-as-Code (IaC)
For posterity, remember that Infrastructure-as-Code provisions infra resources using preset configuration files instead of manually.
The beauty of IaC lies in its ability to treat infrastructure like code, allowing us to manage it with the same processes, tools, and programming languages as application code.
This enables us to leverage software development practices like version control, testing, and automation throughout the infrastructure provisioning lifecycle, making it easier to allocate infrastructure resources efficiently.
Pulumi vs. Terraform
Terraform and Pulumi are key players in the IaC arena, each offering unique features for infrastructure automation. Terraform shines in its broad compatibility with cloud providers such as AWS, Azure, and GCP.
The use of its domain-specific language, Hashicorp Configuration Language (HCL), lets you adopt software engineering practices in managing infrastructure with Terraform. It operates on a declarative model, focusing on what the end state of the infrastructure should look like.
Pulumi, on the other hand, aims to deliver a developer-centric experience by offering support for multiple languages including TypeScript, Go, .NET, Python, and Java. Its architecture is equipped with essentials such as a language host, command-line interface, and state management capabilities.
While Terraform specializes in a focused, declarative approach with its HCL, Pulumi offers broader language support and flexibility, making each tool uniquely suited for various cloud computing tasks and environments.
Key Features Comparison
Terraform stands out with a broad set of features such as its declarative approach, extensive platform support, and a wealth of community modules.
It allows users to express infrastructure requirements in a simple yet powerful way and integrates with a diverse selection of plugins and tools created by the community.
Meanwhile, with its user-friendly interface, extensive integrations, and native provider support, Pulumi becomes a compelling choice for developers working with Infrastructure-as-Code.
One of Pulumi’s standout features is its Dynamic Provider Support, which enables the tool to create Terraform providers and support new resources and features at a much faster pace than Terraform.
This allows Pulumi to stay up-to-date with the latest cloud or SaaS features and resources, ensuring developers can access cutting-edge tools and technologies.
Here is a high-level comparison of the two tools:
Pros & Cons
Another way to look at the two tools is to pit their pros and cons against each other. I do that here in this chart, that dives a little deeper into the contrasts of the previous section.
When to Choose Terraform
- Well-Established Infrastructure: When you're working with traditional VMs, networking configurations, and databases, Terraform has a strong track record here.
- Declarative Code: If you prefer infrastructure to be declared in a domain-specific language designed solely for that purpose, Terraform's HCL is your friend.
- Multi-Cloud & Provider Ecosystem: Massive selection of providers and modules. Great if you have a heterogeneous environment with multiple clouds or SaaS services.
- Community and Resources: Abundance of tutorials, courses, and third-party tools. Also, a very active community.
When to Choose Pulumi
- Full Programming Languages: If you want the expressiveness and power of full-fledged languages like Python, TypeScript, or Go, Pulumi lets you code away.
- Application-Oriented: Better suited for modern, container-based, or serverless architectures. You can even deploy your app code along with your infrastructure.
- Dynamic Configuration: Need complex logic, loops, or conditionals? Pulumi's programming language support makes this a breeze.
- Strong Typing and IDE Support: With general-purpose languages, you get the benefits of strong typing and excellent IDE support for auto-completion, error-checking, etc.
- Integrated Config Management: Manage your secrets and configs in the same language as your infrastructure code, without requiring separate tools.
- Open-Source: If your organization prefers open-source tools for compliance or philosophy, HashiCorp's latest decision to change Terraform's license to BSL might deter you. Pulumi would be a better option, as would OpenTofu, the open-source Terraform fork.
In specific scenarios, such as multi-cloud infrastructure management, both Terraform and Pulumi offer valuable solutions for uniformly managing resources across different environments.
Licensing and How It May Affect Your Terraform vs. Pulumi Decision
- License Flexibility: If you're comfortable with Apache 2.0, Pulumi SDK offers a pretty flexible license for most use cases.
- Commercial Features: For enterprise-grade features, you'd likely end up in a paid plan for both Terraform and Pulumi, depending on your needs.
- Open-Source Commitment: If an OSI-approved license is a strict requirement, Pulumi SDK meets that criterion.
Let's now compare Pulumi and Terraform with this simple example to create an S3 bucket in AWS.
Terraform AWS S3 Bucket Example
Terraform Files
Below is our main.tf file.
Run Terraform
Now all I need to do is run the following commands:
and here is the output of running Terraform:
Cleanup with Terraform
To go ahead and clean up, run terraform destroy.
Pulumi AWS S3 Bucket Example
Since you can use different programming languages with Pulumi, I'm most comfortable with Python, so we'll go with that.
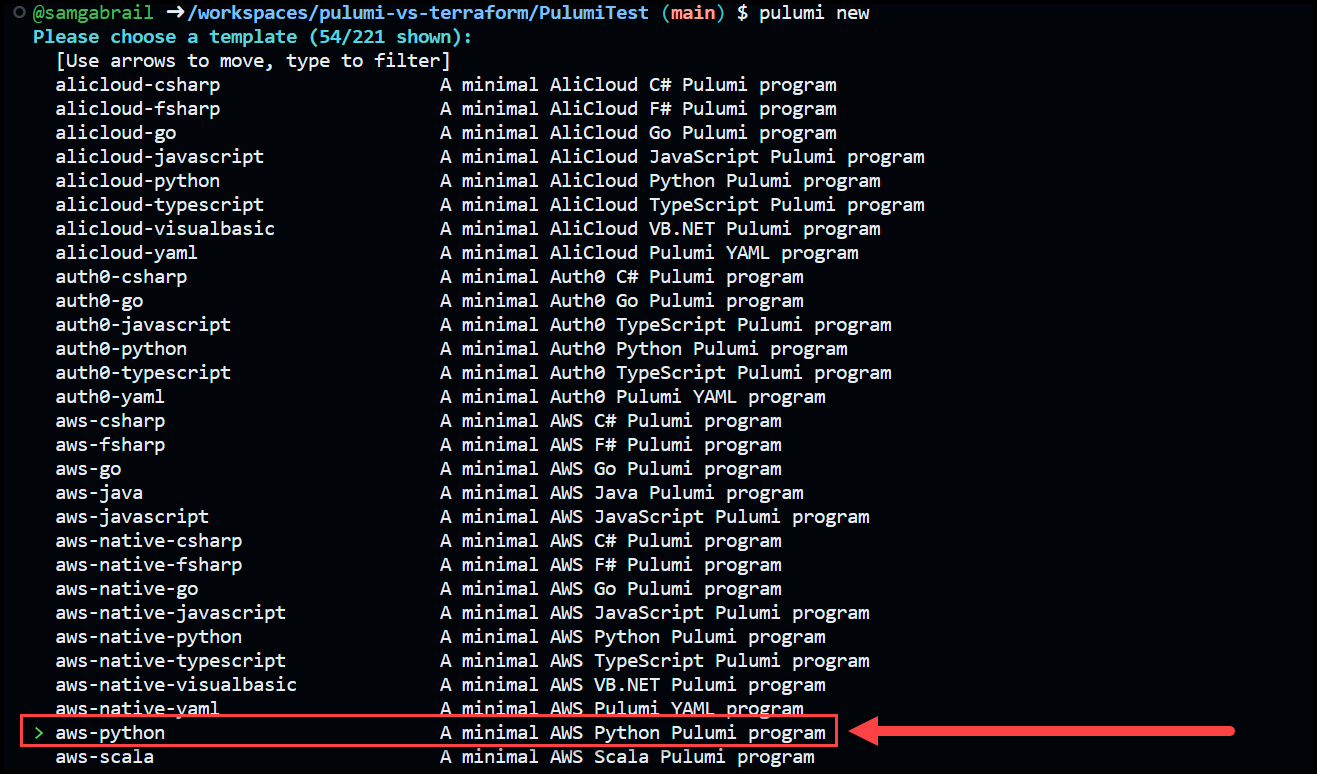
To get started with Pulumi, I can use the command [.code]pulumi new[.code]. Here's what happens when you run [.code]pulumi new[.code]:
- Template Selection: Pulumi will first ask you to pick a template – AWS Python stack, an Azure TypeScript stack, or one of a number of others. You can even use your own custom template if you have one. For this tutorial, I’m using AWS Python.
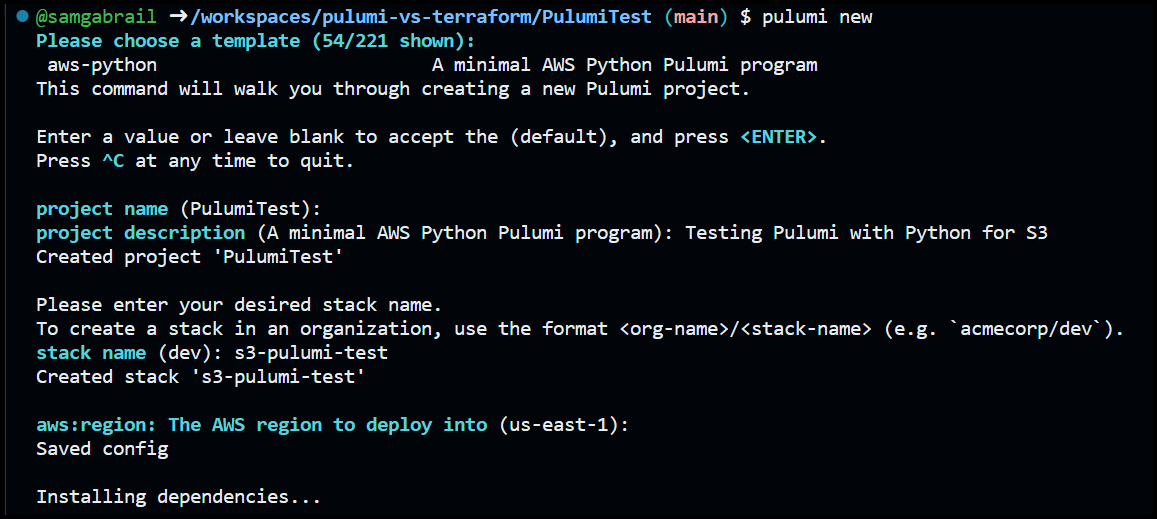
- Project Metadata: You'll be prompted to fill in some metadata for your new project, like the project name, stack name, and sometimes config values that the template requires. This sets up the pulumi.yaml and pulumi.[stack-name].yaml files.
- File Generation: Pulumi will generate a set of files based on the template you chose. These usually include a pulumi.yaml file for the project metadata and source files in the language of your choice (e.g., [.code]__main__.py[.code] for Python and for our example).
- Install Dependencies: If the template has any dependencies (like AWS SDK for a Python AWS template), Pulumi will install them for you.
- Ready to Go: After all this, you'll have a new Pulumi project directory all set up and ready for you to start coding your infrastructure.
I can then cd into our project directory and run [.code]pulumi up[.code] to deploy our new stack, but first, I have to edit the generated code in __main__.py to tailor it to our specific needs.
I've taken a few screenshots of this process below.

Pulumi Files
These are the files that were created in the previous process.
pulumi.s3-pulumi-test.yaml
pulumi.yaml
requirements.txt
This is the original __main__.py file
And below is our updated __main__.py file
Run Pulumi
Let's now run Pulumi, but first, you'll need to log in to Pulumi since we're going to use the Pulumi SaaS to store our stack. Make sure you have a Pulumi account then run [.code]pulumi login[.code]. Create a token and feed it in the prompt. Now you're ready to run the following commands:
and when satisfied run [.code]pulumi up[.code] and choose 'yes' when prompted.
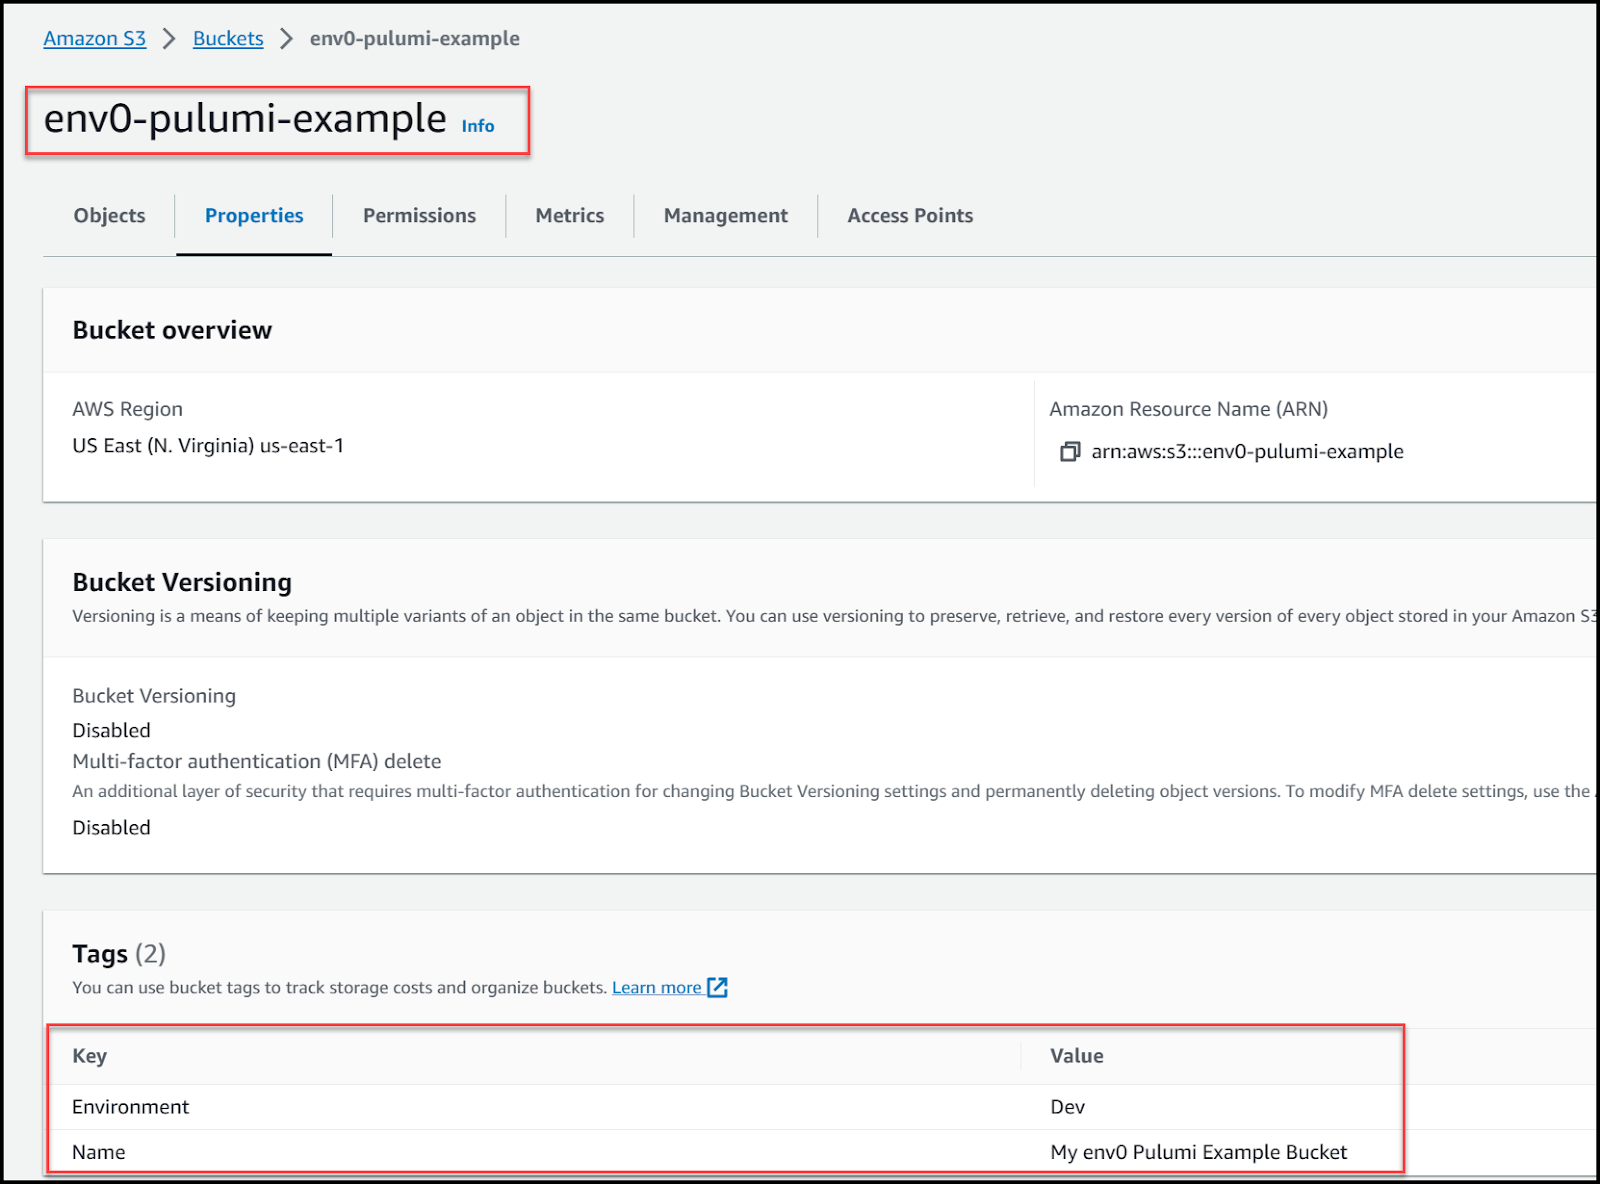
View the S3 Bucket Created by Pulumi in the AWS Console
Cleanup with Pulumi
Now go ahead and run [.code]pulumi destroy[.code] to clean up and delete the bucket.
Summary
In conclusion, both Terraform and Pulumi offer powerful features and benefits for managing and deploying infrastructure. While Terraform’s maturity and extensive community support make it a popular choice, Pulumi’s developer-friendly approach and growing ecosystem position it as an increasingly attractive alternative.
By considering factors such as language support, state management, community resources, and specific use cases, organizations can make an informed decision between these two powerful IaC tools to best meet their infrastructure management needs. Better yet, use both with env0 since it's a framework-agnostic platform — including OpenTofu.
FAQ’s
1. What is the main difference between Pulumi and Terraform?
Terraform uses its own declarative language (HCL) to define infrastructure, while Pulumi lets you use general‑purpose programming languages like Python, TypeScript, or Go for IaC.
2. Which tool is better for multi‑cloud environments?
Both Pulumi and Terraform support multi‑cloud deployments, but Terraform has a larger ecosystem and more provider modules, while Pulumi’s language flexibility can make complex logic easier to express.
3. Is one tool easier to learn than the other?
Terraform’s HCL is designed specifically for infrastructure and is generally simpler to get started with, whereas Pulumi may have a steeper learning curve if you’re new to programming languages.
4. Do Pulumi and Terraform handle state differently?
Both tools manage state (a snapshot of infrastructure), but Terraform requires configuring remote state backends, while Pulumi automatically handles state with its own service or can use cloud backends.
5. Which has better community support?
Terraform has a larger and more mature open‑source community with many public modules, while Pulumi’s community is growing, especially among developers comfortable with familiar programming languages.
6. Can I migrate from Terraform to Pulumi?
Yes — you can migrate Terraform configs to Pulumi using automated tools (like Pulumi’s tf2pulumi converter) or by manually rewriting resources in your chosen language.