
.webp)


Aside from application and infrastructure automation workflow, you also want a way to manage certain aspects of how you’re deploying your environment. For example, a specific location where you define variable values and store Terraform state.
That’s where env0 comes in.
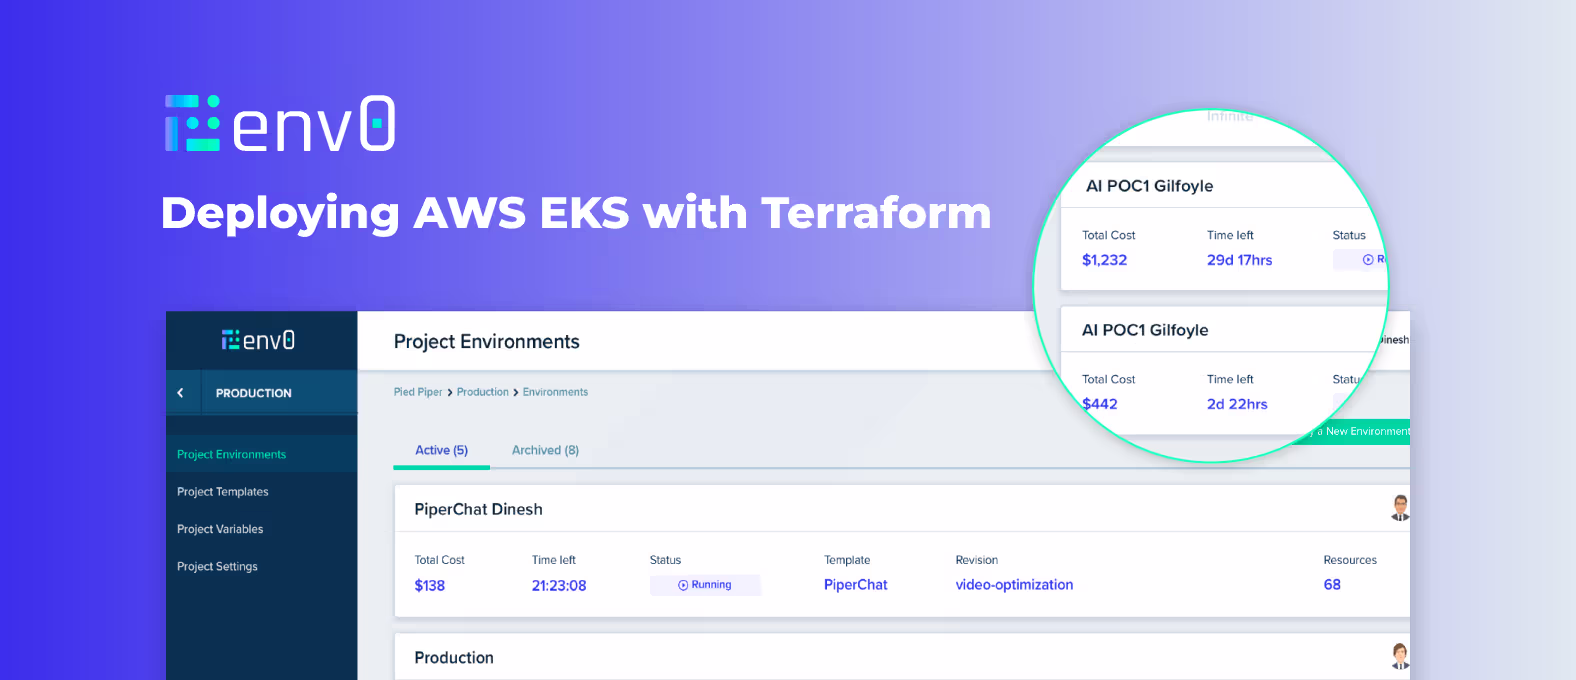
In this blog post, you’ll learn how to deploy an AWS Elastic Kubernetes Service (Amazon EKS) cluster with Terraform using env0.
Prerequisites
To follow along with the hands-on portion of this blog post, you will need the following:
- An env0 account, which you can sign up for a trial here.
- A source control repo like GitHub to store the code in for deployment purposes (demo repo)
- An AWS account. If you don’t have one, you can sign up for a free trial/tier here.
- Credentials configured in your env0 environment for AWS. To learn how to do that, click here.
Why use Terraform for infrastructure automation workflows?
Before jumping in, you may be wondering why you’d want to use Terraform in general. If you haven’t looked at Terraform, it’s an infrastructure code tool that you can use to create environments. Don’t let the “infrastructure automation” piece fool you. Terraform can do anything from build a virtual machine to manage just about every service in Azure, AWS, and every other cloud.
Terraform gives you the ability to not just automate infrastructure, but create repeatable processes around how you create services and environments.
As an example, let’s say you’re planning on building out three virtual machines and a VPC inside of AWS.
Before infrastructure code, you could do this with something like the AWS CLI, which wouldn’t be great because the state of the environment isn’t stored, or manually. If you do it manually, you and your team are stuck in a repetitive motion of tasks that are mundane, and prone to human error.
Instead, you can provision resources (i.e. the three VMs and VPC) with Terraform. That way, all of the configurations are in code, changes are logged because you version resources in Git, and it makes working with your team much easier as you have the ability to see the actual configuration vs someone clicking buttons in an AWS console.
The Terraform Code
Now that you know a little bit about the “why” behind Terraform, let’s dive into the hands-on portion and take a look at the Terraform code that you’ll use to deploy an EKS cluster.
The EKS cluster that you’ll create will use an AWS Fargate profile, which is essentially like “serverless Kubernetes”.
Please note that this code will be running in env0. This section isn’t to run the code, but instead, show you the code so you have an understanding of what’s being deployed.
Create a new [.code]main.tf[.code] file to put the following code in.
First, you’ll specify the Terraform provider that you’ll use, which is AWS.
terraform {
required_providers {
aws = {
source = "hashicorp/aws"
}
}
}
provider "aws" {
region = "us-east-1"
}
Next, you’ll create the resource for the Amazon EKS IAM Role.
resource "aws_iam_role" "eks-iam-role" {
name = "k8senv-eks-iam-role"
path = "/"
assume_role_policy = <<EOF
{
"Version": "2012-10-17",
"Statement": [
{
"Effect": "Allow",
"Principal": {
"Service": "eks.amazonaws.com"
},
"Action": "sts:AssumeRole"
}
]
}
EOF
}
The IAM Role for Amazon EKS will require two policies:
resource "aws_iam_role_policy_attachment" "AmazonEKSClusterPolicy" {
policy_arn = "arn:aws:iam::aws:policy/AmazonEKSClusterPolicy"
role = aws_iam_role.eks-iam-role.name
}
resource "aws_iam_role_policy_attachment" "CloudWatchAgentServerPolicy-eks" {
policy_arn = "arn:aws:iam::aws:policy/CloudWatchAgentServerPolicy"
role = aws_iam_role.eks-iam-role.name
}
Once the Role is created, the Amazon EKS cluster can be created along with logging at the control plane.
resource "aws_eks_cluster" "k8senv-eks" {
name = "k8senv-cluster"
role_arn = aws_iam_role.eks-iam-role.arn
enabled_cluster_log_types = ["api", "audit", "scheduler", "controllerManager"]
vpc_config {
subnet_ids = [var.subnet_id_1, var.subnet_id_2]
}
depends_on = [
aws_iam_role.eks-iam-role,
]
}
Once the Amazon EKS cluster is created, you’ll then create the AWS Fargate profile. If this was a configuration that wasn’t using AWS Fargate, this is the part where you’d specify EC2 instances as worker nodes for your Kubernetes clusters.
Before creating the Fargate profile, it needs an IAM Role just like the Amazon EKS cluster.
resource "aws_iam_role" "eks-fargate" {
name = "eks-fargate-k8senv"
assume_role_policy = jsonencode({
Statement = [{
Action = "sts:AssumeRole"
Effect = "Allow"
Principal = {
Service = "eks-fargate-pods.amazonaws.com"
}
}]
Version = "2012-10-17"
})
}
The Fargate profile needs the following policies attached to the IAM Role:
- [.code]AmazonEKSFargatePodExecutionPolicy[.code]
- [.code]AmazonEKSClusterPolicy-fargate[.code]
- [.code]CloudWatchAgentServerPolicy[.code]
resource "aws_iam_role_policy_attachment" "AmazonEKSFargatePodExecutionRolePolicy" {
policy_arn = "arn:aws:iam::aws:policy/AmazonEKSFargatePodExecutionRolePolicy"
role = aws_iam_role.eks-fargate.name
}
resource "aws_iam_role_policy_attachment" "AmazonEKSClusterPolicy-fargate" {
policy_arn = "arn:aws:iam::aws:policy/AmazonEKSClusterPolicy"
role = aws_iam_role.eks-fargate.name
}
resource "aws_iam_role_policy_attachment" "CloudWatchAgentServerPolicy" {
policy_arn = "arn:aws:iam::aws:policy/CloudWatchAgentServerPolicy"
role = aws_iam_role.eks-fargate.name
}
Once the role is created, you can create the new Fargate profile.
resource "aws_eks_fargate_profile" "k8senv-eks-serverless" {
cluster_name = aws_eks_cluster.k8senv-eks.name
fargate_profile_name = "k8senv-serverless-eks"
pod_execution_role_arn = aws_iam_role.eks-fargate.arn
subnet_ids = [var.private_subnet_id_1]
selector {
namespace = "default"
}
}
To ensure that the variables can be passed in at runtime, you’ll have to define them in a [.code]variables.tf[.code] file
variable "subnet_id_1" {
type = string
}
variable "subnet_id_2" {
type = string
}
variable "private_subnet_id_1" {
type = string
}
Now that you’ve gone through the code, save it in a GitHub repo so it can be deployed with env0.
Configuring env0 for self service infrastructure deployments with Terraform
With the Terraform code in place and ready to be deployed, there are a few steps that you’ll have to take inside of env0 to ensure a successful deployment.
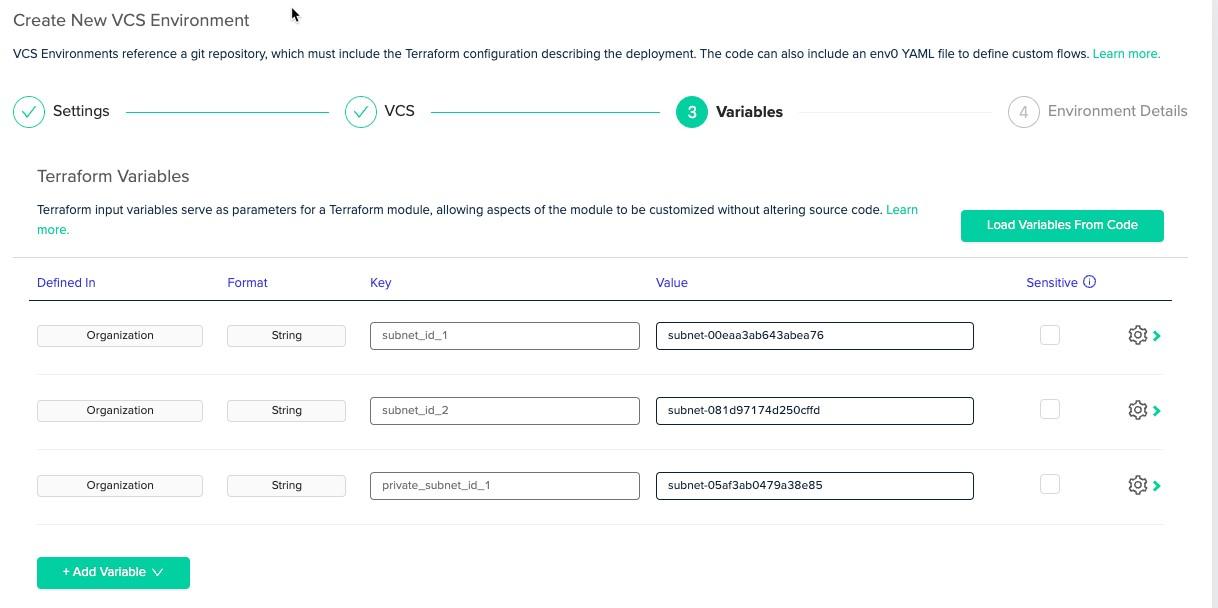
The first is a set of variables to be used inside of your AWS environment that specify AWS account-specific details (subnets). Then, you can configure the env0 project to deploy your Terraform code.
Variables
Log into env0 and under Projects, click on Variables.

Next, add a new variable and choose the + Free Text option.
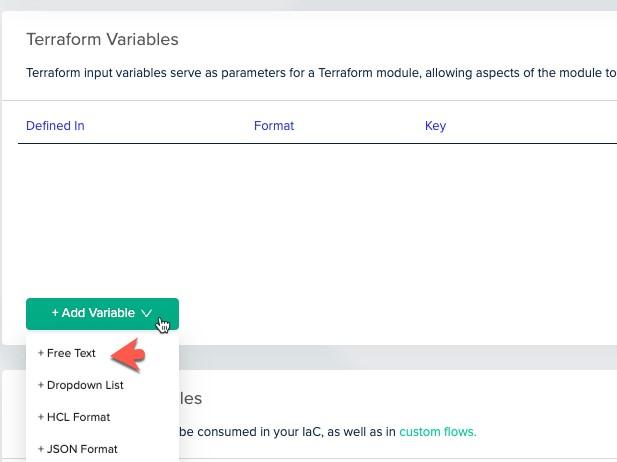
Start adding in variables that exist in the Terraform code.

The three in the Terraform configuration are:
[.code]subnet_id_1 subnet_id_2 private_subnet_id_1[.code]
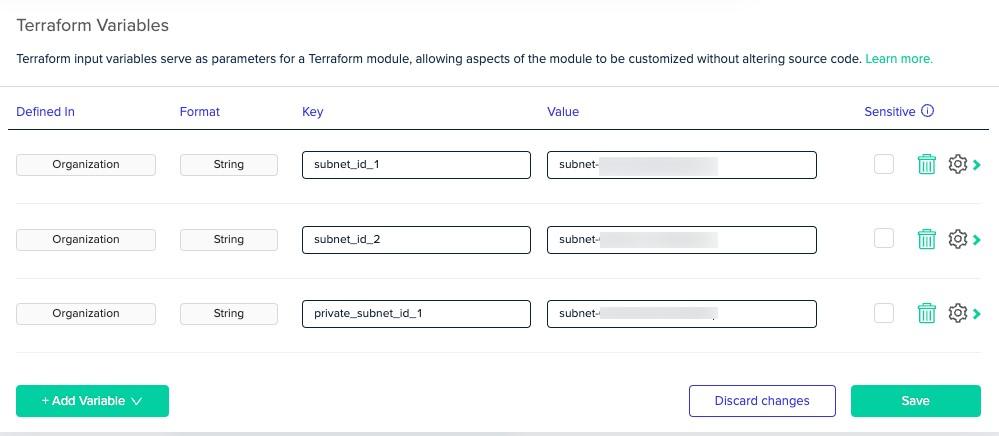
Amazon EKS requires two subnets and Fargate requires at least one private subnet.
Once complete, you should have three variables that contain subnet IDs for the Amazon EKS and Fargate configuration.
Env0 Project
Click the green + CREATE NEW ENVIRONMENT button.

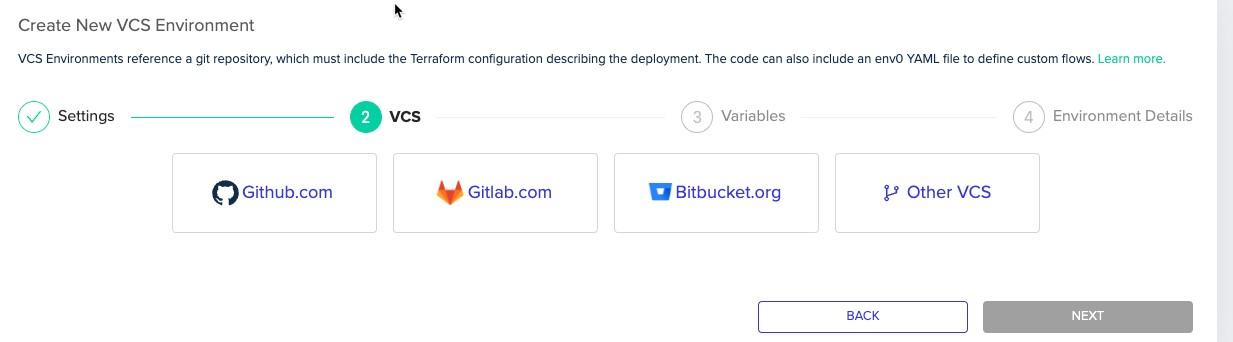
Choose the source control system in which you stored the Terraform code. (env0 is fully compatible with GitHub, GitLab, Bitbucket, Azure DevOps)

When you choose a source control system, you’ll be prompted to authenticate to it.
Once authenticated, you’ll be able to choose the repo where the Terraform code exists along with the branch name.
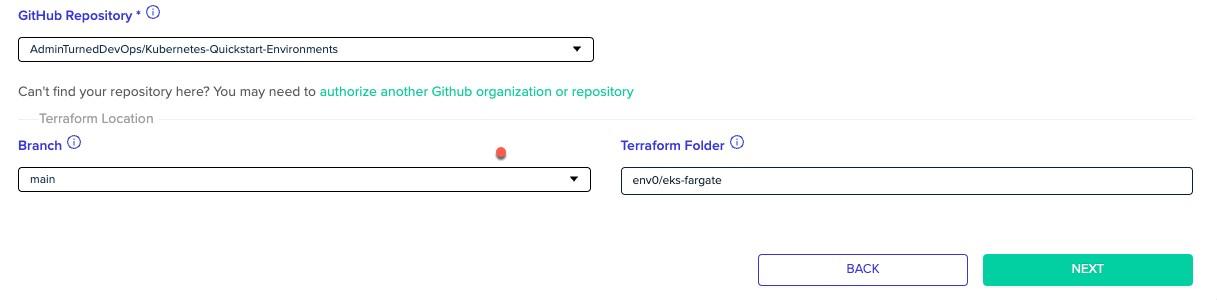
You’ll see the variables that you created in the previous section ready to be used by Terraform. Click the next button.
The last step is to choose the environment name, the Terraform workspace name, and you also have a few other options that you can check on or off.
Drift detection, for example, automatically detects drift between the deployed IaC and the actual environment resources.
If you want env0 to store your Terraform state using env0's managed Remote Backend, you can choose to do so.
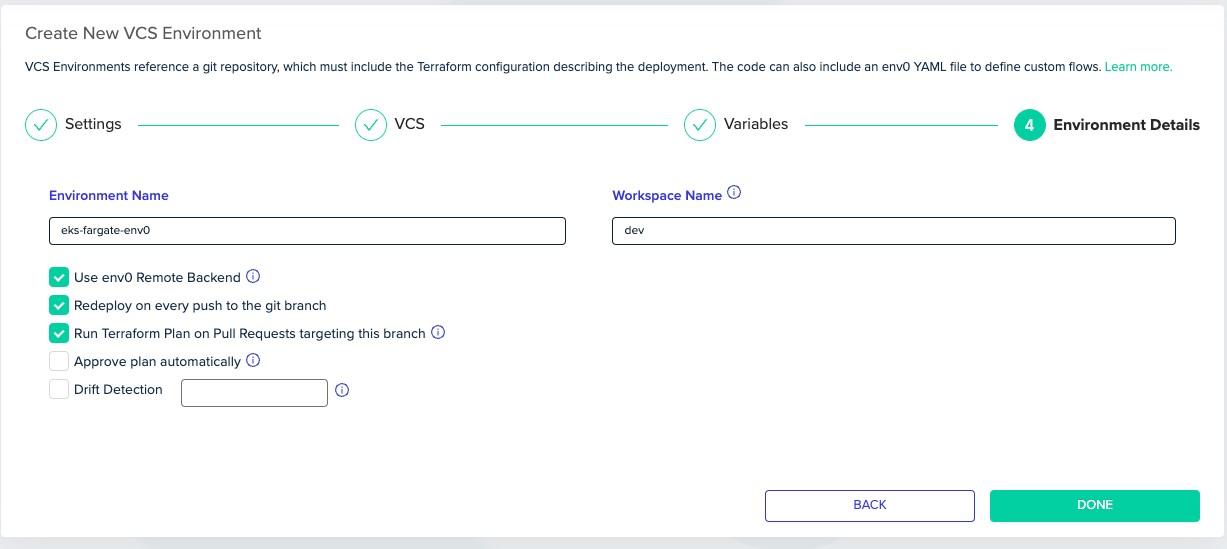
Once complete, the env0 environment will automatically start the deployment process.
Deploying The Code
When the deployment process is started, it’ll look like the below screenshot.

After a few seconds, you’ll see some deployment logs pop up, which will show the steps and the duration of the steps to create the new environment with Terraform.
One really awesome feature is that with every deployment, you’ll see the cost estimation for your environment configurations.

Once complete, you should see all of the steps as completed like in the screenshot below.

Congrats! You have successfully set up EKS with env0. You've completed a crucial step towards infrastructure automation, containerized applications, and run Kubernetes with EKS and Fargate.
This is part two of a four-part series. Keep reading to learn more!When you’re deploying any type of code, whether it’s application code or infrastructure code like Terraform, you want an automated way to deploy it.

![Using Open Policy Agent (OPA) with Terraform: Tutorial and Examples [2026]](https://cdn.prod.website-files.com/63eb9bf7fa9e2724829607c1/6a4f2974e259132365f900ea_69d6a3bde2ffe415812d9782_post_th.png)