.webp)


Introduction
Terraform excels at creating and managing Infrastructure as Code, but it is not a complete solution. Although you can run your Terraform processes through a shell script or directly at the command line, it's better to use automation to streamline your operations and leverage software development principles like continuous integration and continuous delivery.
In this post we are going to investigate how you can store your Terraform configurations in GitHub repositories and leverage GitHub Actions to automate common processes based on triggering events, such as a code commit. We'll walk through how GitHub Actions work, how to use them to automate Terraform operations, and how to embrace and enhance your current workflow.
Overview: Terraform
Terraform is an open-source tool used to create and manage infrastructure using declarative configuration files. These files are typically written in Hashicorp Configuration Language (HCL), and should be treated as code.
Terraform follows a basic workflow of defining your infrastructure as code, running a plan to view the proposed deployment, and applying the results if they are acceptable. Once infrastructure has been deployed, it can be updated using the same workflow, with changes to the existing infrastructure being shown within the execution plan.
Although the Terraform CLI includes all the necessary commands to provision and manage infrastructure, it does not include built-in automation capabilities that would run the commands for you. It also does not include tooling to scan for compliance, validate best practices, or check for security vulnerabilities. That's where solutions like Terraform Cloud, GitHub Actions, and env0 can help.
Overview: GitHub Actions
GitHub Actions are a set of workflows associated with a GitHub repository. Each workflow is triggered by an event and executes a series of jobs hosted on runner machines. Each job is broken up into tasks, and each task uses an action to accomplish its goal.
Some common GitHub Actions include:
- Bash shell scripts
- Code repository checkout
- Programming language setup
- Scripts for GitHub Automation
You can also write your own custom actions and publish them for use by others. For instance, there is a Setup Terraform action published by HashiCorp that will install a specific version of Terraform on the runner machine and configure some helper scripts.
GitHub Actions workflows are stored in the repository they execute from in a special directory called [.code].github/workflows[.code]. Inside the directory, each workflow is defined in a YAML formatted file. We'll dig more into the syntax later in this post.
Connecting Terraform with git
As your use of infrastructure as code matures, you're going to want to store that code somewhere remote and track the changes to that code over time. You may also have other people in your organization that want to collaborate on the code. That's where a source control management tool comes into play. Git is a source control management tool, and GitHub is a place to store repositories managed by git.
Covering all the aspects of git and repositories is well beyond the scope of this post, but as it pertains to Terraform and tracking code changes, here are a few key terms to know:
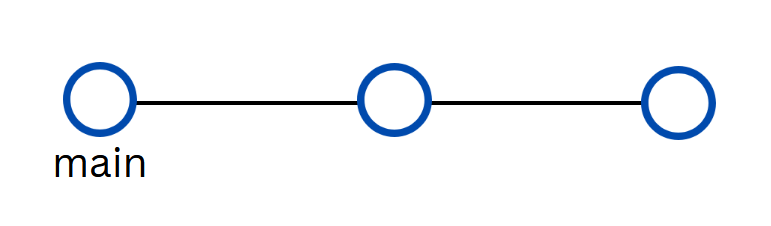
- Repository - An instance of git that tracks the files in a project
- Commit - A tracked change to the code in a repository
- Branch - A pointer to a specific commit that moves with new changes
- Upstream - A remote instance of the repository (GitHub for us)
We'll reference these terms throughout the rest of the blog post.
Using Terraform and GitHub Actions Together
GitHub Actions can automate many of the common tasks you would normally run from your local terminal. For instance, it can automatically check the formatting and validity of your Terraform configuration files by using the `terraform fmt` and `terraform validate` commands.
GitHub Actions can also automatically run a [.code]terraform plan[.code] to see the proposed changes, and scan the execution plan using Open Policy Agent or Checkov to verify it complies with company policy and security best practices.
You can even automate the deployment of a Terraform configuration once the updated code has gone through the necessary checks and approvals. If you can do it through the Terraform CLI, you can do it through GitHub Actions.
By formally defining the desired processes and procedures in GitHub Actions alongside your Terraform configuration, you can ensure that everyone in your organization follows a consistent process and that changes are properly vetted and approved.
There are some caveats to using GitHub Actions to run your Terraform commands instead of your local terminal. Actions execute on a hosted runner machine, so you'll need to provide credentials for any cloud service it needs to interact with. The runner machines are ephemeral as well, so you will need to use a remote backend for the storage of your state data.
Now that you have some background in GitHub Actions, let's walk through an example!
Terraform GitHub Actions Example and Prerequisites
Our example is an existing GitHub repository that contains the following:
- GitHub Actions workflow files
- Terraform configuration to deploy an Azure Virtual Network
- Terraform configuration to configure prerequisites
If you'd like to follow along, you'll need the following resources:
- Microsoft Azure subscription
- Azure CLI
- Code editor like VS Code
- GitHub account
You'll be creating an Azure Virtual Network with a single subnet, and then add a second subnet through a pull request and code promotion. There should be no cost to setting up these resources.
Create a GitHub Repository
Our example is going to need somewhere to live on GitHub, and that takes the form of a repository. There are many ways to create a GitHub repository. You can use the website, GitHub CLI, or even the GitHub Terraform provider to create a new repository. We're going to use an existing GitHub repository that has already been prepared.
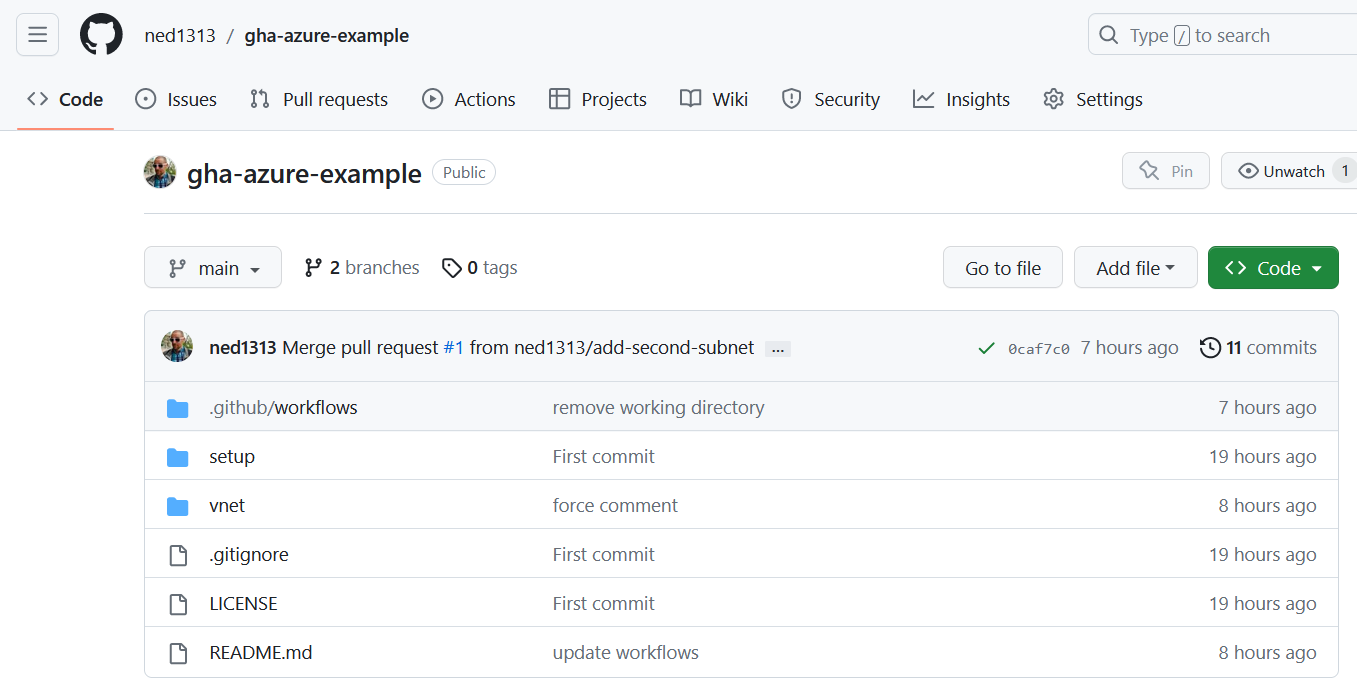
If you're following along, you can fork the repository, which makes a copy of the repository in your GitHub account. The [.code]README.md[.code] file in the root of the repository explains the necessary steps required to prepare a deployment using the contents of the `setup` directory.
Terraform Configuration Files
Inside the repository is a directory called `vnet` that contains the Terraform files we'll be working with.
The [.code]main.tf[.code] terraform file creates an Azure resource group, virtual network, and subnet inside of the virtual network. The subnet block uses a [.code]for_each[.code] loop to create subnets based on the contents of the [.code]subnets[.code] input variable.
The [.code]terraform.tfvars[.code] file contains parameters for the input variables.
We'll start with a single subnet defined, and then introduce a second subnet by switching to the commented out input variable values.
Since the workflow will occur on a hosted GitHub runner, we need to store the Terraform state data in a remote location. The terraform configuration file [.code]terraform.tf[.code] defines an [.code]azurerm[.code] backend for the configuration using a partial config backend block.
We'll need an Azure storage account to support the backend, and credentials to access the storage and provision infrastructure on Azure. Details for the backend configuration and the Azure service principal credentials will be stored in the repository's GitHub Actions Secrets.
The Terraform configuration found in the setup directory creates the Azure Storage resources, the Azure service principal, and adds the entries to GitHub Actions Secrets.
Review Terraform Workflows
Before we review the contents of the GitHub Actions workflows, let's consider what a typical process would be when running Terraform at your local terminal.
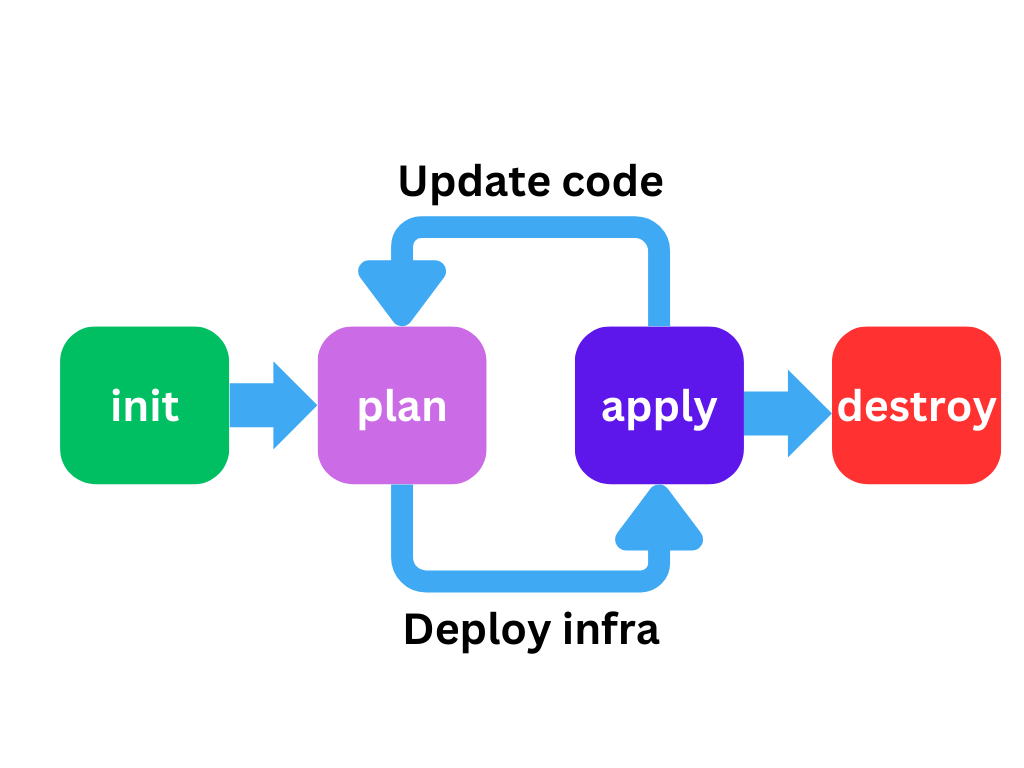
The first step would be to run the [.code]terraform init[.code] command to initialize provider plugins, the state data backend, and any modules used by the configuration files.
Typically you'd run [.code]terraform fmt[.code] to ensure the code is nicely formatted and then [.code]terraform validate[.code] to check your syntax and references.
Once you've verified your code, you'd run [.code]terraform plan[.code] to generate an execution plan to review your changes. If the changes are not what you expect, you make code updates, check formatting and validity, and run a new plan.
Once the execution plan looks good, you'd run [.code]terraform apply[.code] to make the updates to your target environment.
Eventually you might destroy the infrastructure, but that's a topic for another blog post.
Those are the processes we'd like to emulate in our GitHub Actions workflows, but in the context of events that occur in a repository.
GitHub Actions to Run Terraform
We can break our Terraform workflow into events that typically occur when developing and committing Terraform code to a repository. It’s common to use the default branch, often called [.code]main[.code], as the source of truth for deploying your infrastructure.
Configuration changes come in the form of feature branches created from the main branch. When these branches are committed to the code repository, we want to perform checks for validity and formatting, just like we did when updating the configuration locally.

Once our configuration changes have passed those basic tests, we can create a pull request to merge our changes into the default branch. That in turn should kick off a planning action so we can preview the proposed changes to our infrastructure if we were to merge the change.
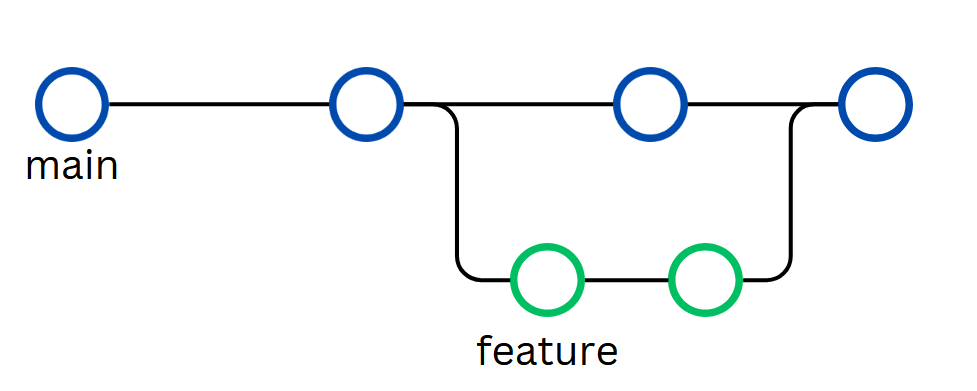
Once we're satisfied with the changes, we can merge our pull request and apply the changes to the target environment. And then the cycle begins again.
Now that we've mapped out our events and the actions for each event, we can review the supporting GitHub Actions workflows.
Managing Infrastructure with GitHub Actions and Terraform
All of our workflows are stored in the .github/workflows directory. There are three workflows defined:
- [.code]push.yml[.code] - Checks formatting and validity when commits occur on any branch but the default one
- [.code]pr.yml[.code] - Generates a Terraform execution plan when a pull request is opened against the default branch
- [.code]merge_main.yml[.code] - Applies the Terraform configuration to the target environment when a commit occurs on the main branch
Let's take a closer look at the push.yml file to get a feel for the GitHub Actions syntax.
Checking the Code on Commit
The [.code]push.yml[.code] file starts with the name of our workflow and the actions that cause it to fire:
This workflow will fire when a push event occurs on all branches ([.code]`*`[.code]) except the main branch ([.code]`!main`[.code]).
The following snippet sets environment variables that will be used by all jobs defined in the workflow:
Setting [.code]TF_LOG[.code] to [.code]INFO[.code] can help in future troubleshooting efforts, and setting [.code]TF_INPUT[.code] to [.code]false[.code] prevents Terraform from prompting for user input. Since there's no one to respond to prompts, we would have to wait for Terraform to timeout.
Next up in the file, we define a single job called [.code]check-code[.code] and set it to execute on an hosted machine running the latest version of Ubuntu.
We also set the default shell as bash for any shell script actions and configure the working directory as [.code]vnet[.code], since that is where our Terraform configuration files reside. Otherwise, GitHub Actions will run all commands from the root of the repository.
Now we have the [.code]steps[.code] section which defines tasks that should be executed on the runner. First we'll clone the repository to the runner machine using the [.code]checkout[.code] action in the following code.
The runner machines do not have Terraform preinstalled, and even if they did, it might not be the version we want. Our next task in the file uses the [.code]setup-terraform[.code] action to install our preferred version of the Terraform binary.
The version of Terraform being installed is sourced from the [.code]TERRAFORM_VERSION[.code] secret value defined in our GitHub repository.
While you can run [.code]terraform fmt[.code] without initializing Terraform, you do need to initialize provider plugins before you can run [.code]terraform validate[.code]. The task in the following snippet initializes Terraform and configures the remote backend for state data.
The run task uses the bash shell we selected earlier to [.code]run[.code] the defined command, in this case [.code]terraform init[.code].
Since we used a partial configuration for the [.code]azurerm[.code] backend, we need to provide the rest of the parameters when we execute [.code]terraform init[.code]. The values for the storage account and service principal are being set as environment variables, sourced from the secrets defined in the GitHub repository.
With Terraform successfully initialized, we can now check our formatting and validate the configuration files with the following actions.
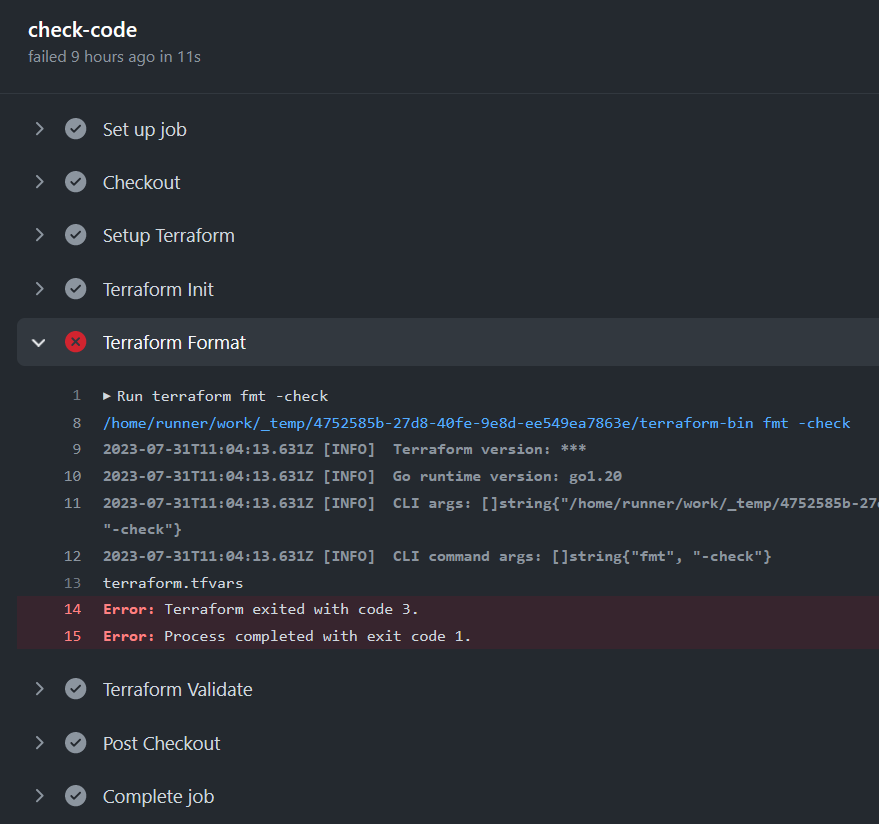
Using the [.code]-check[.code] flag with [.code]terraform fmt[.code] tells Terraform to return a non-zero exit code if there are formatting issues, rather than simply updating the files.
The job will stop running if a step encounters an error, however, we still want to check the validity of our code even if there are formatting problems. The statement [.code]if: success() || failure()[.code] tells GitHub Actions to run the [.code]validate[.code] step regardless of whether the previous step failed or succeeded.
Running an Execution Plan on a Pull Request
Our [.code]pr.yml[.code] file starts with a slightly different event trigger in the following code:
This workflow will fire when a pull request is created that targets the [.code]main[.code] branch.
The job and first few steps of the workflow are essentially the same, with the repository being cloned and Terraform being initialized. Then in the following action we run a [.code]terraform plan[.code] command to generate the execution plan.
Authentication to Azure is handled using a service principal with the parameters being set as environment variables sourced from the GitHub repository secrets. The plan itself is not being saved to a file, as the runner machine is ephemeral and the file would be destroyed when the job is over.
Although we aren't saving the execution plan to a file, we do want to preview the changes somehow. We can capture the output of the plan command as a comment in our pull request through the [.code]github-script[.code] action.
The above task takes the [.code]stdout[.code] of the [.code]plan[.code] step, applies some useful formatting, and adds it as a comment to the pull request. The result looks like this:
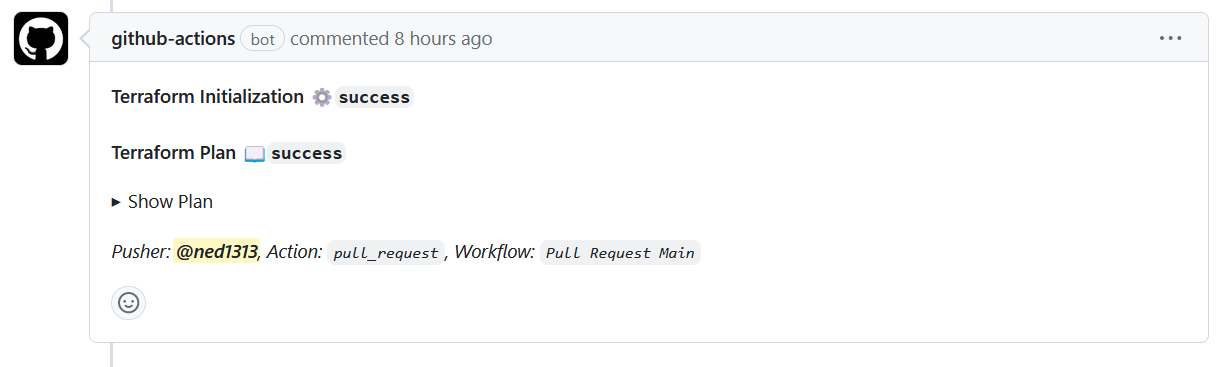
The Show Plan section can be expanded to see the proposed changes.
The pull request also shows the status of all GitHub Actions associated with the request and whether the checks passed successfully.

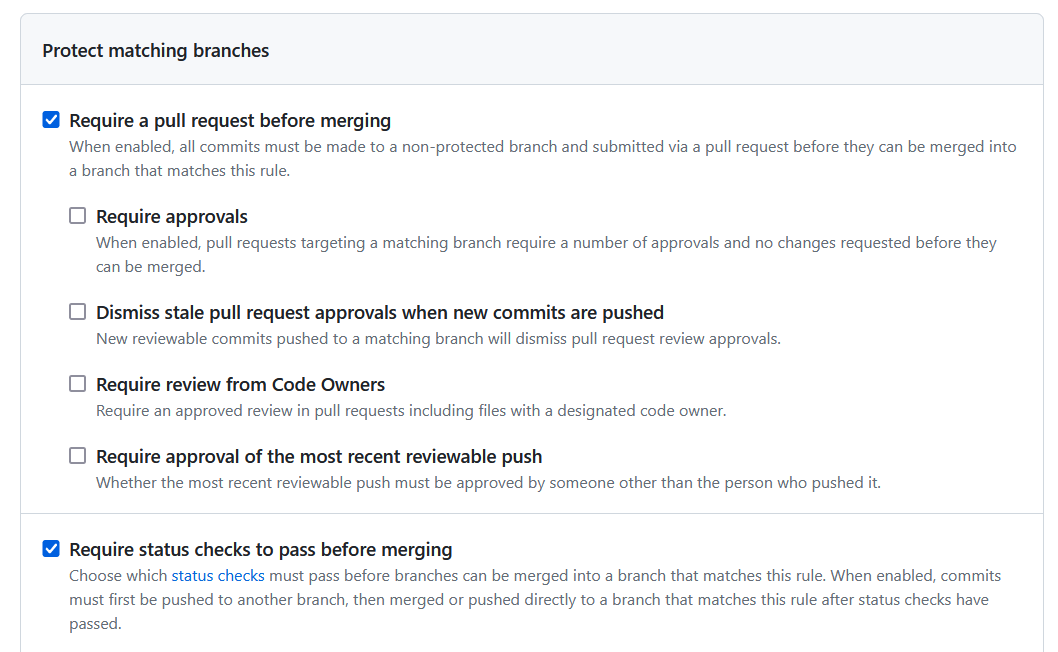
You can configure a branch to require all checks to pass before a pull request can be merged.
Apply Changes on Merge to Main
The last workflow in [.code]merge_main.yml[.code] looks for a push on the [.code]main[.code] branch.
When pull requests are merged, they create a commit on the target branch, which is equivalent to a push. The [.code]main[.code] branch should be protected from direct pushes, only allowing commits to come from a pull request that has passed all its status checks.
The job defined for the workflow starts out the same as the previous two workflows and ends with an [.code]apply[.code] command.
The [.code]-auto-approve[.code] flag is necessary, since we aren't using a saved execution plan, and we aren't interacting directly with the automation. All configuration changes should be going through the pull request process, so the changes being made should match what we saw in the pull request comment.
With the apply complete and resources created, we can start the cycle over again by creating a new feature branch and making changes to our Terraform configuration files.
Walking Through the Workflows
You can walk through the code promotion process yourself by doing the following:
- Create a feature branch from main
- Update the [.code]terraform.tfvars[.code] file with different values
- Commit the change to the feature branch
- Create a pull request to merge the feature branch into main
- Review the plan and merge the pull request to main
Further instructions are included in the [.code]README.md[.code] for the example repository, along with how to cleanup the resources when you are done.
Common Issues and Troubleshooting
There are two common categories of issues to deal with when using GitHub Actions:
- Problems with the Actions and syntax
- Problems with Terraform commands and configuration
Fortunately, the documentation on GitHub Actions is extensive and fairly readable. The error logging for each workflow run should provide enough information and context for you to figure out where your syntax errors lie.
The downside is that workflows are defined in YAML, which is notoriously picky about spacing and structure. I highly recommend using VS Code with the GitHub Actions extension to help with formatting and catch common errors while you're editing.
In our workflows, we set the level of Terraform logging to [.code]INFO[.code] using the [.code]TF_LOG[.code] environment variable. The output values are captured in each workflow run to help you with troubleshooting. You can also run Terraform against your local copy of the files to perform real-time troubleshooting of Terraform command and configuration errors.
Terraform in GitHub Actions Best Practices
The examples shown in this blog post are a great start to adopting GitHub Actions to run your Terraform automation. Here are some tips for getting the most out of GitHub Actions.
Keep It Simple and Light
Individual workflows should be kept as simple as possible without a lot of unnecessary overhead or unused dependencies. There is a cost associated with GitHub Actions based on minutes used. Since the hosted machines need to load all the associated actions and dependencies with each new run, having unwieldy workflows means unnecessary minutes spent loading actions or steps that aren't used by the workflow.
Likewise, each workflow should be dedicated to a discrete job and event. A task that fires on every push to any branch is going to run a lot, so it should be streamlined to only run what is absolutely necessary. Save more intensive actions for situations and events that truly need them. For instance, you could run a terraform plan on every commit to a feature branch, but that's a time consuming exercise for an execution plan you probably won't review. It makes more sense to run it on a pull request only, when you actually plan to review the contents.
Avoid Hardcoded Values
This is a good tip for your Terraform files and your GitHub Actions. Make use of placeholders and input variables in your configurations and workflows to make them more flexible and reusable. In our example, we included a variable for the version of Terraform to run instead of hardcoding it. That allows others to use the same workflow, but customize it to their desired version of Terraform.
In the same regard, you should never hardcode secret values, whether in private or public repositories. Anyone who can view the contents of the repository will have immediate access to your secret values! Instead, you should store secret values in GitHub Actions secrets associated with the repository.
Even better, you could avoid storing static secrets by leveraging dynamic credentials or secrets through a third-party or OIDC. That's beyond the scope of this post, but I highly recommend checking out how to use OIDC with GitHub Actions and the major cloud providers. The best kept secret is the one that doesn't exist!
Create Reusable Workflows
When developing new workflows, you don't have to start from scratch every time. You and your team can create starter workflows that are housed at the organization level. In the starter workflows, you can enshrine common patterns and best practices that you would like others to adopt across the organization.
You can find out more about creating and using starter workflows in the official GitHub documentation.
Scaling Terraform with CI/CD
Managing State
There's no way around the need for remote state backends when you use GitHub Actions. The real question is what type of backend you want to use and how you plan to define it. In the example configuration, we used a partial config for the [.code]azurerm[.code] backend to keep our options open.
As you scale your use of Terraform and GitHub Actions, you may want to consider standardizing on a specific backend, and determine proper naming conventions and access permissions for the remote state backend. State data is extremely important to the proper functioning of Terraform and contains sensitive information you wouldn't want exposed.
Working with multiple environments
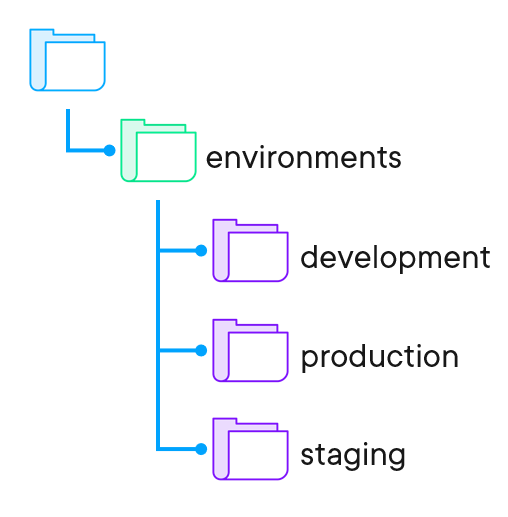
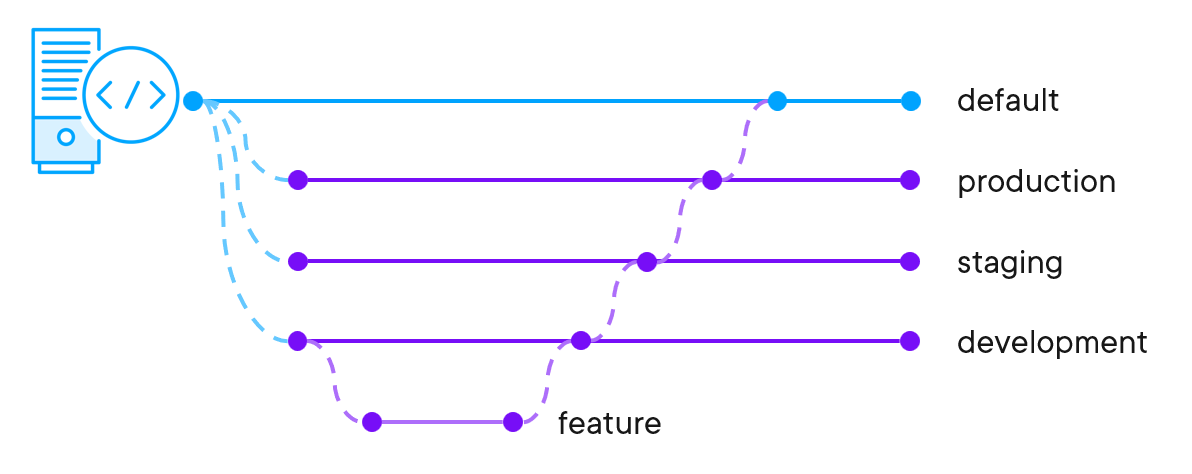
There are many ways to manage multiple environments with Terraform and GitHub Actions. Two common options are managing environments by directory or by branch.
In the case of directories, each environment is defined inside a sub-directory of the repository. There is a default branch that represents the source of truth for all environments, and code updates are made through short-lived feature branches created from the default branch. Promotion of code changes from one environment to another is done by copying files from one environment directory to another.
Managing environments using branches involves having a dedicated branch for each environment. The default branch represents the source of truth for all new environments, and code updates are made through short-lived feature branches that are merged into a lower environment and then promoted to higher environments through a series of pull requests.
Either approach can be used in combination with GitHub environments and GitHub Actions. Each GitHub environment includes its own secrets, protection rules, and variables. Each job in a GitHub Action workflow can reference exactly one environment, which may inform how you design and develop workflows.
Establishing Infrastructure Guardrails
The example workflows we reviewed included basic checks for things like formatting, validation, and execution plan review. But you can do much more to establish infrastructure guardrails, check for security vulnerabilities and verify compliance with company policy enforcement.
You can include static code analysis with Checkov, policy enforcement with Open Policy Agent, or infrastructure testing with Terratest. All of these and more are available as pre-built GitHub Actions you can incorporate in your workflow.
You can also use the native tools in GitHub to enforce checks, protect branches, and limit access permissions to different branches and repositories. Combined with secrets, environments, and starter workflows, GitHub Actions can be a powerful force to automate and standardize your infrastructure as code management.
Conclusion
I hope you've found this walk through Automating Terraform with GitHub Actions helpful. If you're looking for further resources, I recommend checking out the following posts:
https://docs.envzero.com/docs/plan-on-pull-request
Automating Terraform and Infrastructure as Code with env0
If you'd like to reach out to me with comments or questions, I can be found on nedinthecloud.com. Thanks again and happy building!