
.webp)


When working with Terraform CLI, organizing your configuration files is crucial for your infrastructure's long-term maintainability and scalability as code.
Properly structured files ensure that your Terraform codebase is intuitive to navigate, straightforward to update, and clear to comprehend, which is particularly important as your cloud infrastructure becomes more complex.
Introduction to Terraform Configuration Files Structure
Choosing the proper structure for your Terraform configuration files at the beginning of a project is essential because later restructuring can be challenging and require significant refactoring efforts.
As your Terraform-managed infrastructure grows, the initial file organization can significantly influence the ease of navigation, updates, and collaboration.
For the simplicity of this example, we will deploy an AWS EC2 instance and an S3 bucket to demonstrate how Terraform uses various files to define resources and assign variables.
Typically, when you're just starting to structure a Terraform project, you should begin with the following foundational files to organize your infrastructure code effectively:
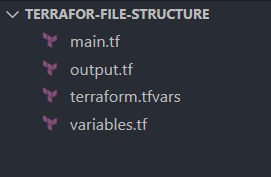
main.tf
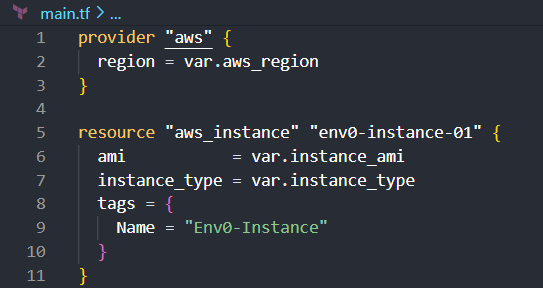
When initiating a Terraform project, the main.tf file is typically the starting point for defining your core infrastructure configuration.
This file articulates the setup of your Terraform providers, resources, and any initial modules your infrastructure will rely on.
Here's an example of how you might structure your main.tf to set up an AWS provider provision for an EC2 instance:
variables.tf
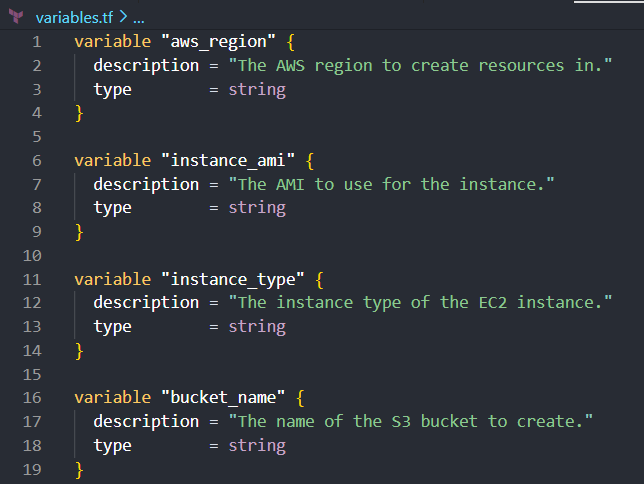
The variables.tf file is the second key component in a Terraform project. In this file you define all the input variables that your configuration will use.
This file manages and documents the expected inputs, making Terraform configurations more dynamic and reusable.
Here's an example of how you structure your variables.tf file to declare variables used in your main.tf:
outputs.tf
The outputs.tf file is the third essential component in a Terraform project. It displays values from your infrastructure.
This file extracts and displays information about the resources you've provisioned, such as IDs, ARNs, or custom values, making it easier to understand the deployed infrastructure or to integrate with other systems.
Here's how you structure your outputs.tf file to define outputs for the EC2 instance ID and the S3 bucket ARN:

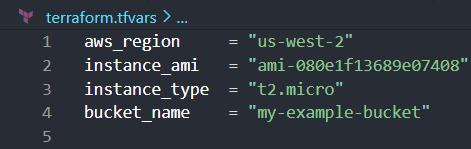
terraform.tfvars
The terraform.tfvars file is an optional yet often utilized component in a Terraform project. It allows you to assign values to the variables declared in the variables.tf file.
Here's an example of how you might structure your terraform.tfvars file to assign values to the variables:
After running the [.code]terraform init[.code] command, a folder is created in the root directory, which contains:
- .terraform.lock.hcl
- terraform-provider-aws.exe

terraform.lock.hcl
The .terraform.lock.hcl file's primary purpose is to lock the provider versions to ensure that all team members and CI/CD systems use identical versions.
This prevents inconsistencies arising from different versions. The file includes detailed version information and a list of cryptographic hashes corresponding to the provider's packages for various platforms and architectures.
The lock file specifies the versions and helps maintain your Terraform project's integrity. Using it ensures that any provider updates are intentional and verified, as the hashes in the lock file must match the downloaded providers' hashes.
When updating providers, Terraform will modify the .terraform.lock.hcl file to reflect the new versions and hashes.
These changes should be reviewed and committed to your version control system to synchronize the team's environments.
terraform-provider-aws.exe
During the initialization process, Terraform downloads and installs the necessary provider plugins required for the Terraform configuration to interact with the specified infrastructure services.
These providers are the components that Terraform uses to translate the configuration files into API calls for the various services.
In our example, terraform-provider-aws.exe is the executable for the AWS provider plugin, which allows Terraform to manage resources on the Amazon Web Services platform. However, this is just one example of many providers that Terraform supports.
Provider plugins, such as GCP (terraform-provider-google.exe), Azure (terraform-provider-azurerm.exe), and many others, are also downloaded as needed based on the configuration files.
Each provider plugin is a binary executable specific to the platform Terraform is running on.
Upon running [.code]terraform init[.code], these executables are stored in a subdirectory within the .terraform directory created in the project directory.
The .terraform directory acts as a local cache for these plugins. It contains a separate subdirectory for each provider to avoid conflicts and ensure that each plugin is isolated from changes in others. Because it's auto-generated by terraform init, the .terraform directory should never be committed to version control. For a complete checklist, see our practical guide to Terraform .gitignore patterns.
After executing the [.code]terraform plan[.code] command, while the primary focus is on generating an execution plan, Terraform also prepares for potential changes to your infrastructure.
If you proceed to [.code]terraform apply[.code], this preparation involves creating two files you should be aware of:
- terraform.tfstate
- .terraform.tfstate.lock.info.
Let's dive in.
terraform.tfstate
Terraform.tfstate is a JSON file that is essentially Terraform's memory of your infrastructure. It records all the resources Terraform has created or managed on your behalf and tracks their current state, using this information to map the real-world resources back to your configuration.
When you run [.code]terraform plan[.code], Terraform looks at this file to understand your current state and what changes need to be made to match your desired state. Although [.code]terraform plan[.code] doesn't modify the terraform.tfstate file, it reads from it to generate the plan.
The actual update to this file happens when you apply your plan with [.code]terraform apply[.code].
terraform.tfstate.lock.info
When Terraform begins an operation that will modify the state, such as [.code]terraform apply[.code], it creates this lock file.
The lock file indicates to other Terraform processes that the state is currently being modified and that they should only attempt to make changes once the lock is released.
Once the operation is complete, Terraform automatically deletes the .terraform.tfstate.lock.info file, releasing the lock and allowing other operations to proceed.
Examples: Terraform File Structures for Advanced Scenarios
Complex projects often require managing diverse resources across different stages (development, staging, and production, to name a few) or even across various clients.
Below are some examples, each representing a set of unique challenges and considerations for organizing Terraform configurations.
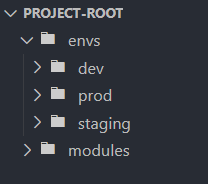
1. Multi-Environment Projects
For projects that span multiple environments, it's essential to isolate the configurations for each environment to prevent unintended changes that could affect stability.
A common approach is to use separate directories for each environment within your project, such as envs/dev, envs/staging, and envs/prod.
Each directory can contain environment-specific versions of your Terraform configurations, allowing for tailored deployment strategies and parameters for each environment.
Let's create a structure allowing separate configurations for development, staging, and production environments.
First, create a directory structure that separates multiple files for each environment:
Understanding how Terraform stores and tracks your infrastructure is the next step after getting your file structure right. Our guide to the Terraform state file covers how state works, where it's stored, and how to protect it. To keep your IaC configurations secure from the start, see our comparison of the top IaC security scanning tools — Checkov, tfsec, and Terrascan. And as your infrastructure scales, automated drift detection with env0 helps you catch and resolve configuration drift before it becomes a problem.
Within each environment directory, add the necessary Terraform configuration files. For example, in the dev environment:
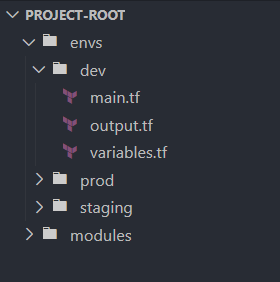
Repeat this step for staging and prod directories, ensuring each has its own set of configuration files.
To apply the default Terraform configuration for the development environment, navigate to the dev directory and run the Terraform commands:
- [.code]cd envs/dev[.code]
- [.code]terraform init[.code]
- [.code]terraform plan[.code]
- [.code]terraform apply[.code]
Repeat the staging and prod environments process by creating similar main.tf and outputs.tf files within their respective directories and running the Terraform commands within each directory.
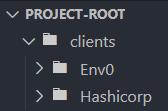
2. Multi-client Projects
When managing infrastructure for multiple clients, it is vital to separate each client's configurations for security, privacy, and customization.
Like the multi-environment approach, consider creating a dedicated directory for each client, such as clients/env0 and clients/HashiCorp.
This structure ensures that each client's infrastructure is managed independently, reducing the risk of cross-client configuration leaks or conflicts.
We'll create a directory structure that isolates each client's Terraform configurations.
This approach ensures that each client's infrastructure is managed separately, a step that is crucial for maintaining security and privacy and allowing for client-specific customizations.
Start by setting up a directory for each client within your Terraform project at the root directory:
Within each client's directory, add the necessary Terraform configuration files. For example, for env0:

Repeat this step for HashiCorp and additional clients, ensuring each has its own set of configuration files.
In clients/Env0/main.tf, define the resources specific to env0. For example, you might create an S3 bucket exclusively for env0's use:

Repeat this process for clients/Hashicorp/main.tf , ensuring the resources are defined with client-specific names and tags.
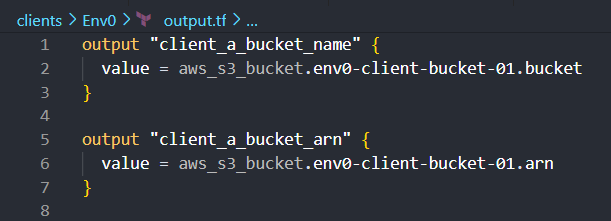
In clients/env0/outputs.tf, define outputs relevant to env0's resources. For the S3 bucket, you might want to output its name and ARN:
Customize the outputs for each client in their respective outputs.tf files.
To deploy the resources for a specific client, navigate to the client's directory and execute Terraform commands:
- [.code]cd clients/Env0[.code]
- [.code]terraform init[.code]
- [.code]terraform plan[.code]
- [.code]terraform apply[.code]
Follow the same process for HashiCorp and other clients by navigating their directories and running the Terraform commands.
3. Splitting a Monolithic Terraform State
When working with Terraform, starting with one state file that holds all your infrastructure information is common.
This is known as a monolithic state file. As your project grows and you add more resources, this single file can become too complex and challenging to manage. To simplify things, it's better to split this big state file into smaller ones, each dedicated to a specific resource like an S3 bucket or an EC2 instance.
Doing this makes each part of your infrastructure more straightforward to handle. It's like having a clear list for each resource type so you can quickly find and change things without affecting everything else.
Splitting a monolithic Terraform state into smaller ones is an approach to improve infrastructure.
Here are some steps on how to achieve this...
Start by organizing your project in a single directory that contains all your Terraform configurations. While this setup starts simple, it can become more complex as your project grows.
project
└── env0_monolith
    ├── application.tf
    ├── database.tf
    └── variables.tf
The first step towards a more manageable structure is categorizing your resources into logical groups.
For instance, you might have resources related to your application and others related to your database. Create separate directories within your project for each group.
project
├── env0_monolith
│   ├── application.tf
│   ├── database.tf
│   └── variables.tf
│
└── database
    ├── database.tf
    └── variables.tf
After setting up the new directories, move the relevant Terraform files from the monolithic directory to their new homes.
project
├── application
│   ├── application.tf
│   └── variables.tf
│
└── database
    ├── database.tf
    └── variables.tf
After the files are moved, review each component's Terraform code to ensure they can operate independently. This might involve adjusting variables or outputs.
Test each component to confirm everything works as expected. With the components now separated, you can manage and update each independently.
You'll end up with a project structure where each component is neatly organized in its directory. This clear separation makes the project easier to navigate and manage.
project
├── application
│   ├── main.tf
│   ├── outputs.tf
│   └── variables.tf
│
└── database
    ├── main.tf
    ├── outputs.tf
    └── variables.tf
Organizing Terraform Modules Within a Project
Organizing Terraform modules within a project is a strategic approach to managing and reusing code across your infrastructure. This allows you to package and encapsulate resources and configurations that can be used repeatedly throughout your project.
A module in Terraform serves as a container for multiple resources to be used together, allowing for reusability and better organization of your infrastructure code.
Encapsulating related resources can simplify and make Terraform configurations more manageable, especially as projects become complex.
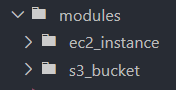
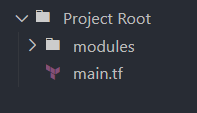
Within the modules directory, create a subdirectory for the S3 bucket module and another for the EC2 instance module.
Add the Terraform files that define the root module resources, input variable values, and outputs inside each root module's directory.

Call the root modules defined in your main project files or within environment-specific directories.
Calling the S3 Bucket Module:
module "app_s3_bucket" {
source = "./modules/s3_bucket"
bucket_name = "my-app-bucket" acl = "private"
}Calling the EC2 Instance Module:
module "app_instance" {
source = "./modules/ec2_instance"
instance_type = "t2.micro"
ami = "ami-7549540092"
}
Navigate to the directory where you're calling the modules and run the [.code]terraform init[.code], [.code]plan[.code], and [.code]apply[.code] commands to initialize the child module and apply your configuration.
External Configuration Data and Terraform File Function
Incorporating external configuration data into your Terraform project is standard, particularly when managing IaC across different environments or dealing with sensitive information that should be separate from the main Terraform files.
This approach aligns with the broader conversation on file types and structures within Terraform projects, emphasizing the importance of flexibility and security in IaC workflows.
To demonstrate how this works, let's see how to integrate dynamic configuration data from an external file, such as input.yaml or a JSON-based file, directly into your Terraform configuration.
This method is beneficial for scenarios where your infrastructure settings might change between environments or when you need to take sensitive data without exposing it within your primary Terraform files.
Suppose your variables are stored in an external file, such as YAML or JSON-based file named input.yaml, which contains dynamic configuration data that you wish to incorporate directly into your Terraform configuration.
Using the [.code]file[.code] function, you can read content from external files, such as YAML or JSON, and use it within your Terraform configurations. This enables a more dynamic and flexible infrastructure setup.
For example, you might have a JSON file containing a list of IP addresses for security group rules or a YAML file with configuration parameters for a set of resources. The file function allows you to read these files and use their contents as variables or parameters within your Terraform code.
This approach keeps your Terraform configurations clean and organized and makes it easier to update them by simply changing the external files without modifying the core Terraform files.
Suppose you have a file named config.json with the following content:
{
    "ami": "ami-0c55b159cbfafe1f0",
    "instance_type": "t2.micro"
  }
}
Similarly, create a config.yaml file. For example:
ami: ami-0c55b159cbfafe1f0
instance_type: t2.micro
In your main.tf file, use Terraform's file function and [.code]jsondecode[.code] (and a hypothetical [.code]yamldecode[.code] for YAML files) to read and parse these configuration files.
provider "aws" {
  region = "us-west-2"
}

locals {
  json_config = jsondecode(file("${path.module}/config.json"))
  yaml_config = yamldecode(file("${path.module}/config.yaml"))
}

resource "aws_instance" "from_json" {
  ami           = local.json_config.ami
  instance_type = local.json_config.instance_type

  tags = {
    Name = "InstanceFromJSON"
  }
}

resource "aws_instance" "from_yaml" {
  ami           = local.yaml_config.ami
  instance_type = local.yaml_config.instance_type

  tags = {
    Name = "InstanceFromYAML"
  }
}
Following these steps, you leverage external JSON and YAML files to define configuration data for your Terraform project.
This method enhances the maintainability of your Terraform configurations by separating data from your infrastructure code, allowing for more accessible updates and transparent organization.
env0: Using Folder Structure for Environment Management
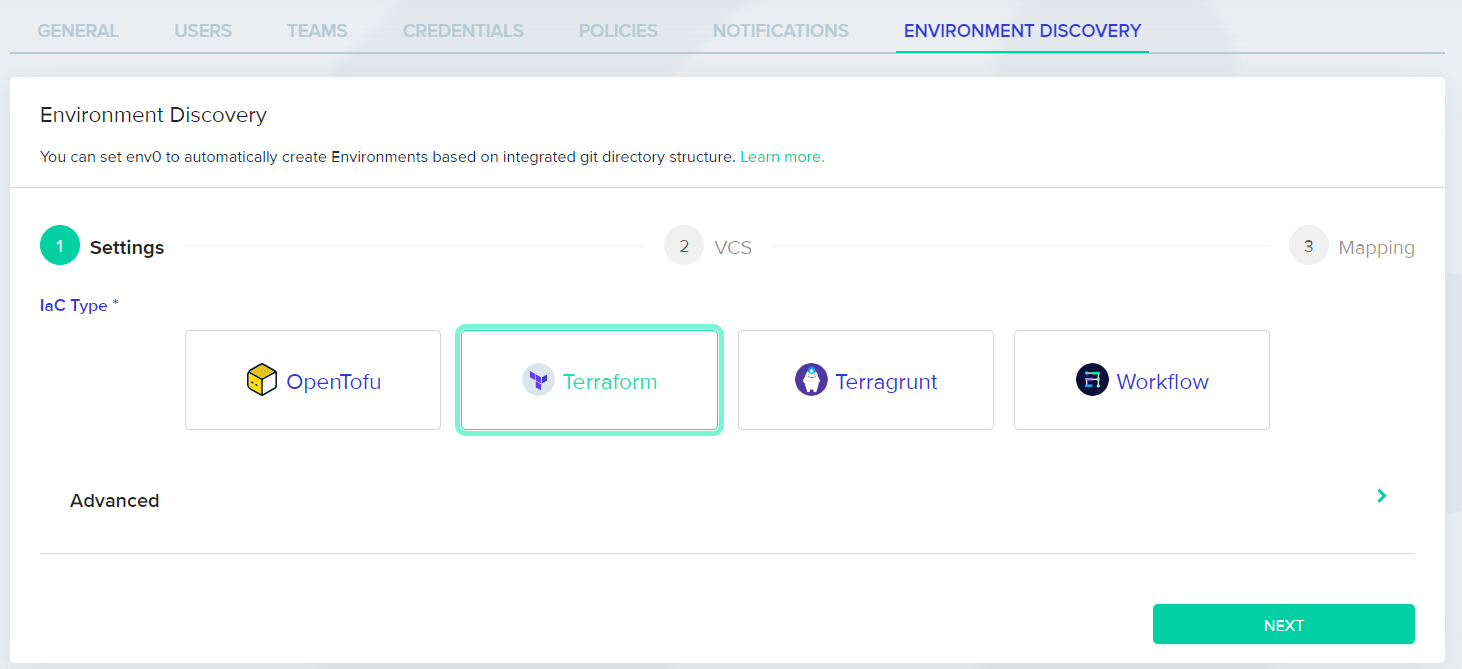
env0 provides an Environment Discovery capability which can be used to automatically create and destroy environments based on the content of your pull requests, leveraging preconfigured folder structures.
This feature aligns with GitOps best practices and the Terragrunt flow, allowing teams to maintain a clear and organized structure for their Infrastructure-as-Code (IaC) configurations, while preserving Git's role as the central hub for code management, auditability, etc. For a deep dive into Terragrunt's DRY configuration patterns and multi-environment stacks, see our Terragrunt tutorial.
Here is a quick video that demonstrates how it works:
The beauty of Environment Discovery lies in its ability to reduce manual overhead and the potential for human error.
Using it ensures that each environment is treated as a distinct entity with its own set of configurations and state, which is crucial for maintaining consistency and stability across different stages of development, testing, and production.
To explain how it works, let's explore how it can be used to set up your Terraform project.
First, organize your Terraform project with an explicit directory and file structure. Here's a basic example:
my-terraform-project/
├── environments/
│   ├── dev/
│   │   └── main.tf
│   ├── staging/
│   │   └── main.tf
│   └── prod/
             └── main.tf
Navigate to your Project Settings in env0, select the Environment Discovery tab, and click 'Get Started' to initiate the setup process.
Choose the type of infrastructure you use (e.g., Terraform, Terragrunt) and proceed to the next step.
Specify a multi-glob pattern that matches the directories and files in your repository and corresponds to different environments. For example, a pattern like src/prod/**/*.tf would match all Terraform files in the prod directory.
Decide which files or directories to exclude. For example, you should exclude standard configuration files that are not environment-specific, such as those in an _envcommon folder.
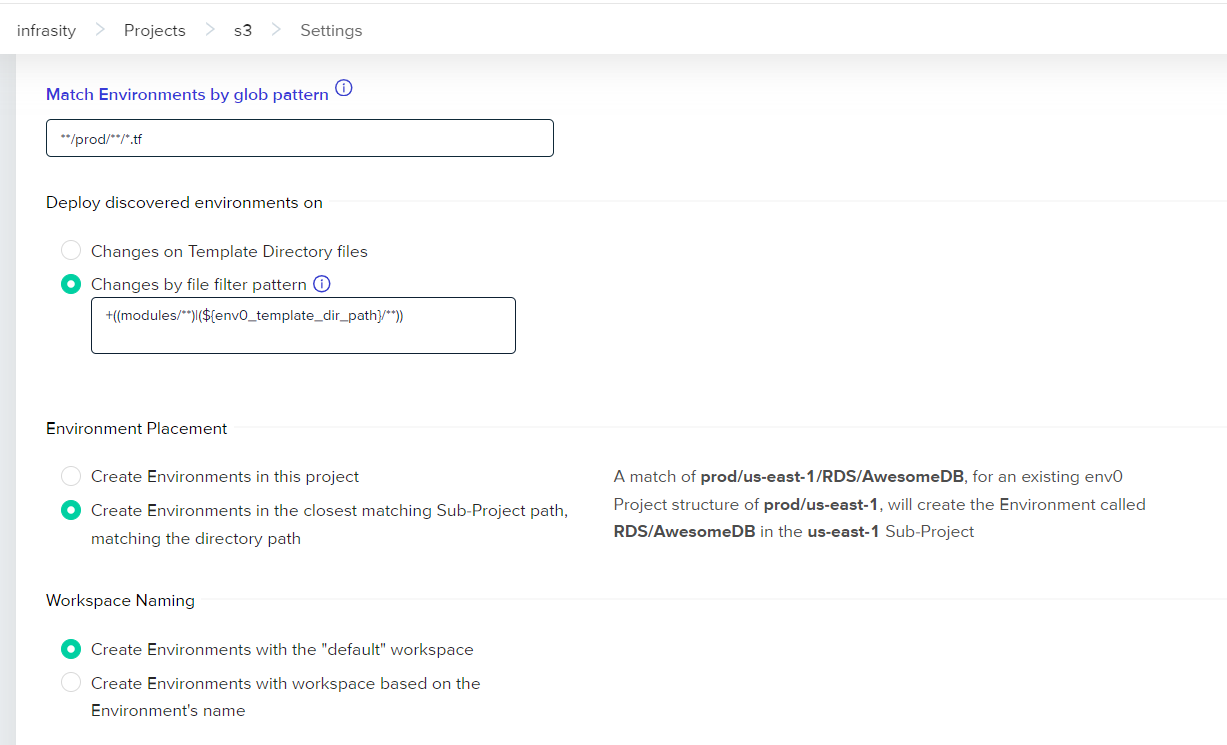
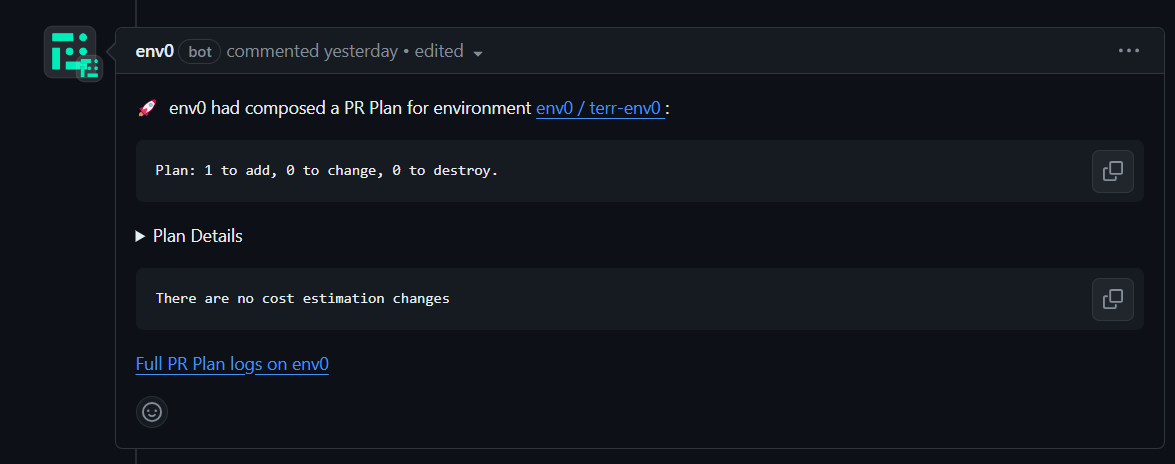
With Environment Discovery configured, env0 will automatically create and plan environments whenever file changes match the specified patterns in your pull requests.
Make a pull request with changes in your desired environment. assuming they match the pattern you defined, env0 will trigger the creation of a new environment, providing you with a plan you can review to see the proposed changes before they are applied.
This flow streamlines and standardizes environment creation and destruction processes, enabling teams to maintain consistency across environments.
The result is a more efficient, GitOps-friendly, error-resistant, and scalable approach to environment management, which is essential for modern cloud infrastructure operations.
Frequently Asked Questions
Q. What are the Terraform configuration files?
Terraform files are written in HashiCorp Configuration Language (HCL) or JSON and have the extensions .tf for HCL and .tf.json for JSON. They define Terraform's infrastructure and can include resource definitions, variable declarations, output values, and module calls.
Q. What is the order of multiple files in Terraform?
Terraform loads all .tf and .tf.json files alphabetically in a directory and combines them into a single configuration. Due to Terraform's declarative nature, the order in which files are loaded does not affect the final configuration. Override files are loaded last and in alphabetical order.
Q. How can I load input data from a file in Terraform?
In Terraform, you can load input data from a file using several built-in functions and data sources. Here's how you can do it:
- Using the file() function: This function reads the contents of a file at the given path and returns them as a string. It helps load simple text data.
- Parsing structured data: For structured data like JSON or YAML, you can use the [.code]jsondecode()[.code] and [.code]yamldecode()[.code] functions after loading the file content as a string to parse it into Terraform-readable data.
- Using the templatefile function: This function is an advanced way to render a template from a file, allowing you to insert variables into your file data.
- Using data sources: If you need to read a file that is not located within your Terraform configuration directory or is in a separate repository, you can use the http data source or the [.code]github_repository_file[.code] data source from the GitHub provider to fetch the file content. However, this requires the data to be accessible over HTTP or through the GitHub API.
- Using the local_file Data Source: This data source is part of the HashiCorp/local provider and can read files while respecting resource dependencies. It's beneficial for reading files generated dynamically during a Terraform operation.
Q. What is Terraform backup file?
A Terraform backup file, named terraform.tfstate.backup, acts as a version of the primary Terraform state file (terraform.tfstate). Terraform automatically creates this backup file during operations that modify the state file, such as applying changes to your infrastructure.
The purpose of the backup file is to serve as a safeguard, providing a previous version of the state file before the most recent changes were applied. This can be crucial for recovery in case the current state file becomes corrupted or if changes need to be rolled back for any reason.
The backup file contains the old state of your resources before the latest modifications, ensuring that you have a fallback option to restore the previous state of your infrastructure if necessary.