

.webp)


Related reading: Terraform Alternatives: A 2026 Buyer's Guide. Covers both IaC tool replacements (OpenTofu, Pulumi, Terragrunt) and platform alternatives (env zero, Spacelift, Scalr) with a full comparison table and buyer decision framework.
Infrastructure-as-code: Why IaC Matters for Cloud Provisioning
Infrastructure-as-Code (IaC) allows engineers to manage cloud assets, databases, and networks as code, enhancing efficiency and consistency and bypassing manual ClickOps for cloud infrastructure provisioning and deployment.
Infrastructure code: Key Benefits of IaC
- Automation and Error Reduction: Using IaC, you can automate the setup of a complex server environment in minutes with a single script, eliminating hours of manual configuration. This not only accelerates deployment but also significantly reduces the chance of human error.
- Version Control and Collaboration: Enable version control to track changes and enhance team collaboration. For instance, when a team member submits a pull request for an IaC configuration change, the entire team can collaboratively review, discuss, and approve the IaC changes.
- Scalability: By changing a few lines in your IaC script, you can effortlessly scale your cloud infrastructure to handle the increased load, transforming what used to be a complex process involving manual adjustments in your cloud environment.
- Multi-Cloud Support: IaC tools are cloud-agnostic, meaning they offer flexibility in deploying infrastructure across various cloud environments (AWS, Azure, GCP, etc).
- Security: IaC tools integrate with security frameworks like OPA, enabling engineers to define security policies and check compliance before (or after) the infrastructure provisioning process, ensuring infrastructure security.
In this post, I’ve selected a range of the most popular IaC tools to provide a quick overview of the ecosystem and help you find the IaC option best suited for your organization or project.
Terraform CLI IaC Tool (Terraform Code and State)
Terraform CLI is the most popular and widely used IaC tool today. Owned by HashiCorp, which was recently acquired by IBM, Terraform is designed to provision and manage infrastructure resources through code.
Terraform key features are:
- Multi-cloud Support: Offers extensive multi-cloud support, enabling efficient infrastructure management across various platforms like AWS, Azure, GCP, and env zero, with the same tool and syntax.
- Declarative Syntax: Terraform employs the declarative HashiCorp Configuration Language (HCL) to describe the infrastructure's desired state through IaC.
- State Management: State management in Terraform uses a state file to track resources, serving as a source of truth for efficient updates, deletions, and metadata tracking.
Get Started
You should follow a series of steps to get started with Terraform:
1. Install Terraform
You can download and install Terraform on your local machine. It supports different operating systems like Windows, Linux, and MacOS.
2. Write your first Terraform Configuration
Create a new directory for your Terraform project and create a file named main.tf inside that directory. We'll take an example of writing the Terraform configuration for provisioning an S3 bucket in main.tf. Here is an example configuration:
This configuration:
- Defines an AWS provider and sets the region where the resources will be created.
- Defines a resource block for an AWS S3 bucket with a unique bucket name, sets the access control list (ACL) to private, and adds some descriptive tags.
3. Run Terraform Workflow (Terraform CLI in Action)
You would now need to basic Terraform commands to provision this S3 bucket in AWS in the real world.
- [.code]terraform init[.code]: This command prepares your directory for Terraform operations by downloading the necessary provider plugins.

- [.code]terraform plan[.code]: This command will show you a plan of all the resources Terraform will create, modify, or destroy based on your configuration. The [.code]plan[.code] output shows creating an S3 bucket (env zero-dev-bucket).

- [.code]terraform apply[.code]: If you're satisfied with the plan, apply the configuration to create the S3 bucket by running [.code]terraform apply[.code]. After confirming with a ‘yes’, you’ll see the S3 bucket provisioned in your cloud environment.

Licensing
Recently, Terraform moved from Mozilla Public License (MPL) to Business Source License (BSL), confirming it will no longer be an open-source project. For instance, since HashiCorp moved from its open-source license, the Gitlab community has rooted to replace Terraform CI templates with OpenTofu templates for SaaS and Self-Managed features in GitLab, since its internal legal analysis restricts shipping Terraform CI templates.
Terraform CLI is also accompanied by Terraform Cloud (TFC), which is a HashiCorp's commercial offering. Visit here to learn what makes env zero a great Terraform Cloud alternative.
OpenTofu IaC Tool: Open Source Terraform Alternative
OpenTofu is an open-source alternative for Terraform and a drop-in replacement for Terraform v1.6. OpenTofu is forked from Terraform, and initiated by env zero, Gruntwork, Harness, Spacelift, and others as a response to HashiCorp's shift from an open-source MPL license to the Business Source License (BSL) for Terraform.OpenTofu comes with all the features of Terraform, except that it is open-source. Moreover, OpenTofu has its own registry that uses the same modules and providers that can be used with Terraform.
Key features:
- Open Source Nature: OpenTofu's open-source nature ensures that its codebase is freely accessible to all, fostering a transparent and inclusive environment for users and developers.
- Community-driven Development: OpenTofu's development is community-driven, emphasizing collaboration in feature suggestions, bug reporting, and documentation enhancements, making the process transparent and feedback-valued for users.
Get Started
You can get started with OpenTofu by just adding or replacing the Terraform binary with the OpenTofu binary, defining the configuration with the same HCL syntax, and running your workflow.
1. Install OpenTofu
Follow the OpenTofu installation guide with respect to your operating system.
2. Define your OpenTofu configuration
OpenTofu uses the same HCL syntax for defining your infrastructure code. Let’s take the same example of provisioning an S3 bucket:
3. Run OpenTofu workflow
After defining your configuration, run the same workflow as Terraform with some minor changes in syntax (replace [.code]terraform[.code] with [.code]tofu[.code] when running workflow commands).
- [.code]tofu init[.code]: same as [.code]terraform init[.code] it initializes the directory by downloading provider plugins and modules.

- [.code]tofu plan[.code]: Again, identical to the terraform command it shows you an execution plan to modify, create, or destroy resources. In our case, we’re creating an S3 bucket.

- [.code]tofu apply[.code]: After running the command, Opentofu generates an execution plan again and asks for confirmation. Upon confirming with a ‘yes’, it creates the env zero-tofu-bucket:

Licensing
OpenTofu is under the open source Mozilla Public License (MPL) and was acquired by the Linux Foundation.
Pulumi IaC: Infrastructure-as-code Tools for Developers
Pulumi is an open-source Infrastructure as Code (IaC) tool enabling engineers to manage cloud infrastructure with languages like JavaScript, TypeScript, Python, Go, and .NET, offering flexibility beyond traditional declarative-syntax IaC tools like Terraform.
Here are some of its key features:
- Multi-Cloud Support: Like Terraform, Pulumi too offers a wide range of integration with various cloud providers like AWS, GCP, Azure, etc.
- State Management: Pulumi automatically manages the state of your infrastructure, keeping track of your resources and their relationships.
- Secret Management: Pulumi provides secure handling of sensitive information, such as passwords or API keys, integrating with existing secrets management tools like AWS KMS, Azure Key Vault, or HashiCorp Vault.
Get Started
1. Install Pulumi and create a project
There are different ways of installing Pulumi on your local system, and you can find everything here. You can follow along on creating a Pulumi project and get started writing Python code for provisioning an S3 bucket.
2. Write a script to provision infrastructure
Here's a basic Python script to deploy an S3 bucket:
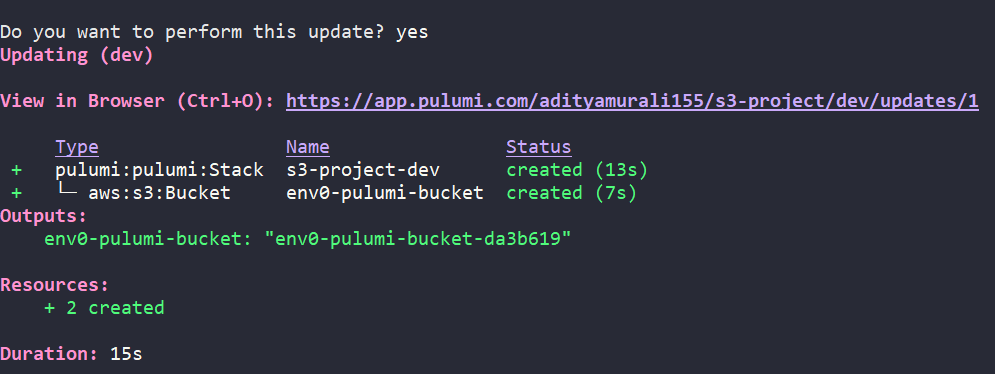
3. Deploy Stack
Run [.code]pulumi up[.code] to provision the S3 bucket (env zero-pulumi-bucket):

Licensing
Pulumi is an open-source project licensed under Apache License 2.0.
Crossplane IaC Tool for Kubernetes
Crossplane is an open-source Kubernetes add-on that makes cloud infrastructure management native to Kubernetes through custom resource definitions (CRDs), enabling provisioning and management of cloud resources directly from Kubernetes.
It allows you to define your infrastructure using Kubernetes manifests, making the entire cloud infrastructure a Kubernetes-native experience.
Key features:
- Universal Control Plane: Crossplane makes Kubernetes a universal control plane with CRDs for cloud resources, simplifying multi-cloud infrastructure provisioning and management.
- Multi-cloud and Hybrid Cloud Support: Crossplane supports multiple cloud providers (AWS, GCP, Azure, Alibaba Cloud, and more), enabling you to deploy workloads and services across different clouds, facilitating complex multi-cloud and hybrid cloud architectures.
Get Started
To provision an S3 bucket using Crossplane, we should have:
- An existing Kubernetes cluster running (preferably minikube or kind)
- Helm (to install Crossplane)
- Configure the AWS provider
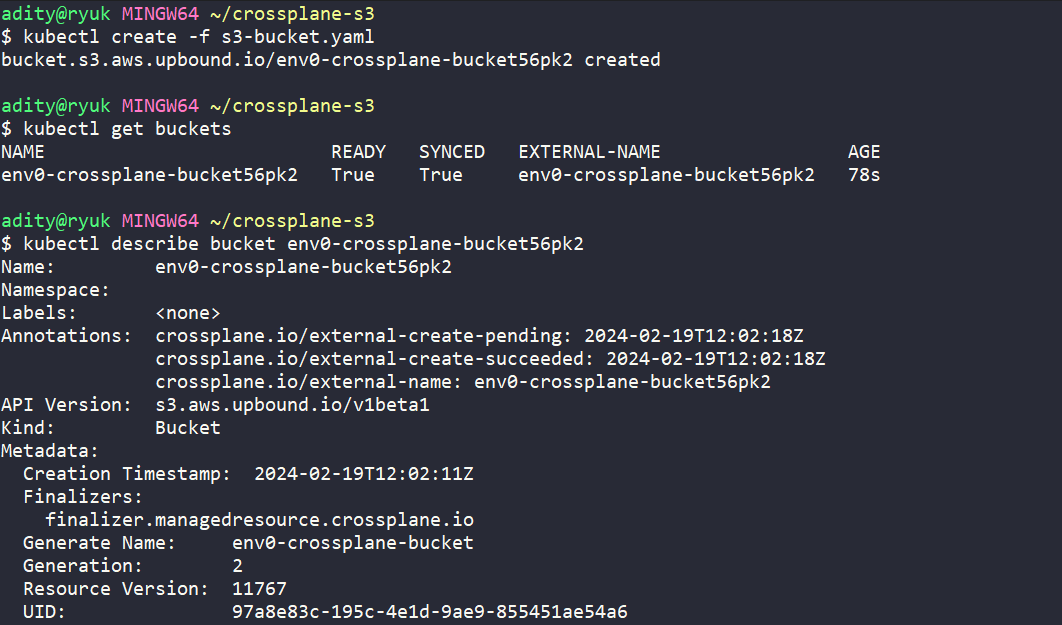
After following all the prerequisites, I have defined a custom resource definition (CRD) to provision an S3 bucket below:
After running [.code]kubectl apply[.code] command on our CRD, we see that our bucket is provisioned:
Licensing
Crossplane is open source and licensed under Apache License 2.0.
Ansible IaC Software for Configuration Management
Ansible is an open-source automation tool, or platform, used for IT tasks such as configuration management, application deployment, intra-service orchestration, and provisioning. Ansible uses a simple syntax written in YAML called playbooks.
Key features:
- Agentless Architecture: No need to install any agents on the nodes to manage them.
- Idempotency: Ensures that an operation will produce the same results if executed multiple times on the same system.
- Simplifies Complex Deployments: Ansible's modular and scalable nature allows for the orchestration of complex multi-tier IT application environments.
Get Started
Taking an example to create an IAM using Ansible, you would typically use the [.code]aws.iam_user[.code] module. Here's a simple example of an Ansible playbook that creates an IAM user env zero-ansible-user:
Run [.code]ansible-playbook [playbook-name][.code], in our case iam-playbook:

Licensing
Ansible is open source and licensed under the GNU General Public License v3.0 (GPLv3).
Related reading: How to use Ansible: complete tutorial for beginners [2026]. Hands-on walkthrough from installation to roles, with a full Jenkins CI/CD demo
Salt IaC Tools for Automation
SaltStack, also known simply as Salt, is an open-source configuration management and remote execution tool. It is designed to automate the management of infrastructure changes, software deployment, and configuration across a wide range of systems in data centers and cloud environments.
Key features:
- Configuration Management: Employs a declarative, YAML-based language for idempotent state files, enabling simple, readable system state definitions with consistent outcomes on multiple applications.
- Remote Execution: Efficiently executes commands across thousands of servers using ZeroMQ or SSH, with flexible targeting based on hostname, metadata, or custom grains.
Get Started
Install Saltstack, and make sure you have the latest AWS CLI installed for provisioning AWS resources. After that, configure your AWS credentials.
Define your S3 bucket config in the provision-s3.sls file in /srv/salt/ folder (make one, if it doesn’t exist) and make sure to uncomment the config below located in /etc/salt/master folder:
Here is the bucket config:
We provisioned the env zero-salt-bucket by running the [.code]salt-call[.code] command:

Licensing
Saltstack, or Salt, is open source and licensed under Apache License 2.0.
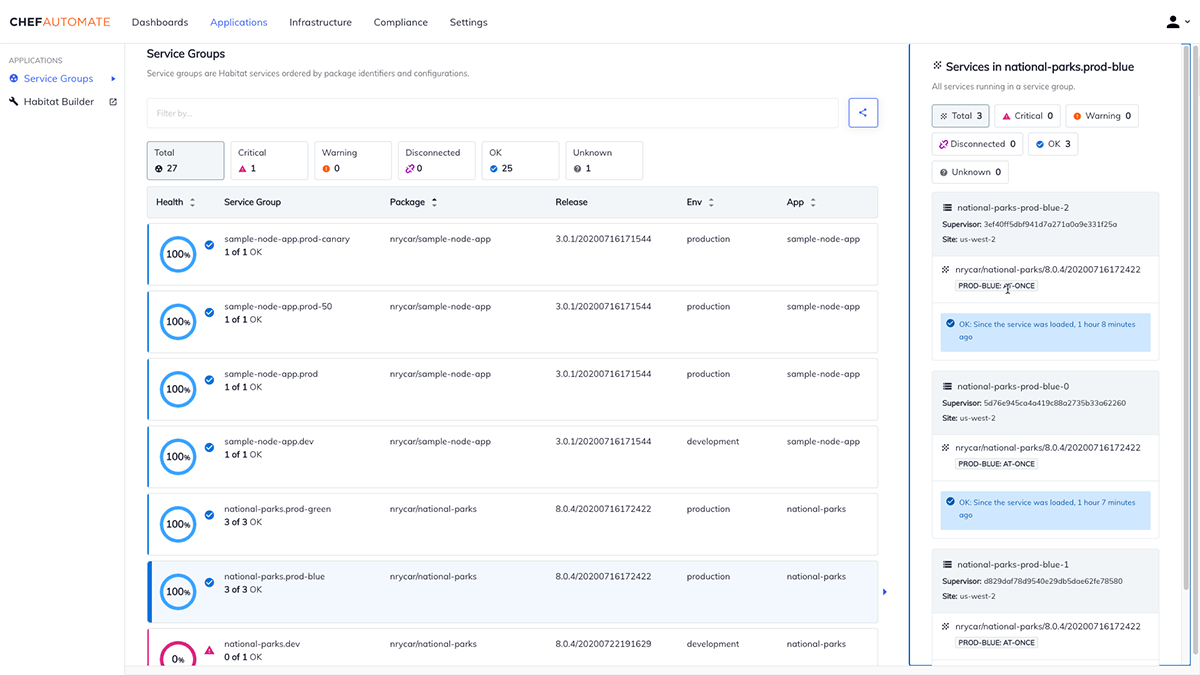
Chef IaC Tool for Infrastructure Automation
Chef is a powerful automation platform that transforms infrastructure into code, automating how infrastructure is configured, deployed, and managed across a network, regardless of size. It's especially popular in cloud and server management contexts, where managing large numbers of servers efficiently and predictably is critical.
Key features:
- Infrastructure as Code (IaC): Chef uses Ruby to write infrastructure configuration, allowing for automation, versioning, and testing of your IaC.
- Automated Configuration: Automates server configuration and maintenance for both small and large-scale environments, ensuring uniform system setup across any number of servers.
Get Started
Install Chef Workstation and generate a cookbook. After that, navigate to the cookbook directory and start writing your recipe.
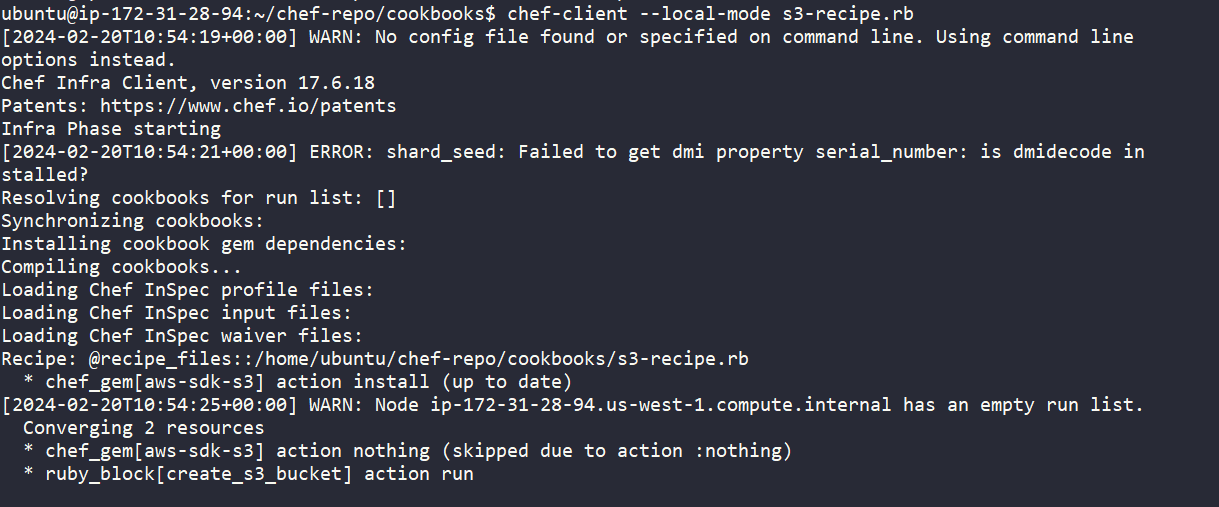
Here is a recipe written in Ruby to provision an S3 bucket using Chef:
We successfully provisioned env zero-chef-bucket, running the [.code]chef-client[.code] command:
This is the Chef automated dashboard in action:
Licensing
Chef is available under Apache License 2.0.
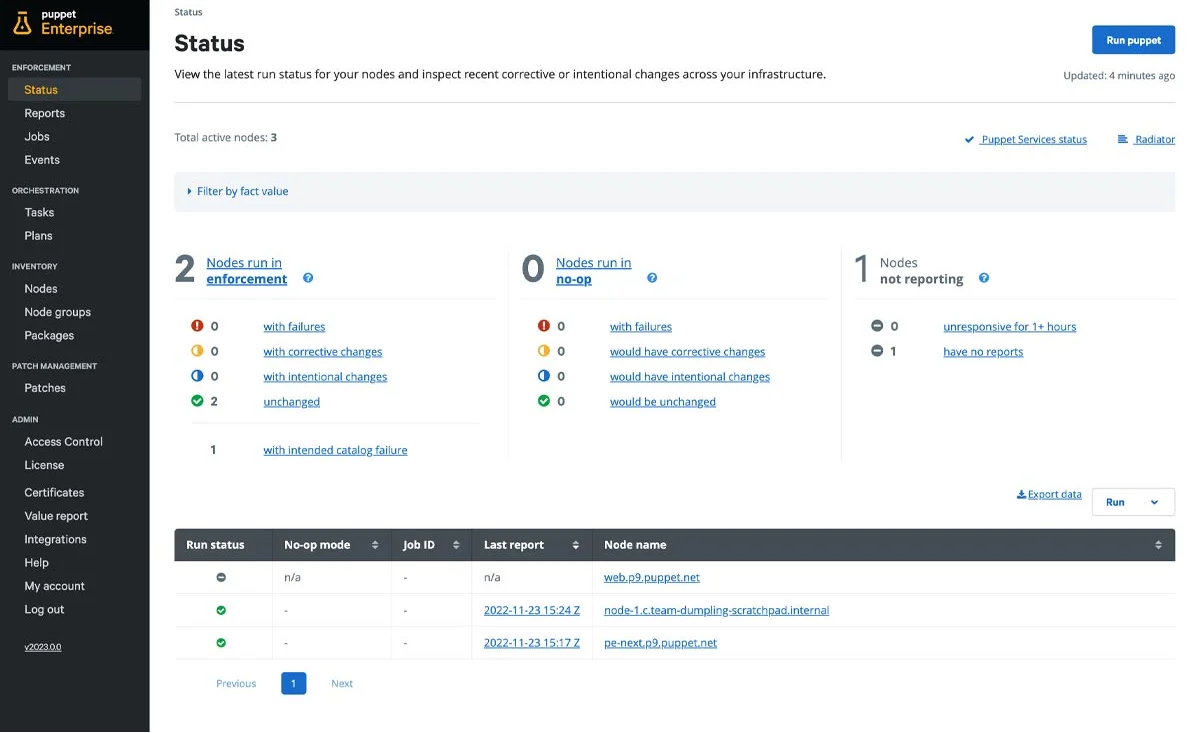
Puppet IaC Tools for Infrastructure Management
Puppet is a configuration management tool designed to automate the management of infrastructure across its lifecycle, from provisioning and managing infrastructure configuration, to orchestration and reporting
Key features:
- Automated Infrastructure Management: Uses a declarative language (Ruby) to automate infrastructure setup and enable centralized control.
- Scalability: Employs a master-agent architecture, enabling it to manage a large number of nodes from a central point.
- Security and Compliance: Automates compliance enforcement and security management by monitoring and adjusting configurations to meet external regulations, internal policies, and applying security updates.
Get Started
You can write a Puppet manifest to provision an S3 bucket like below:
We can visualize our infrastructure using Puppet Dashboard.
Licensing
Puppet is licensed under Apache License 2.0.
Alternative to Terraform: What Usually Triggers a Switch
Teams typically evaluate alternatives to Terraform when licensing, workflow requirements, governance needs, or multi-tool support become a priority.
Frequently Asked Questions/FAQs
Q. What is the difference between Pulumi, Crossplane, OpenTofu, and Terraform?
Terraform, OpenTofu, and Pulumi are Infrastructure as Code (IaC) tools designed to provision and manage cloud infrastructure, using HCL and popular programming languages (Python, JavaScript, .NET, etc.), respectively.
In contrast, Crossplane is built specifically for Kubernetes, allowing you to manage infrastructure through Kubernetes CRDs, encompassing a wide range of major cloud providers and their services.
Q. Which is better: Terraform or Ansible?
Terraform specializes in provisioning immutable cloud infrastructure with a declarative model, tracking all resources. Ansible is best for configuration management and application deployment with a procedural approach, without tracking resources. You should choose based on your focus: infra-provisioning or management.
Q. What is the difference between Chef, Puppet and Ansible?
Puppet and Chef are both configuration management tools that use a master-agent model and a declarative language for system configuration, requiring a setup process for the master and agents.
Ansible, on the other hand, is agentless, using SSH to connect and execute tasks in a procedural style, making it simpler to set up and use for ad-hoc task execution and automation.
Q. What tools are competitors of Terraform?
Different tools help us manage resources and automate infrastructure provisioning, like Terraform. Top competitors include OpenTofu (an open-source version of Terraform), Pulumi, and Crossplane, to name a few. Chef and Puppet, though competitors, are hard to install and configure and have more of a learning curve than Terraform.
![Using Open Policy Agent (OPA) with Terraform: Tutorial and Examples [2026]](https://cdn.prod.website-files.com/63eb9bf7fa9e2724829607c1/69d6a3bde2ffe415812d9782_post_th.png)
