Why Atlantis is popular

Atlantis is an open source, self-hosted tool used for automating Terraform deployments and improving collaboration. It became immensely popular because it helps to automate the deployment of Terraform code. It ties itself to your version control system (VCS) of choice. This allows teams to use their regular VCS workflow with peer reviews centered around pull/merge requests to deploy Terraform code. It was built for one purpose and it does it well. 

Atlantis also allows you to apply changes before merging to the main branch, which is helpful in development (dev) environments.

Challenges of using Atlantis at scale

Atlantis may work well for smaller organizations, but may not be sufficient for teams with more advanced requirements. Here’s why:

  • Single-threaded: With no concurrency, Atlantis can create a bottleneck for large environments.
  • Atlantis is not Highly Available out of the box.
  • Workflow Inflexibility: You need to create a pull/merge request every time to run a Terraform plan.
  • It’s quite chatty in Git: Atlantis dumps its output in comments, which makes it hard to follow and understand what happened.
  • You need to configure your own remote backend to store state files securely.
  • Open source: You need to self-host it, manage it, and rely on the community for ongoing support. 

Check out this page for a more thorough comparison of env0 vs Atlantis. If you’re ready to make your move to env0 or want an idea of how migrating from Atlantis to env0 works, let’s get started.

Terraform code used in this demo

Let’s take a look at what we’ll build for this demo. (tl;dr, you can find the link to the GitLab repo here.)

What we’ll build

For this demo, we will build a simple Ubuntu 22.04 virtual machine (VM) instance in Google Cloud, using GitLab as our VCS.

Folder structure

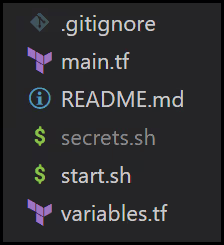
We have a simple folder structure shown in the image below. We’ll take a look at each file separately in the next sections
[.code]start.sh[.code] file

The [.code]start.sh[.code] file is a shell script that runs the Atlantis server. I created a [.code]secrets.sh[.code] file that is the same as the [.code]start.sh[.code] file with my parameters populated. I’m not checking the [.code]secrets.sh[.code] file into Git because it contains some secrets. You can create your own by copying the [.code]start.sh[.code] file and populating it with your secrets. Then run [.code]./secrets.sh[.code] to start the Atlantis server.

The start.sh file is not necessary when demoing the env0 workflows. Below is the content of the start.sh file:

#!/usr/bin/bash
URL="https://{YOUR_HOSTNAME}.ngrok.io"
SECRET="{YOUR_RANDOM_STRING}"
TOKEN="{YOUR_TOKEN}"
USERNAME="{the username of your GitHub, GitLab or Bitbucket user}"
REPO_ALLOWLIST="$YOUR_GIT_HOST/$YOUR_USERNAME/$YOUR_REPO" #GitLab example: REPO_ALLOWLIST="gitlab.com/public-projects3/infrastructure-software-public/env0-atlantis"

export GOOGLE_APPLICATION_CREDENTIALS="path-to-json-file"

atlantis server \
--atlantis-url="$URL" \
--gitlab-user="$USERNAME" \
--gitlab-token="$TOKEN" \
--gitlab-webhook-secret="$SECRET" \
--repo-allowlist="$REPO_ALLOWLIST"

[.code]main.tf[.code] file

The [.code]main.tf[.code] file is the main Terraform configuration file. Here is where we define the VM instance that we would like to provision in Google Cloud Platform (GCP).

The configuration is straightforward. One thing to note is that Atlantis requires a remote storage backend. When demoing Atlantis, we uncomment the backend gcs block to use Google Cloud Storage (GCS) as the remote backend to store the Terraform state file. When working with env0, we comment that block out since the state file gets stored securely for us in env0’s own environment. Below is the content of the [.code]main.tf[.code] file:

terraform {
  # Comment this backend block when using env0 and uncomment when using Atlantis
  # backend "gcs" {
  #   bucket = "tekanaid-tf-state-prod"
  #   prefix = "terraform/state"
  # }
  required_providers {
    google = {
      source  = "hashicorp/google"
      version = "4.40.0"
    }
  }
}

provider "google" {
  project     = var.project
  region      = var.region
}

resource "google_compute_instance" "default" {
  name         = var.instance_name
  machine_type = "e2-micro"

  zone         = var.zone
  tags = ["dev", "engineering"]

  boot_disk {
    initialize_params {
      image = "projects/ubuntu-os-cloud/global/images/ubuntu-2204-jammy-v20221014"
      labels = {
        env = "dev"
      }
    }
  }

  network_interface {
    network = "default"
    access_config {
      // Ephemeral public IP
    }
  }
}

[.code]variables.tf[.code] file

The variables used in the [.code]main.tf[.code] file are declared in this [.code]variables.tf[.code] file. The default values for these variables are for the dev environment. In the env0 workflow, we define these variables to match the prod environment.

The variables are:

  1. project: The GCP project ID (you will need to change this to match your own project ID).
  2. region: The GCP cloud region.
  3. zone: The zone within the cloud region used.
  4. instance_name: The name we give to our VM instance.

Below is the content of the [.code]variables.tf[.code] file:

variable "project" {
  description = "The project ID"
 type = string
 default = "terraformprojects-365816"
}

variable "region" {
  description = "Cloud Region"
 type = string
 default = "us-central1"
}

variable "zone" {
  description = "Zone in the Cloud Region"
 type = string
 default = "us-central1-a"
}

variable "instance_name" {
  description = "Name of the VM instance"
 type = string
 default = "atlantis-vm-dev"
}

Atlantis workflow

Now that we understand what the Terraform code is doing, let’s take a look at the Atlantis workflow:

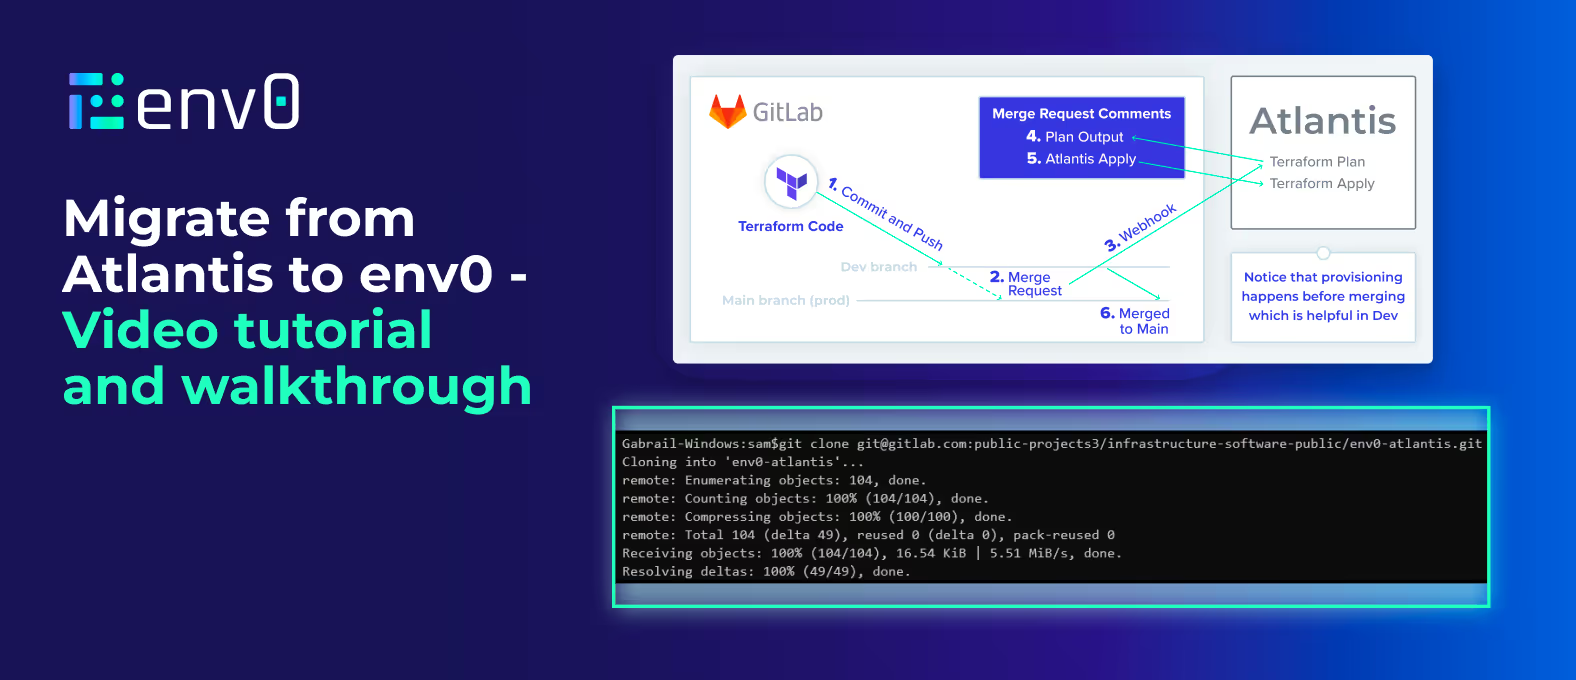
Atlantis relies on merge requests to trigger a webhook from the VCS to Atlantis. Below is the workflow as shown in the image above:

  1. A developer commits and pushes their code to a dev branch. This could also be a feature branch. The developer has access to push to this branch.
  2. The developer then creates a merge request.
  3. This triggers a Terraform Plan in Atlantis via a webhook from the VCS.
  4. The Terraform Plan output shows up in the comments of the merge request.
  5. When an approver is happy with the plan as part of the peer review, typing `Atlantis apply` in a new comment will run `terraform apply` in Atlantis. This is done via a webhook.

Notice that provisioning happens before merging which is helpful in a dev environment. For more step-by-step instructions, refer to the video demo above.

env0 dev workflow (similar to Atlantis)

Now let’s see how to use env0 for a similar development workflow similar to what we saw with Atlantis.
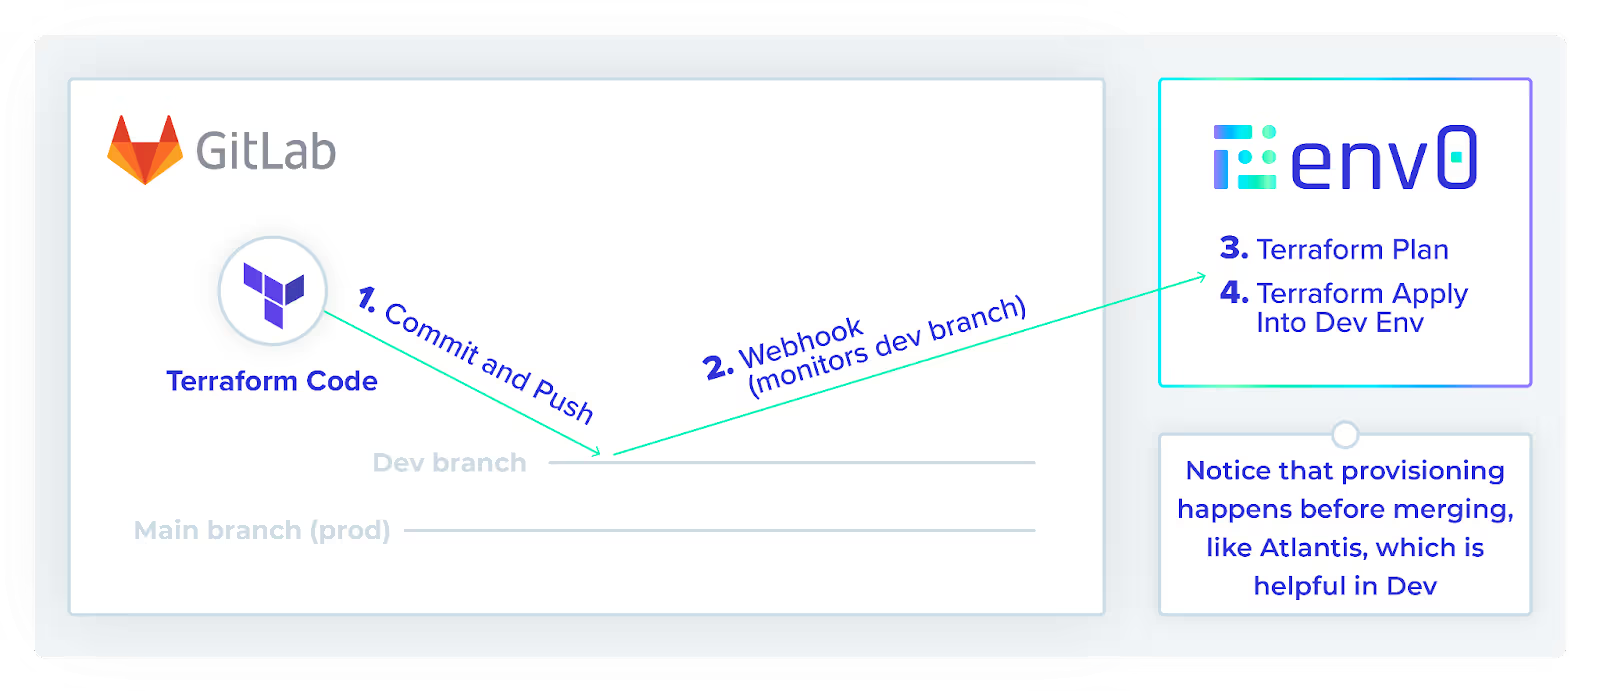
Since env0 is very flexible with workflows, it can mimic the Atlantis workflow that we just saw. Below is the workflow as shown in the image above:

  1. A developer commits and pushes their code to the dev branch.
  2. A webhook fires from the VCS to env0 (env0 is monitoring the dev branch).
  3. env0 creates a Terraform Plan.
  4. env0 waits for approval of the plan to run `terraform apply`.

Notice that provisioning happens before merging, like Atlantis, which is helpful in dev.

env0 prod workflow

The team may run some additional test pipelines in the dev environment. Once tests are complete, the platform engineering team can merge the dev branch into the main branch to deploy into a production environment.
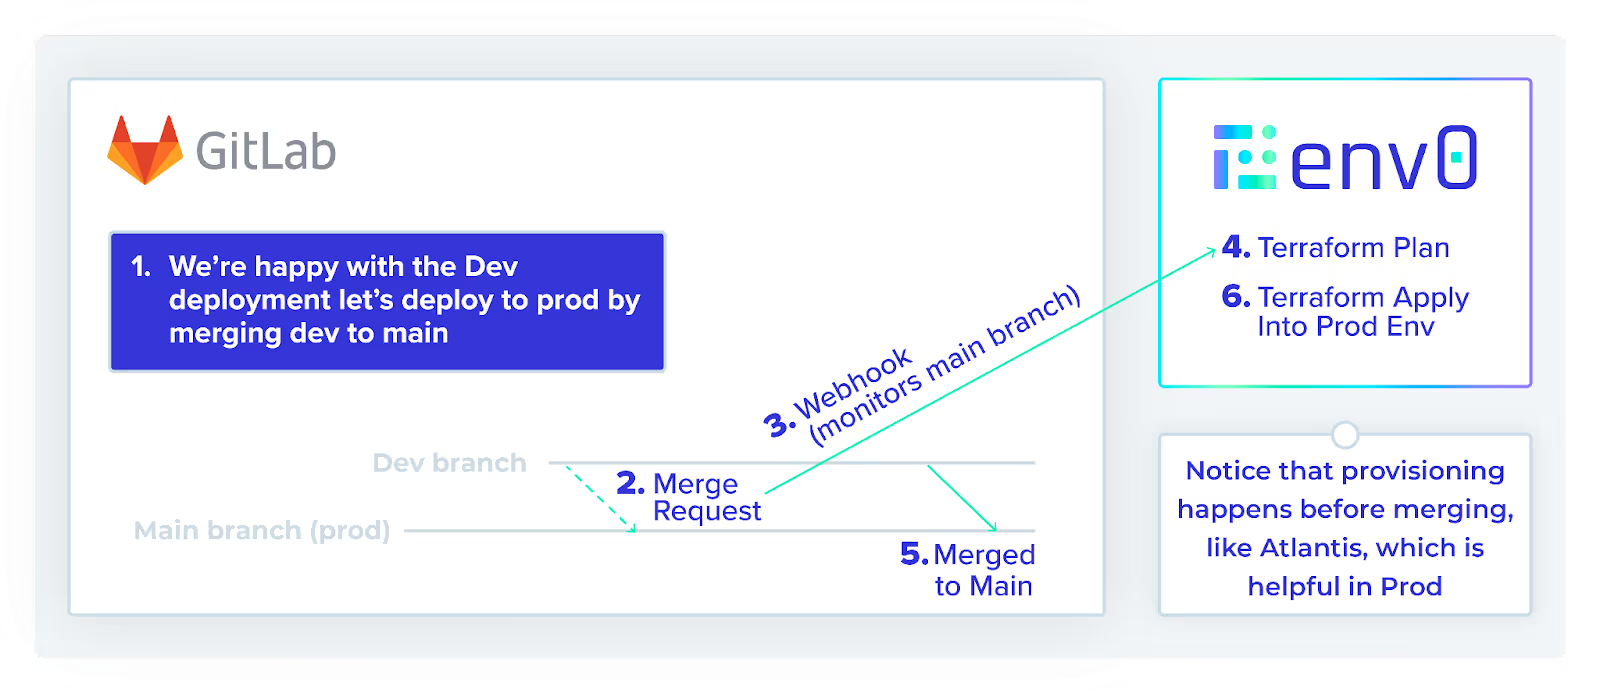
Below are the steps to do so as per the image above:

  1. The platform engineering team is ready to merge the dev branch with the main branch.
  2. They create a merge request.
  3. env0 is monitoring the main branch and a webhook fires from the VCS to env0.
  4. env0 creates a Terraform Plan.
  5. The platform engineering team double checks the plan and then accepts the merge request.
  6. env0 runs `terraform apply` and our resources are deployed into production.

Notice that provisioning happens after merging, which is what we need in production.

Migrating from Atlantis to env0

If you are currently working with Atlantis, the video walks through the steps to migrate to env0. You can also follow the instructions written out below.

  1. Prepare Terraform locally

Download and install Terraform locally on your computer. If you don’t have the Terraform binary running locally on your computer, you can download it from this link.

  1. Clone your VCS repo

Clone your repo from the VCS to your computer. Run [.code]git clone <your_repo_url>[.code] on your local computer.

You may also want to check out a specific branch. In our case, we will check out the dev branch:

[.code]git checkout dev[.code]

  1. Initialize Terraform

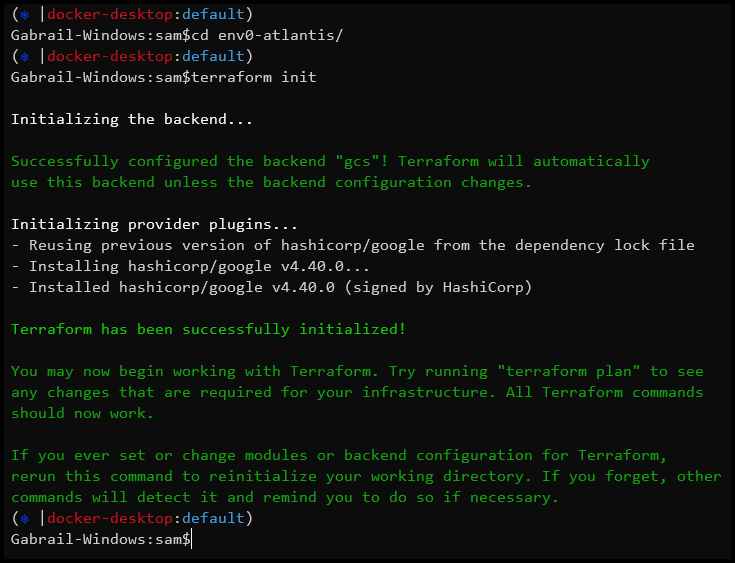
Change your directory to the folder you just cloned. Now, run terraform init to initialize with the current state configuration.
  1. Create an env0 project

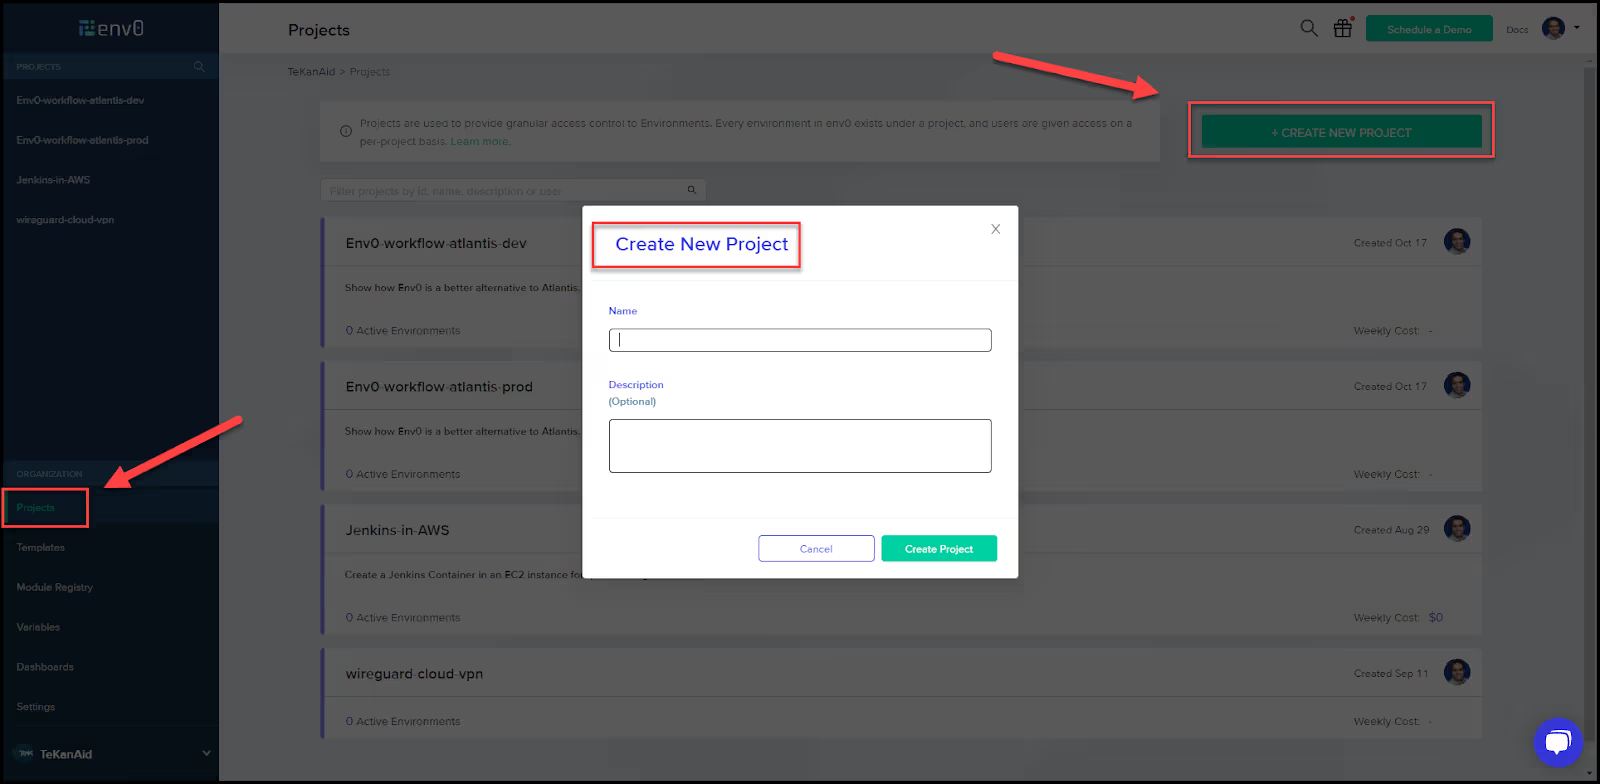
Create a project in env0 and give it a name and a description.
  1. Update the backend configuration (optional) 

You may choose to keep your current backend. However, env0 can store the state files securely for you. If you choose to make use of env0's remote backend, continue below. 

Change the backend configuration in your Terraform block from the one you’re using (mine is GCS) to a remote backend pointing to an existing env0 project. Give it a unique workspace name. 

terraform {
  backend "remote" {
    hostname = "backend.api.env0.com"
    organization = "."

    workspaces {
      name = ""
    }
  }
}
terraform {
  backend "remote" {
    hostname = "backend.api.env0.com"
    organization = "<YOUR_ORGANIZATION_ID>.<YOUR_PROJECT_ID>"

    workspaces {
      name = "<YOUR_WORKSPACE_NAME>"
    }
  }
}

You can find your Organization ID from the URL. You need to be an admin, then go to organization settings and you’ll find it in the URL as per the screenshot below.
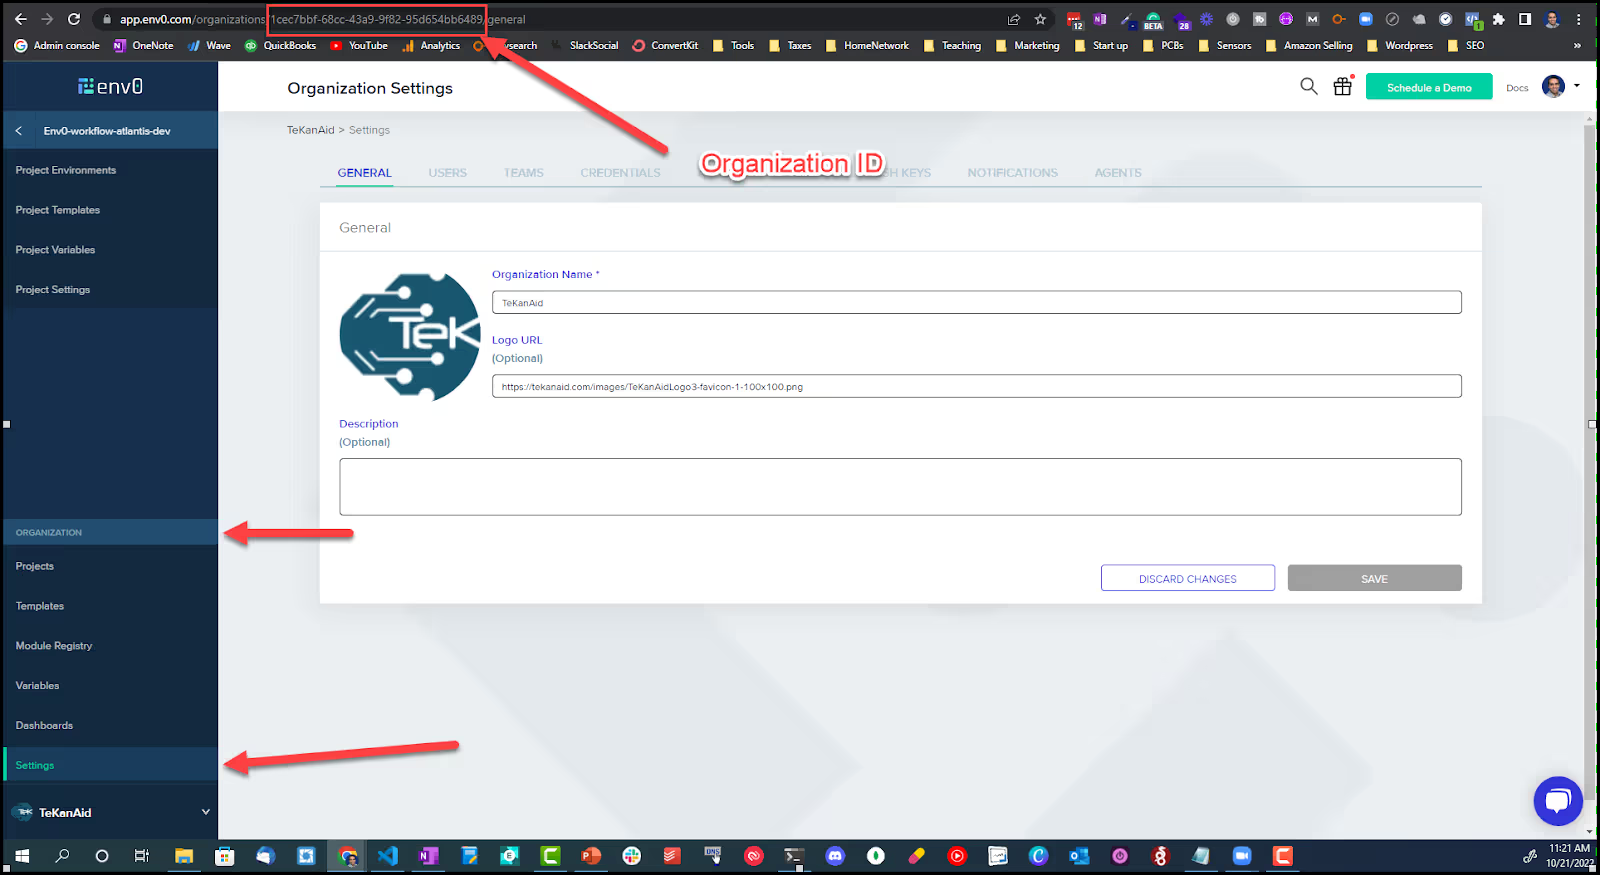
You can find your Project ID also from the URL. Go to the project settings and you’ll find it in the URL as per the screenshot below.

  1. Commit and push updates

Commit and push the updated backend configuration change into your repo.

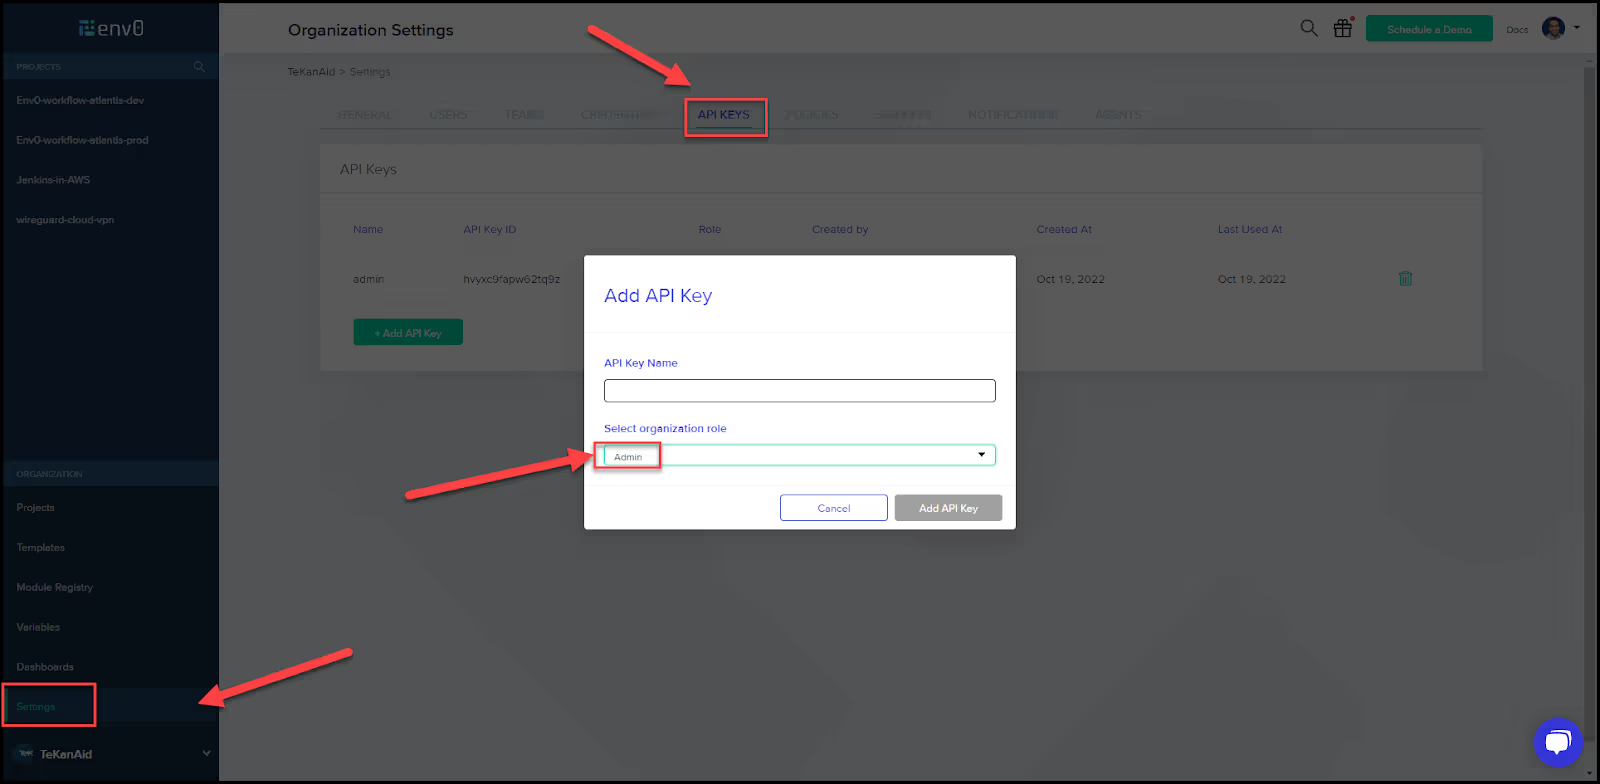
  1. Generate an API key

Generate an admin API key that will create a token used to log into env0 in the next step.
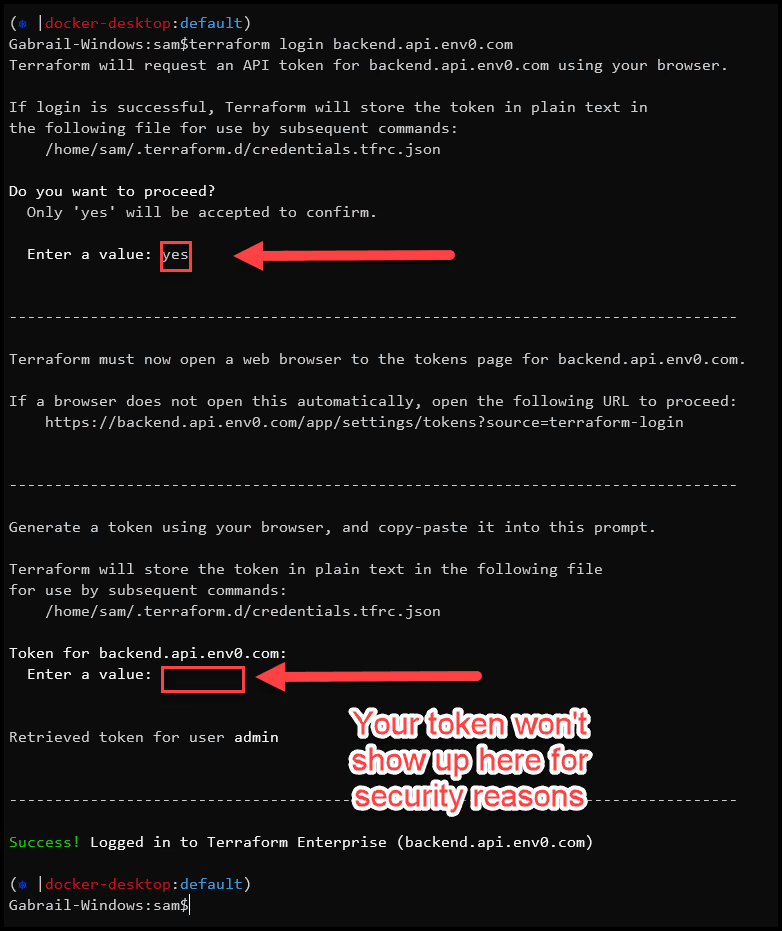
  1. Log into env0 from the CLI

From your CLI on your computer, log into env0 with the command terraform login backend.api.env0.com and accept the prompt, then paste the above token you got. Please note that when you paste your token, you won’t get an indication that it was pasted, for security purposes. Don’t paste it twice, just trust that the system took it and hit enter.
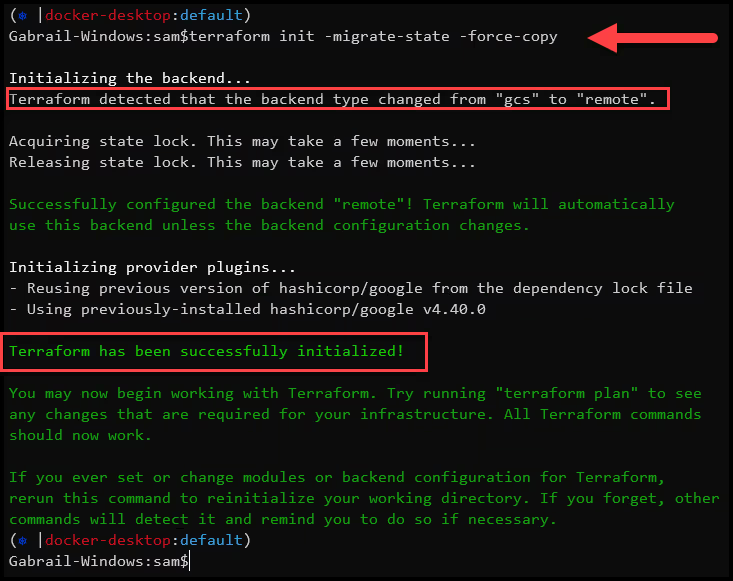
  1. Migrate the state

Run the command: [.code]terraform init -migrate-state -force-copy[.code]
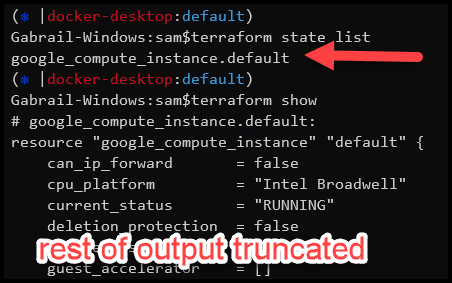
  1. Verify the state migration

From your computer, run terraform state list and  terraform show to verify that you see the resources migrated over successfully.
  1. Run a Terraform plan for additional verification

Furthermore, running terraform plan confirms that no changes will happen to the infrastructure.

  1. Creation of an environment and an env0 template

env0 automatically creates an environment and a template by the admin token we used.

  1. Populate the template

Go to the auto-generated template and choose the Terraform version to work with under settings.

Populate the fields to point to your VCS.

You can also load variables from the code.

Then click Save to save your template.

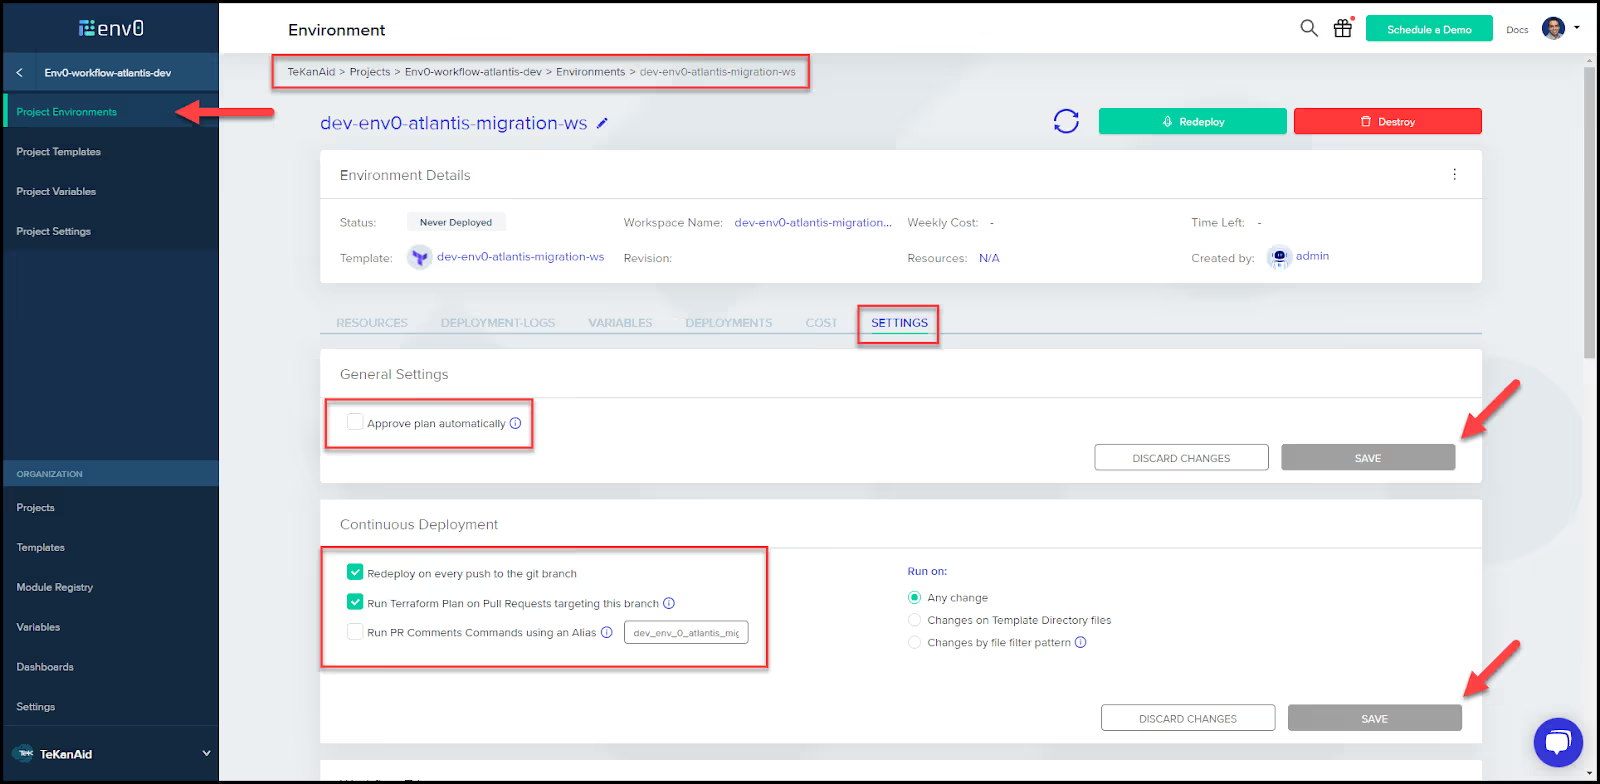
  1. Populate the environment settings

Go back to the environment that was automatically created and click on it. In the environment settings, uncheck the Approve plan automatically setting, then click Save.

Also, check the following two settings in the Continuous Deployment section:

Redeploy on every push to the git branch

Run Terraform Plan on Pull Requests targeting this branch

Then click Save.

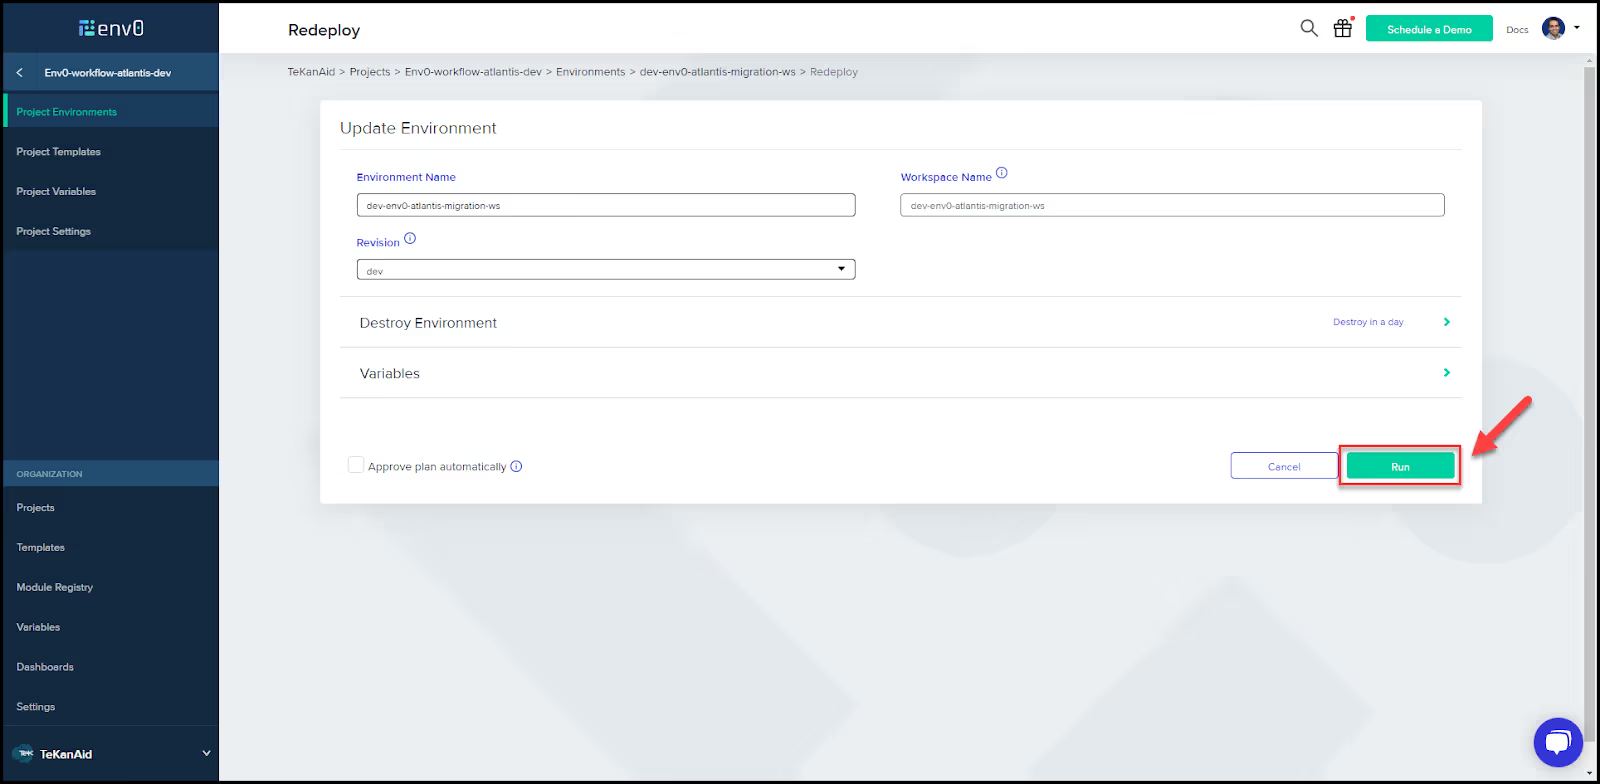
  1. Redeploy the environment

From the top right, click the button to redeploy this environment.

Double check that everything looks good, then click Run.

This should succeed and the Terraform Plan section should show no changes.

  1. Remove the backend configuration

You can now safely remove the backend configuration in your Terraform file and then commit and push the update.

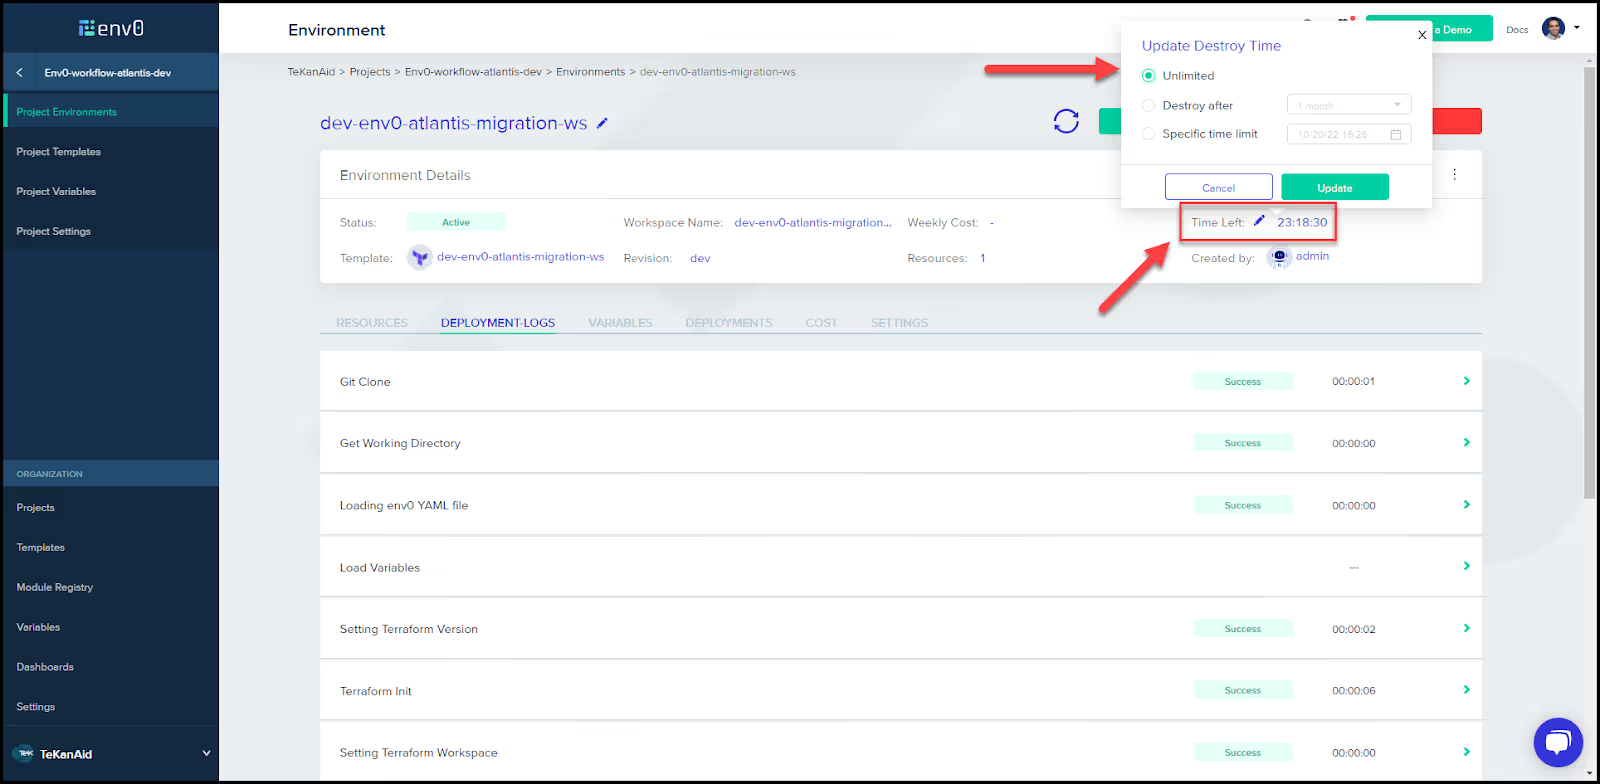
This will trigger the webhook from your VCS to run env0. The deployment will result in no changes, the same as what we saw in the previous step. One thing to note is that the environment that was automatically created has a TTL of 24 hours. You may want to remove that TTL by clicking on the Time Left pencil icon:

Congratulations, you have successfully migrated from Atlantis to env0! You’re now ready to use the full feature set that env0 has to offer.

Wrapping up

If you really like the ability to plan and apply from pull/merge request comments in Atlantis, env0 can do that too. As you’ve seen throughout this blog post, env0 is very flexible and can easily work with your current workflow. To learn more about the advantages of migrating from Atlantis to env0, check out our Atlantis Alternative page.

About the author

Sam Gabrail is the President of TeKanAid Solutions Inc., an IT training company focused on DevOps. Sam enjoys creating content to help practitioners upskill in DevOps principles and cloud native technologies. To learn more, visit the TeKanAid website and blog.

Sam also offers a beginner’s course in Terraform.In this video we'll walk you through how to migrate from Atlantis to env0, but before we dive in, some background on Atlantis.

Why Atlantis is popular

Atlantis is an open source, self-hosted tool used for automating Terraform deployments and improving collaboration. It became immensely popular because it helps to automate the deployment of Terraform code. It ties itself to your version control system (VCS) of choice. This allows teams to use their regular VCS workflow with peer reviews centered around pull/merge requests to deploy Terraform code. It was built for one purpose and it does it well. 

Atlantis also allows you to apply changes before merging to the main branch, which is helpful in development (dev) environments.

Challenges of using Atlantis at scale

Atlantis may work well for smaller organizations, but may not be sufficient for teams with more advanced requirements. Here’s why:

  • Single-threaded: With no concurrency, Atlantis can create a bottleneck for large environments.
  • Atlantis is not Highly Available out of the box.
  • Workflow Inflexibility: You need to create a pull/merge request every time to run a Terraform plan.
  • It’s quite chatty in Git: Atlantis dumps its output in comments, which makes it hard to follow and understand what happened.
  • You need to configure your own remote backend to store state files securely.
  • Open source: You need to self-host it, manage it, and rely on the community for ongoing support. 

Check out this page for a more thorough comparison of env0 vs Atlantis. If you’re ready to make your move to env0 or want an idea of how migrating from Atlantis to env0 works, let’s get started.

Terraform code used in this demo

Let’s take a look at what we’ll build for this demo. (tl;dr, you can find the link to the GitLab repo here.)

What we’ll build

For this demo, we will build a simple Ubuntu 22.04 virtual machine (VM) instance in Google Cloud, using GitLab as our VCS.

Folder structure

We have a simple folder structure shown in the image below. We’ll take a look at each file separately in the next sections

[.code]start.sh[.code] file

The [.code]start.sh[.code] file is a shell script that runs the Atlantis server. I created a [.code]secrets.sh[.code] file that is the same as the [.code]start.sh[.code] file with my parameters populated. I’m not checking the [.code]secrets.sh[.code] file into Git because it contains some secrets. You can create your own by copying the [.code]start.sh[.code] file and populating it with your secrets. Then run [.code]./secrets.sh[.code] to start the Atlantis server.

The start.sh file is not necessary when demoing the env0 workflows. Below is the content of the start.sh file:

#!/usr/bin/bash
URL="https://{YOUR_HOSTNAME}.ngrok.io"
SECRET="{YOUR_RANDOM_STRING}"
TOKEN="{YOUR_TOKEN}"
USERNAME="{the username of your GitHub, GitLab or Bitbucket user}"
REPO_ALLOWLIST="$YOUR_GIT_HOST/$YOUR_USERNAME/$YOUR_REPO" #GitLab example: REPO_ALLOWLIST="gitlab.com/public-projects3/infrastructure-software-public/env0-atlantis"

export GOOGLE_APPLICATION_CREDENTIALS="path-to-json-file"

atlantis server \
--atlantis-url="$URL" \
--gitlab-user="$USERNAME" \
--gitlab-token="$TOKEN" \
--gitlab-webhook-secret="$SECRET" \
--repo-allowlist="$REPO_ALLOWLIST"

[.code]main.tf[.code] file

The [.code]main.tf[.code] file is the main Terraform configuration file. Here is where we define the VM instance that we would like to provision in Google Cloud Platform (GCP).

The configuration is straightforward. One thing to note is that Atlantis requires a remote storage backend. When demoing Atlantis, we uncomment the backend gcs block to use Google Cloud Storage (GCS) as the remote backend to store the Terraform state file. When working with env0, we comment that block out since the state file gets stored securely for us in env0’s own environment. Below is the content of the [.code]main.tf[.code] file:

terraform {
  # Comment this backend block when using env0 and uncomment when using Atlantis
  # backend "gcs" {
  #   bucket = "tekanaid-tf-state-prod"
  #   prefix = "terraform/state"
  # }
  required_providers {
    google = {
      source  = "hashicorp/google"
      version = "4.40.0"
    }
  }
}

provider "google" {
  project     = var.project
  region      = var.region
}

resource "google_compute_instance" "default" {
  name         = var.instance_name
  machine_type = "e2-micro"

  zone         = var.zone
  tags = ["dev", "engineering"]

  boot_disk {
    initialize_params {
      image = "projects/ubuntu-os-cloud/global/images/ubuntu-2204-jammy-v20221014"
      labels = {
        env = "dev"
      }
    }
  }

  network_interface {
    network = "default"
    access_config {
      // Ephemeral public IP
    }
  }
}

[.code]variables.tf[.code] file

The variables used in the [.code]main.tf[.code] file are declared in this [.code]variables.tf[.code] file. The default values for these variables are for the dev environment. In the env0 workflow, we define these variables to match the prod environment.

The variables are:

  1. project: The GCP project ID (you will need to change this to match your own project ID).
  2. region: The GCP cloud region.
  3. zone: The zone within the cloud region used.
  4. instance_name: The name we give to our VM instance.

Below is the content of the [.code]variables.tf[.code] file:

variable "project" {
  description = "The project ID"
 type = string
 default = "terraformprojects-365816"
}

variable "region" {
  description = "Cloud Region"
 type = string
 default = "us-central1"
}

variable "zone" {
  description = "Zone in the Cloud Region"
 type = string
 default = "us-central1-a"
}

variable "instance_name" {
  description = "Name of the VM instance"
 type = string
 default = "atlantis-vm-dev"
}

Atlantis workflow

Now that we understand what the Terraform code is doing, let’s take a look at the Atlantis workflow:

Atlantis relies on merge requests to trigger a webhook from the VCS to Atlantis. Below is the workflow as shown in the image above:

  1. A developer commits and pushes their code to a dev branch. This could also be a feature branch. The developer has access to push to this branch.
  2. The developer then creates a merge request.
  3. This triggers a Terraform Plan in Atlantis via a webhook from the VCS.
  4. The Terraform Plan output shows up in the comments of the merge request.
  5. When an approver is happy with the plan as part of the peer review, typing `Atlantis apply` in a new comment will run `terraform apply` in Atlantis. This is done via a webhook.

Notice that provisioning happens before merging which is helpful in a dev environment. For more step-by-step instructions, refer to the video demo above.

env0 dev workflow (similar to Atlantis)

Now let’s see how to use env0 for a similar development workflow similar to what we saw with Atlantis.

Since env0 is very flexible with workflows, it can mimic the Atlantis workflow that we just saw. Below is the workflow as shown in the image above:

  1. A developer commits and pushes their code to the dev branch.
  2. A webhook fires from the VCS to env0 (env0 is monitoring the dev branch).
  3. env0 creates a Terraform Plan.
  4. env0 waits for approval of the plan to run `terraform apply`.

Notice that provisioning happens before merging, like Atlantis, which is helpful in dev.

env0 prod workflow

The team may run some additional test pipelines in the dev environment. Once tests are complete, the platform engineering team can merge the dev branch into the main branch to deploy into a production environment.

Below are the steps to do so as per the image above:

  1. The platform engineering team is ready to merge the dev branch with the main branch.
  2. They create a merge request.
  3. env0 is monitoring the main branch and a webhook fires from the VCS to env0.
  4. env0 creates a Terraform Plan.
  5. The platform engineering team double checks the plan and then accepts the merge request.
  6. env0 runs `terraform apply` and our resources are deployed into production.

Notice that provisioning happens after merging, which is what we need in production.

Migrating from Atlantis to env0

If you are currently working with Atlantis, the video walks through the steps to migrate to env0. You can also follow the instructions written out below.

  1. Prepare Terraform locally

Download and install Terraform locally on your computer. If you don’t have the Terraform binary running locally on your computer, you can download it from this link.

  1. Clone your VCS repo

Clone your repo from the VCS to your computer. Run [.code]git clone <your_repo_url>[.code] on your local computer.

You may also want to check out a specific branch. In our case, we will check out the dev branch:

[.code]git checkout dev[.code]

  1. Initialize Terraform

Change your directory to the folder you just cloned. Now, run terraform init to initialize with the current state configuration.

  1. Create an env0 project

Create a project in env0 and give it a name and a description.

  1. Update the backend configuration (optional) 

You may choose to keep your current backend. However, env0 can store the state files securely for you. If you choose to make use of env0's remote backend, continue below. 

Change the backend configuration in your Terraform block from the one you’re using (mine is GCS) to a remote backend pointing to an existing env0 project. Give it a unique workspace name. 

terraform {
  backend "remote" {
    hostname = "backend.api.env0.com"
    organization = "."

    workspaces {
      name = ""
    }
  }
}
terraform {
  backend "remote" {
    hostname = "backend.api.env0.com"
    organization = "<YOUR_ORGANIZATION_ID>.<YOUR_PROJECT_ID>"

    workspaces {
      name = "<YOUR_WORKSPACE_NAME>"
    }
  }
}

You can find your Organization ID from the URL. You need to be an admin, then go to organization settings and you’ll find it in the URL as per the screenshot below.

You can find your Project ID also from the URL. Go to the project settings and you’ll find it in the URL as per the screenshot below.

  1. Commit and push updates

Commit and push the updated backend configuration change into your repo.

  1. Generate an API key

Generate an admin API key that will create a token used to log into env0 in the next step.

  1. Log into env0 from the CLI

From your CLI on your computer, log into env0 with the command terraform login backend.api.env0.com and accept the prompt, then paste the above token you got. Please note that when you paste your token, you won’t get an indication that it was pasted, for security purposes. Don’t paste it twice, just trust that the system took it and hit enter.

  1. Migrate the state

Run the command: [.code]terraform init -migrate-state -force-copy[.code]

  1. Verify the state migration

From your computer, run terraform state list and  terraform show to verify that you see the resources migrated over successfully.

  1. Run a Terraform plan for additional verification

Furthermore, running terraform plan confirms that no changes will happen to the infrastructure.

  1. Creation of an environment and an env0 template

env0 automatically creates an environment and a template by the admin token we used.
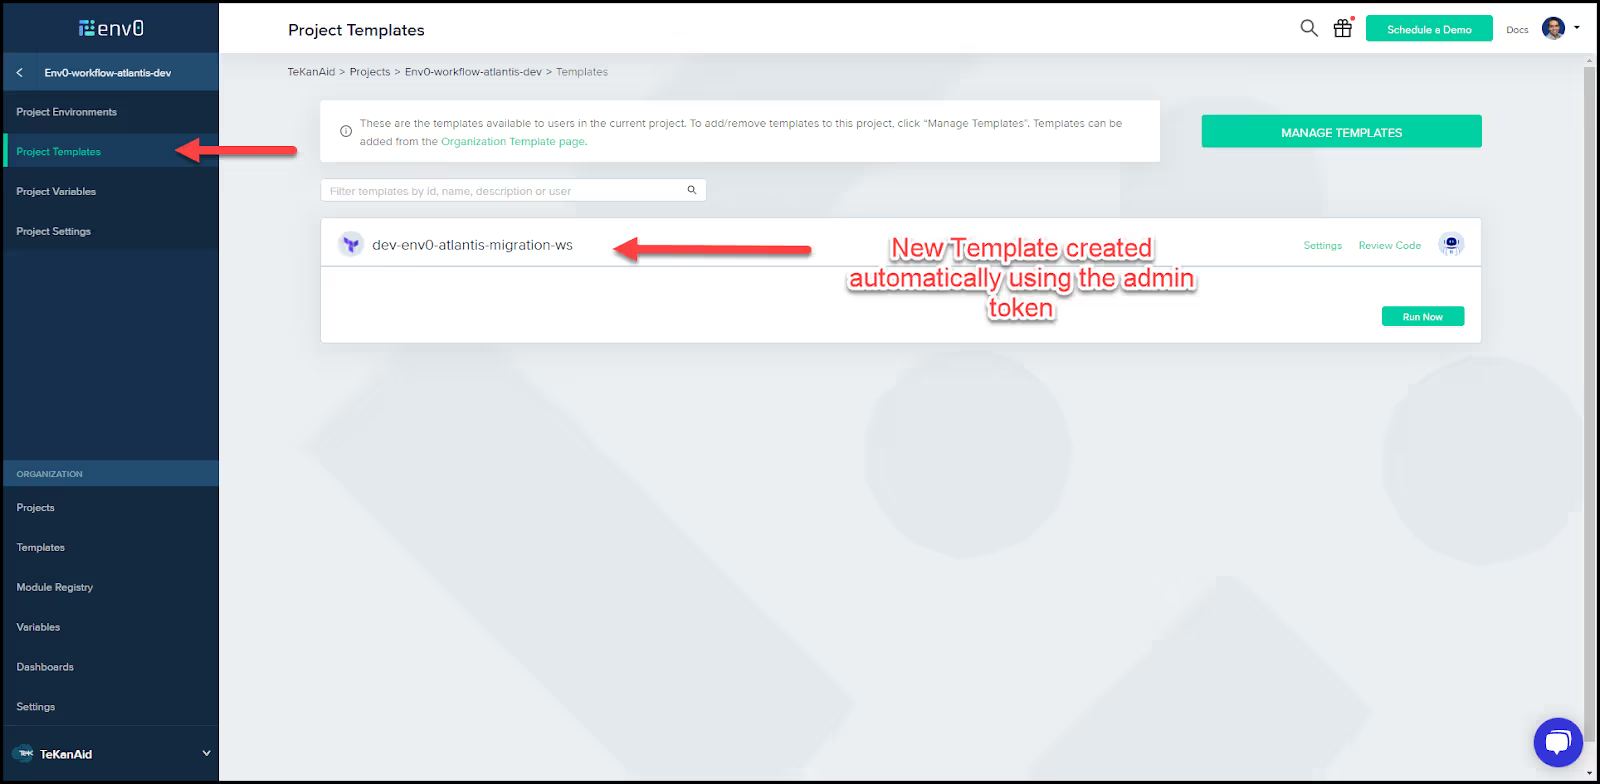
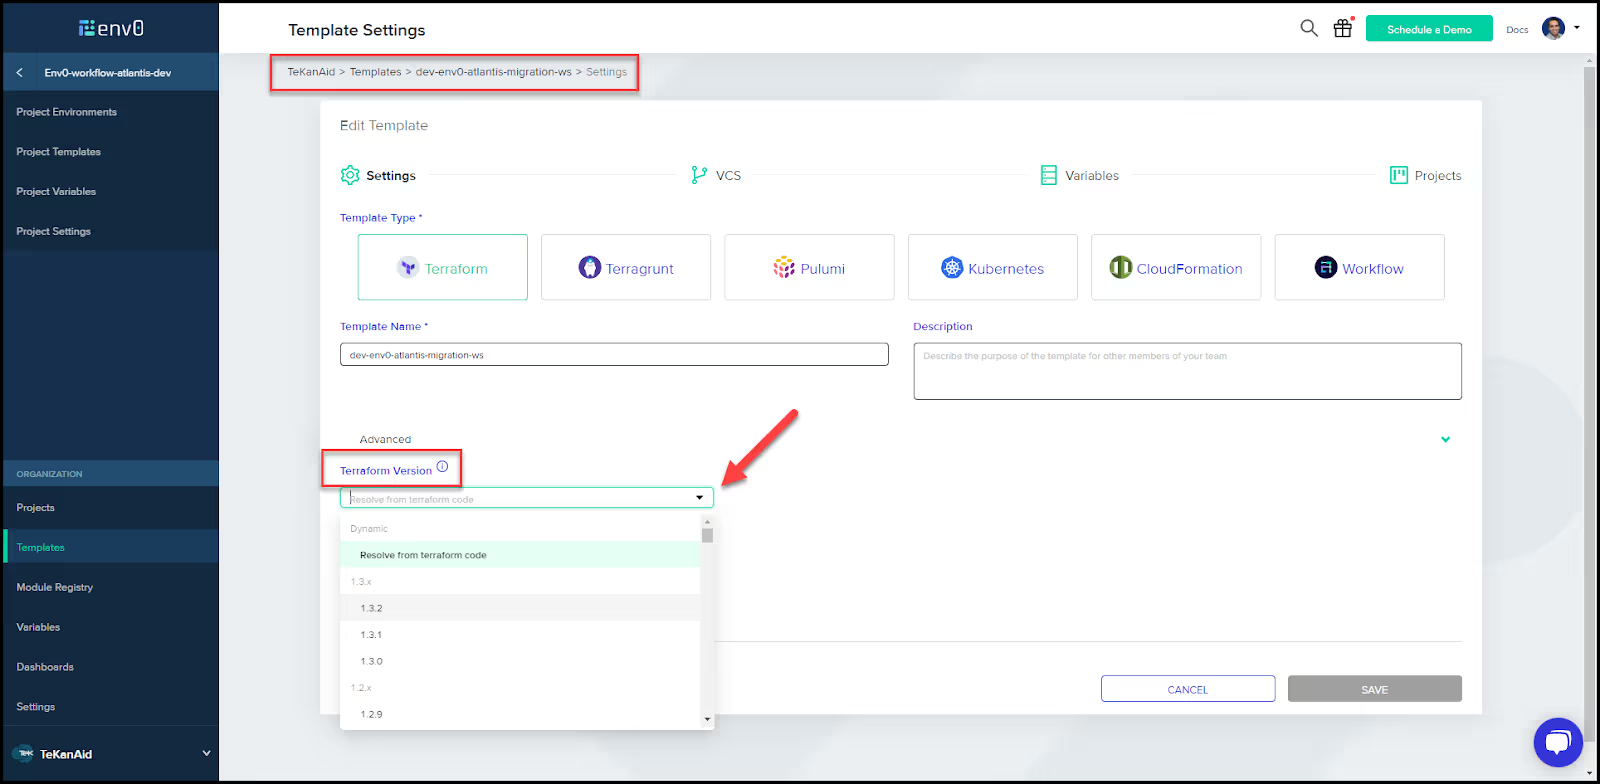
  1. Populate the template

Go to the auto-generated template and choose the Terraform version to work with under settings.
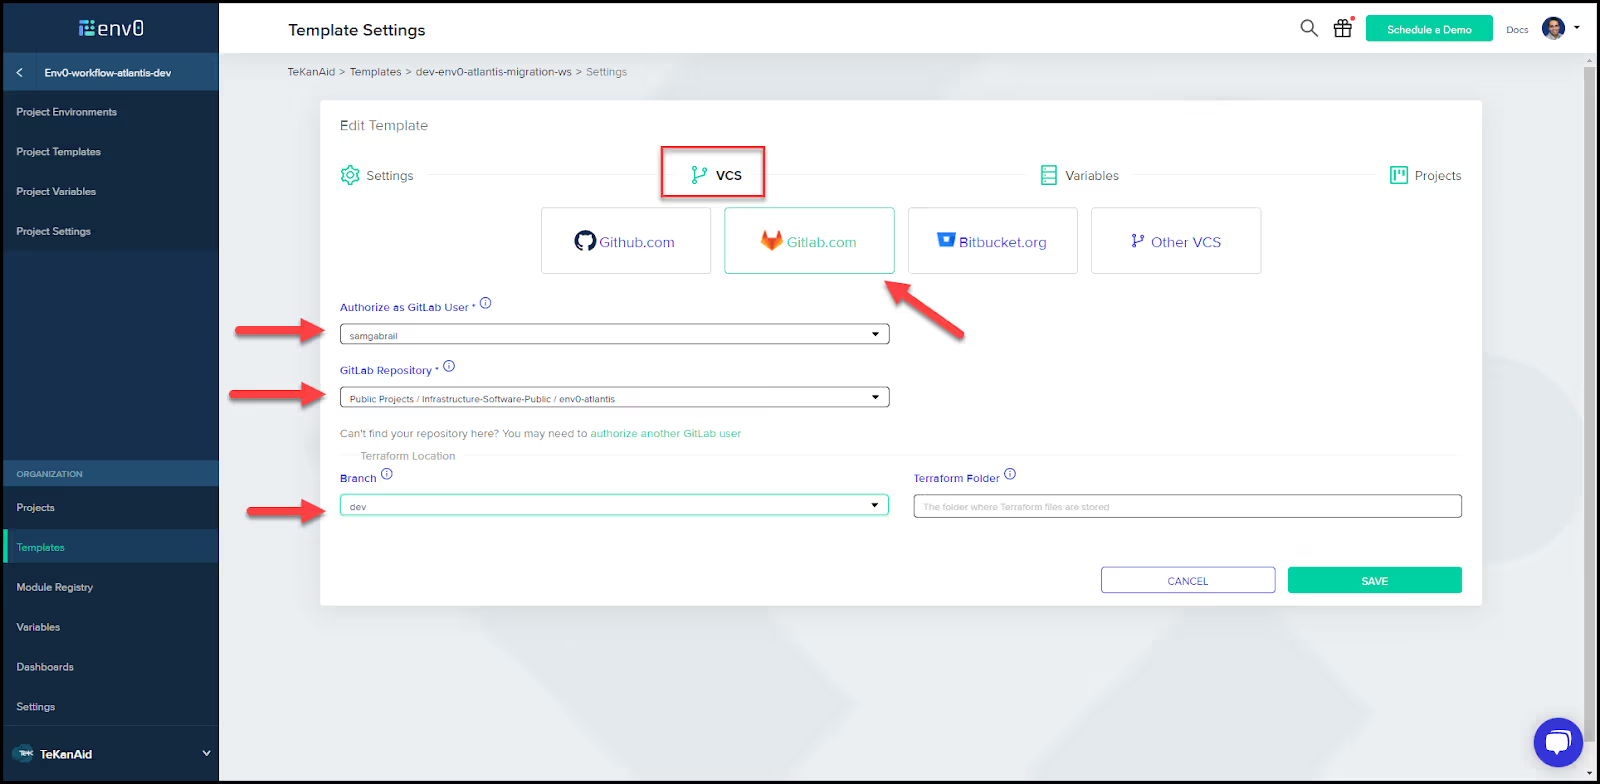
Populate the fields to point to your VCS.
You can also load variables from the code.
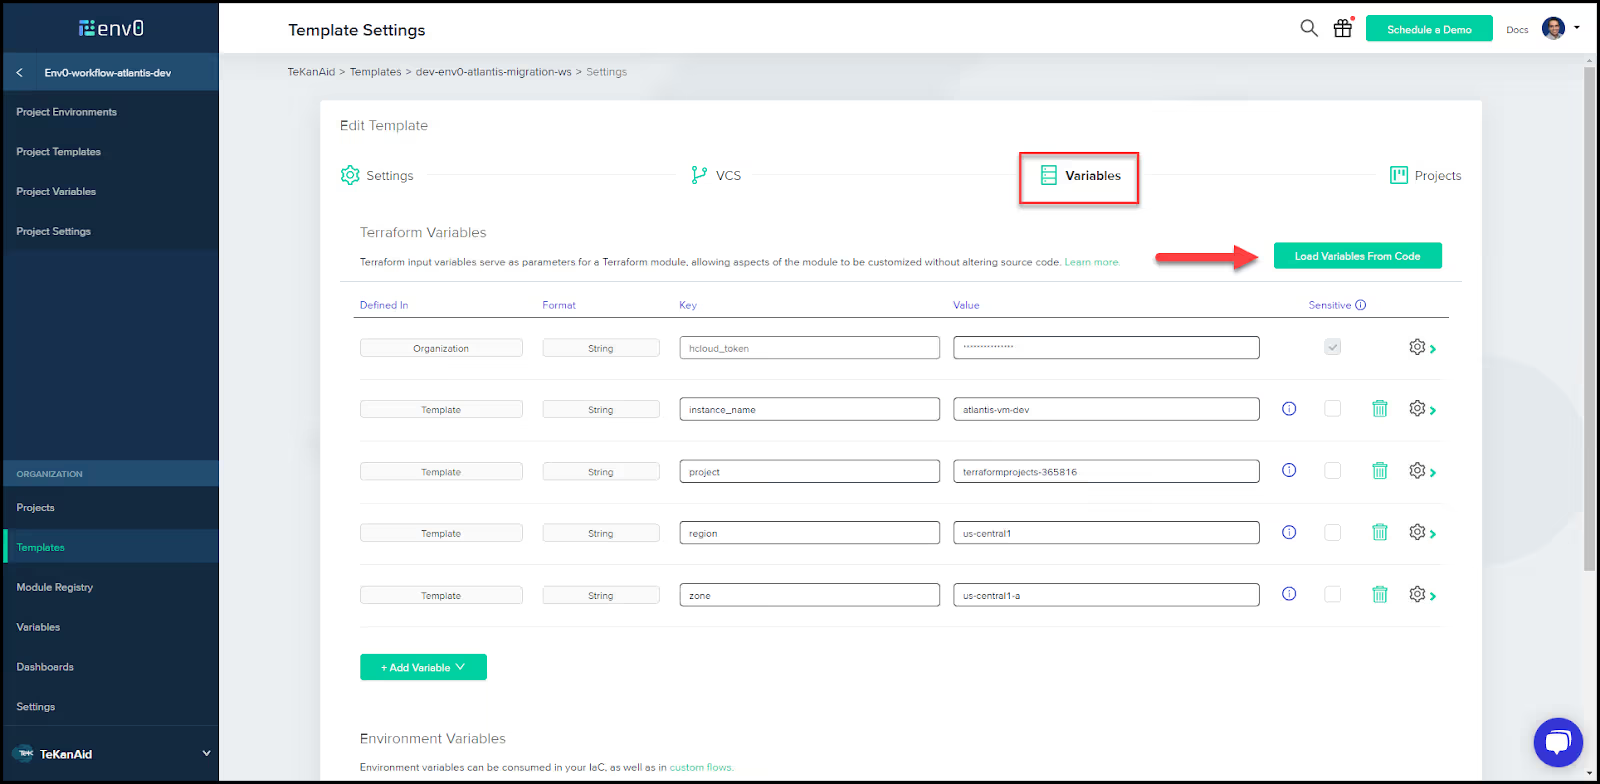
Then click Save to save your template.

  1. Populate the environment settings

Go back to the environment that was automatically created and click on it. In the environment settings, uncheck the Approve plan automatically setting, then click Save.

Also, check the following two settings in the Continuous Deployment section:

Redeploy on every push to the git branch

Run Terraform Plan on Pull Requests targeting this branch

Then click Save.
  1. Redeploy the environment

From the top right, click the button to redeploy this environment.

Double check that everything looks good, then click Run.
This should succeed and the Terraform Plan section should show no changes.

  1. Remove the backend configuration

You can now safely remove the backend configuration in your Terraform file and then commit and push the update.

This will trigger the webhook from your VCS to run env0. The deployment will result in no changes, the same as what we saw in the previous step. One thing to note is that the environment that was automatically created has a TTL of 24 hours. You may want to remove that TTL by clicking on the Time Left pencil icon:
Congratulations, you have successfully migrated from Atlantis to env0! You’re now ready to use the full feature set that env0 has to offer.

Wrapping up

If you really like the ability to plan and apply from pull/merge request comments in Atlantis, env0 can do that too. As you’ve seen throughout this blog post, env0 is very flexible and can easily work with your current workflow. To learn more about the advantages of migrating from Atlantis to env0, check out our Atlantis Alternative page.

About the author

Sam Gabrail is the President of TeKanAid Solutions Inc., an IT training company focused on DevOps. Sam enjoys creating content to help practitioners upskill in DevOps principles and cloud native technologies. To learn more, visit the TeKanAid website and blog.

Sam also offers a beginner’s course in Terraform.In this video we'll walk you through how to migrate from Atlantis to env0, but before we dive in, some background on Atlantis.

Logo Podcast
With special guest
Andrew Brown

Schedule a technical demo. See env0 in action.

Footer Illustration