.webp)


OpenID Connect is a protocol that can be used to authenticate with your compatible third-party service. OIDC allows your deployments to exchange short-lived tokens directly from your cloud provider or third-party service. env0 provides an OIDC token as an environment variable, which is also a short-lived token. A deployment can use it to access a compatible cloud service without the need for a long-lived credential stored and managed by env0, adding an extra layer of security to your deployments.
What is OpenID Connect (OIDC)?
OpenID Connect (OIDC) is a simple identity layer on top of the OAuth 2.0 protocol. It allows third-party applications to verify the end user's identity and obtain basic user profile information. OIDC uses JSON web tokens (JWTs), which you can obtain using flows conforming to the OAuth 2.0 specifications.
How is JWT a secure format?
JWT is actually a pretty simple format: a base64-encoded JSON string. Its goal is representing claims securely between two parties. Of course, decoding a base64 is a straightforward method and anyone could decode it as it’s not encrypted. Security kicks in when validating its signature. JWT contains a header, payload, and signature. A signature is the result of a function that uses the header, the payload, a secret key, and hash function. If the payload/claim is modified, the signature will not be the same, rendering the JWT invalid.
Why use OIDC authentication?
OIDC is an identity authentication protocol and may be used to verify the identity of a user to client service or between services. This widespread protocol is implemented by many third-party service providers, and is a safe and relatively easy way to authenticate with those services. For instance, you could use it to authenticate your favorite Secrets Manager, fetching values securely and verifying the permissions to this service. For example, your GitHub Action could fetch secrets from your AWS/GCP/Azure cloud and use them during its processing.
OIDC support in env0
In order to deploy your Infrastructure as Code (IaC) successfully while integrating your cloud service, env0 deployments have access to your cloud credentials or sensitive variables. Although env0 encrypts and securely saves your sensitive cloud credentials or secrets, you may want to manually manage the access to those values. Using the OIDC protocol can add an extra layer of security to your deployments: instead of letting env0 manage those values, you can grant the env0 IdP (Identity Provider) to securely access your Secret Manager at deployment runtime.
env0 provides an OIDC token (JWT) as an environment variable called [.code]ENV0_OIDC_TOKEN[.code]. This variable can be made available at deployment time, which can then be used to access compatible cloud services with no long-lived credential stored in env0. With our Custom Flows mechanism, you can access this JWT value and use it to authenticate your third-party service and fetch data securely.
Let’s set up a simple OIDC flow in env0 together to see how it works :)
Set up OIDC in env0
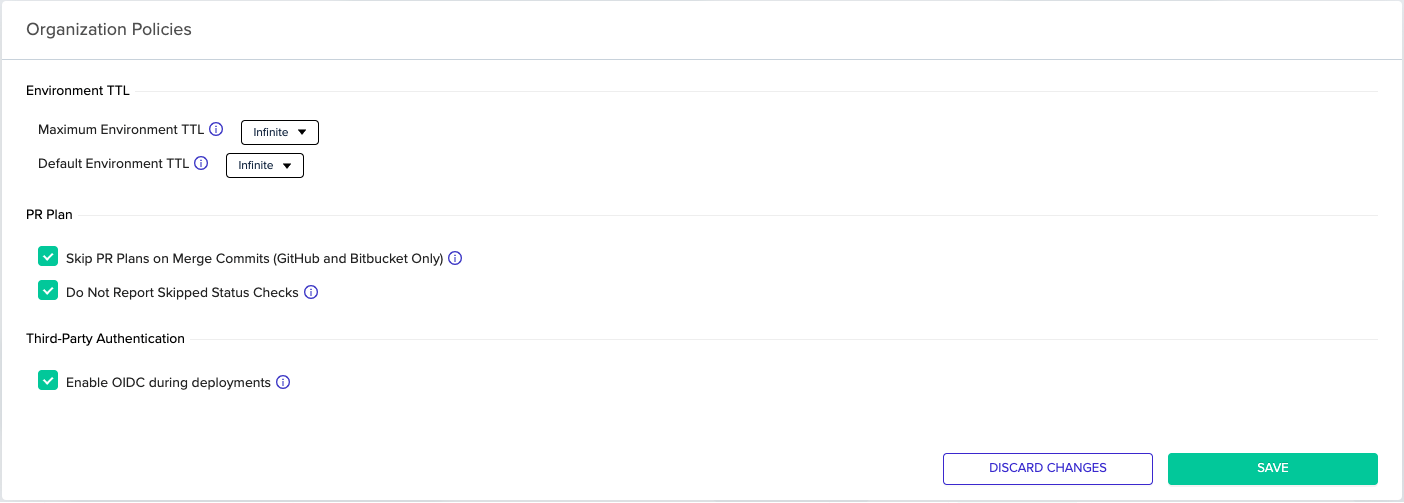
Organization admins can enable the OIDC integration by toggling the related checkbox in the Organization Policies tab. Afterwards, any deployment will have access to an [.code]ENV0_OIDC_TOKEN[.code] environment variable.
Setting up your third-party service integration
In this blog post, we’ll cover how to integrate Vault by OIDC. For other services consult the service’s documentation for how to add an identity provider (e.g. GCP, AWS). Generally, the process involves two phases. Phase one adds an OIDC/JWT authentication method to your service. This phase will require adding a JWT Verification method. The second phase will probably include Bounding Claims.
JWT verification
JWT signatures will be verified against public keys from the issuer (env0). A JSON Web Key Set (JWKS) URL should be configured on your third-party service’s side. Keys will be fetched from this endpoint during authentication. This way your third-party service can decrypt and verify env0’s JWT ([.code]ENV0_OIDC_TOKEN[.code]).
Our JWKS URL is: https://login.app.env0.com/.well-known/jwks.json
Bound claims
Once a JWT has been validated as being properly signed and unexpired, the authorization flow should validate that any configured "bound" parameters match. This is a very important step which ensures that only a specific JWT can access your third-party service. In our case, we need to make sure that the JWT:
- Is issued by env0.
- Matches your organization only.
- Is to be used for OIDC authentication flow.
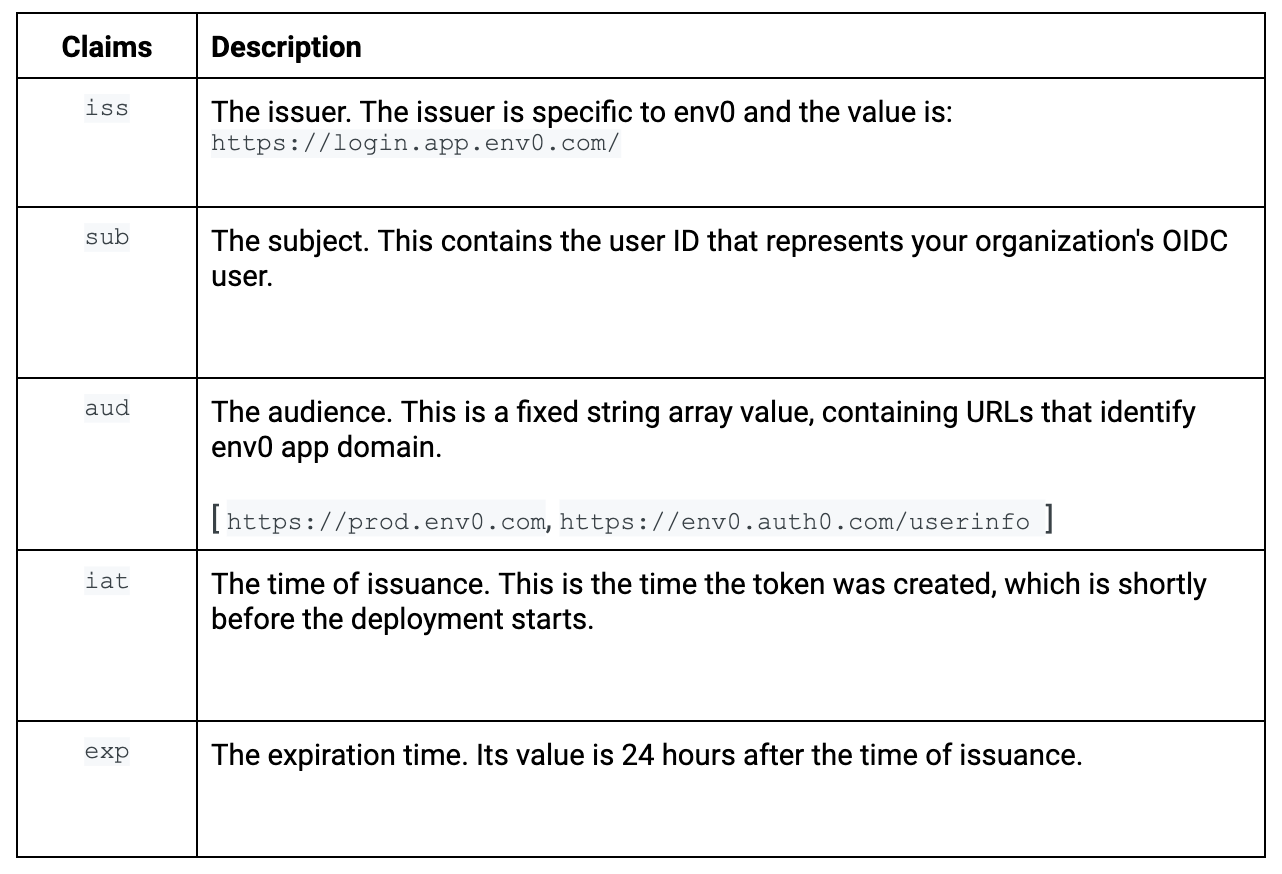
The OpenID Connect ID token contains the following standard claims. The following table shows the main claims you will probably want to bind and validate on your third-party service’s side.
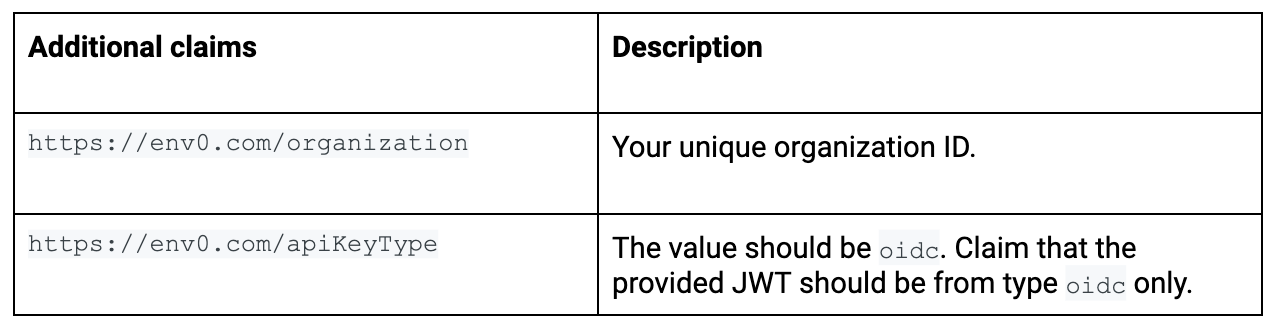
Our JWT also contains some additional custom claims that you need to validate:
NOTE:
The OIDC token is unique to your organization. The custom claims attached to the token contain your organization ID. You can find your env0 organization ID by navigating to the Organization Settings page in our web app and copying the UUID from the URL.
Vault example
Prepare your Vault cluster
- Set up your secrets store
Let’s create a new dummy KV store in Vault in order to save and fetch secrets from it.
# create KV store type
vault secrets enable -path=secrets-for-env0/ kv
# bound a ACL policy for permissions
vault policy write env0-access - <<EOF
path "secrets-for-env0/*" {
capabilities = ["read", "create", "update"]
}
EOF
If you already have your own secrets store up and running, you can skip this step. Just note that in this guide we named our store as [.code]secrets-for-env0[.code]. The new ACL policy named [.code]env0-access[.code] will be used in the following steps for allowing access to this KV store through our OIDC token login.
- Set up JWT verification
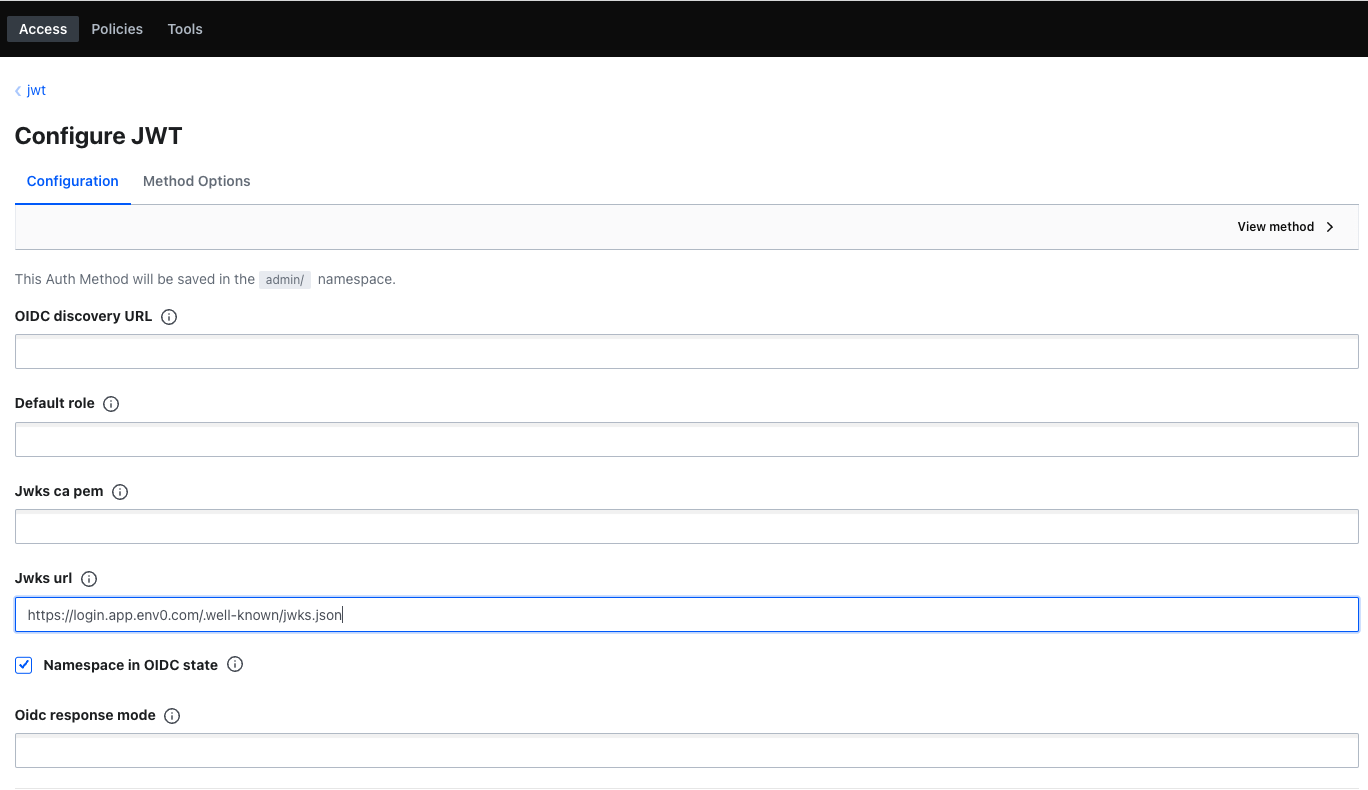
As we saw earlier, we should add a JWT authentication method in our Vault then configure env0 JWKS URL to ensure Vault can verify and decrypt env0’s JWTs.
You could use Vault’s Terraform provider, but here we’ll make it simpler by using the following CLI commands:
vault auth enable -path=env0-jwt/ jwt
vault write auth/env0-jwt/config jwks_url="https://login.app.env0.com/.well-known/jwks.json"
If you like, you can view the results on Vault’s UI by navigating to Access -> Auth Methods.
- Specify your bound claims
In the following example, we add a new custom role that binds [.code]sub, aud[.code] and env0’s custom claims via the Vault CLI. For more info see the tables above.
export ENV0_ORGANIZATION_ID="your-env0-org-uuid"
export ROLE_NAME=prod-env0-my-org-role
vault write auth/env0-jwt/role/$ROLE_NAME - <<EOF
{
"user_claim": "sub",
"role_type": "jwt",
"bound_audiences": [
"https://prod.env0.com",
"https://env0.auth0.com/userinfo"
],
"bound_claims": {
"https://env0.com/organization": "$ENV0_ORGANIZATION_ID",
"https://env0.com/apiKeyType": "oidc"
},
"policies": ["env0-access"]
}
EOF
Now your Vault cluster is ready to receive env0’s JWTs—meaning your deployments can authenticate with Vault!
env0 deployment
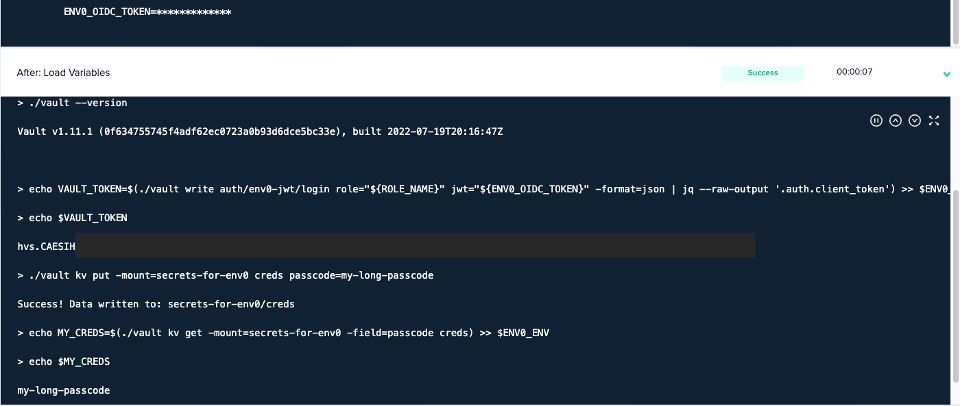
After you successfully enable and configure OIDC on both sides of the bridge, the final step is to deploy your env0 environment and log into Vault. The following YAML file is our [.code]env0.yml[.code] which controls our Custom Flows mechanism. Here we add a custom script, hooked after the “Load Variables” deployment step. This script downloads Vault CLI directly to the deployment docker’s runtime. Then it executes the JWT’s login CLI command which uses both the role we created earlier and the special [.code]ENV0_OIDC_TOKEN[.code] environment variable. Finally, we successfully put a new secret in Vault and fetch it right after.
version: 1
deploy:
steps:
setupVariables:
after:
# Install Vault
- curl -sL https://releases.hashicorp.com/vault/1.11.1/vault_1.11.1_linux_amd64.zip -o vault1.zip
- unzip -o vault1.zip
- ./vault --version
# Log in via OIDC token, and save Vault's token to be used in downstream custom flow
- echo VAULT_TOKEN=$(./vault write auth/env0-jwt/login role="${ROLE_NAME}" jwt="${ENV0_OIDC_TOKEN}" -format=json | jq --raw-output '.auth.client_token') >> $ENV0_ENV
- echo $VAULT_TOKEN
# Put Example
- ./vault kv put -mount=secrets-for-env0 creds passcode=my-long-passcode
# Get Example
- echo MY_CREDS=$(./vault kv get -mount=secrets-for-env0 -field=passcode creds) >> $ENV0_ENV
- echo $MY_CREDS
Note that to execute that Custom Flow successfully, you should either create an [.code]env0.yml[.code] file or append that hook to your existing file. In addition, you should add the following Environment Variables with their proper values: [.code]ROLE_NAME, VAULT_ADDR, VAULT_NAMESPACE[.code].
The results
If you have questions about this post, or you’d like to chat about thoughts you may have, please contact us on Twitter, or email us at hello@env0.com!