.webp)


Video Tutorial: Deploy with Terraform to On-Prem vSphere with env0 Self-Hosted Agents
In this video tutorial, we’ll deploy an on-premesis vSphere virtual machine with Terraform using env0’s self-hosted agent capability. This enables you to run deployments in a local environment without needing to open any inbound firewalls—handy for organizations with strict compliance requirements.
Why Integrate vSphere with Terraform Using env0's Self-Hosted Agents?
Integrating vSphere with Terraform via env0's self-hosted agents presents a unique opportunity for organizations to streamline their infrastructure management while adhering to strict security and compliance regulations.
This approach not only simplifies the deployment of virtual machines in on-premises environments but also enhances automation and scalability within private clouds.
The beauty of using Terraform with env0's self-hosted agents lies in the ability to automate the provisioning of vSphere virtual machines securely. Organizations can leverage Terraform's Infrastructure as Code (IaC) capabilities to manage their vSphere environment efficiently, reducing manual errors and improving deployment consistency.
This integration is particularly beneficial for enterprises that operate in regulated industries or have stringent security policies, as it allows for deployments within the safety of the organization's own data center without exposing internal networks to external threats.
Moreover, env0's self-hosted agent capability enables seamless connectivity to the organization's vSphere infrastructure without the need to open inbound firewalls. This approach significantly mitigates security risks associated with exposing the internal infrastructure to the Internet.
By running deployment workloads on their own Kubernetes cluster, organizations gain full control over their deployment processes and the security of their infrastructure. Additionally, storing secrets on the organization's infrastructure further enhances the security posture by keeping sensitive information within a controlled environment.
Through this integration, organizations benefit from the agility and efficiency of cloud-native technologies while maintaining the security and control of their on-premises infrastructure. It's a win-win scenario that empowers teams to deliver faster without compromising on security or compliance requirements.
What is an env0 self-hosted agent?
A self-hosted agent allows you to run env0 deployment workloads on your own Kubernetes cluster. Organizations can have one or more agents, each of which can be located in a different environment, cloud provider, or network segment. With a self-hosted agent:
- Execution is contained on your own servers/infrastructure
- The agent requires an internet connection but no inbound network access
- Secrets can be stored on your own infrastructure
As you can see, the main use case for self-hosted agents is to run deployments in a local environment securely. This is quite common at large enterprises or government agencies with strict compliance requirements that don’t allow external systems to have inbound access to the environment.
When using self-hosted agents, there is no need to open firewalls inbound into the environment. The outbound domains needed are listed in the docs.
Video walkthrough
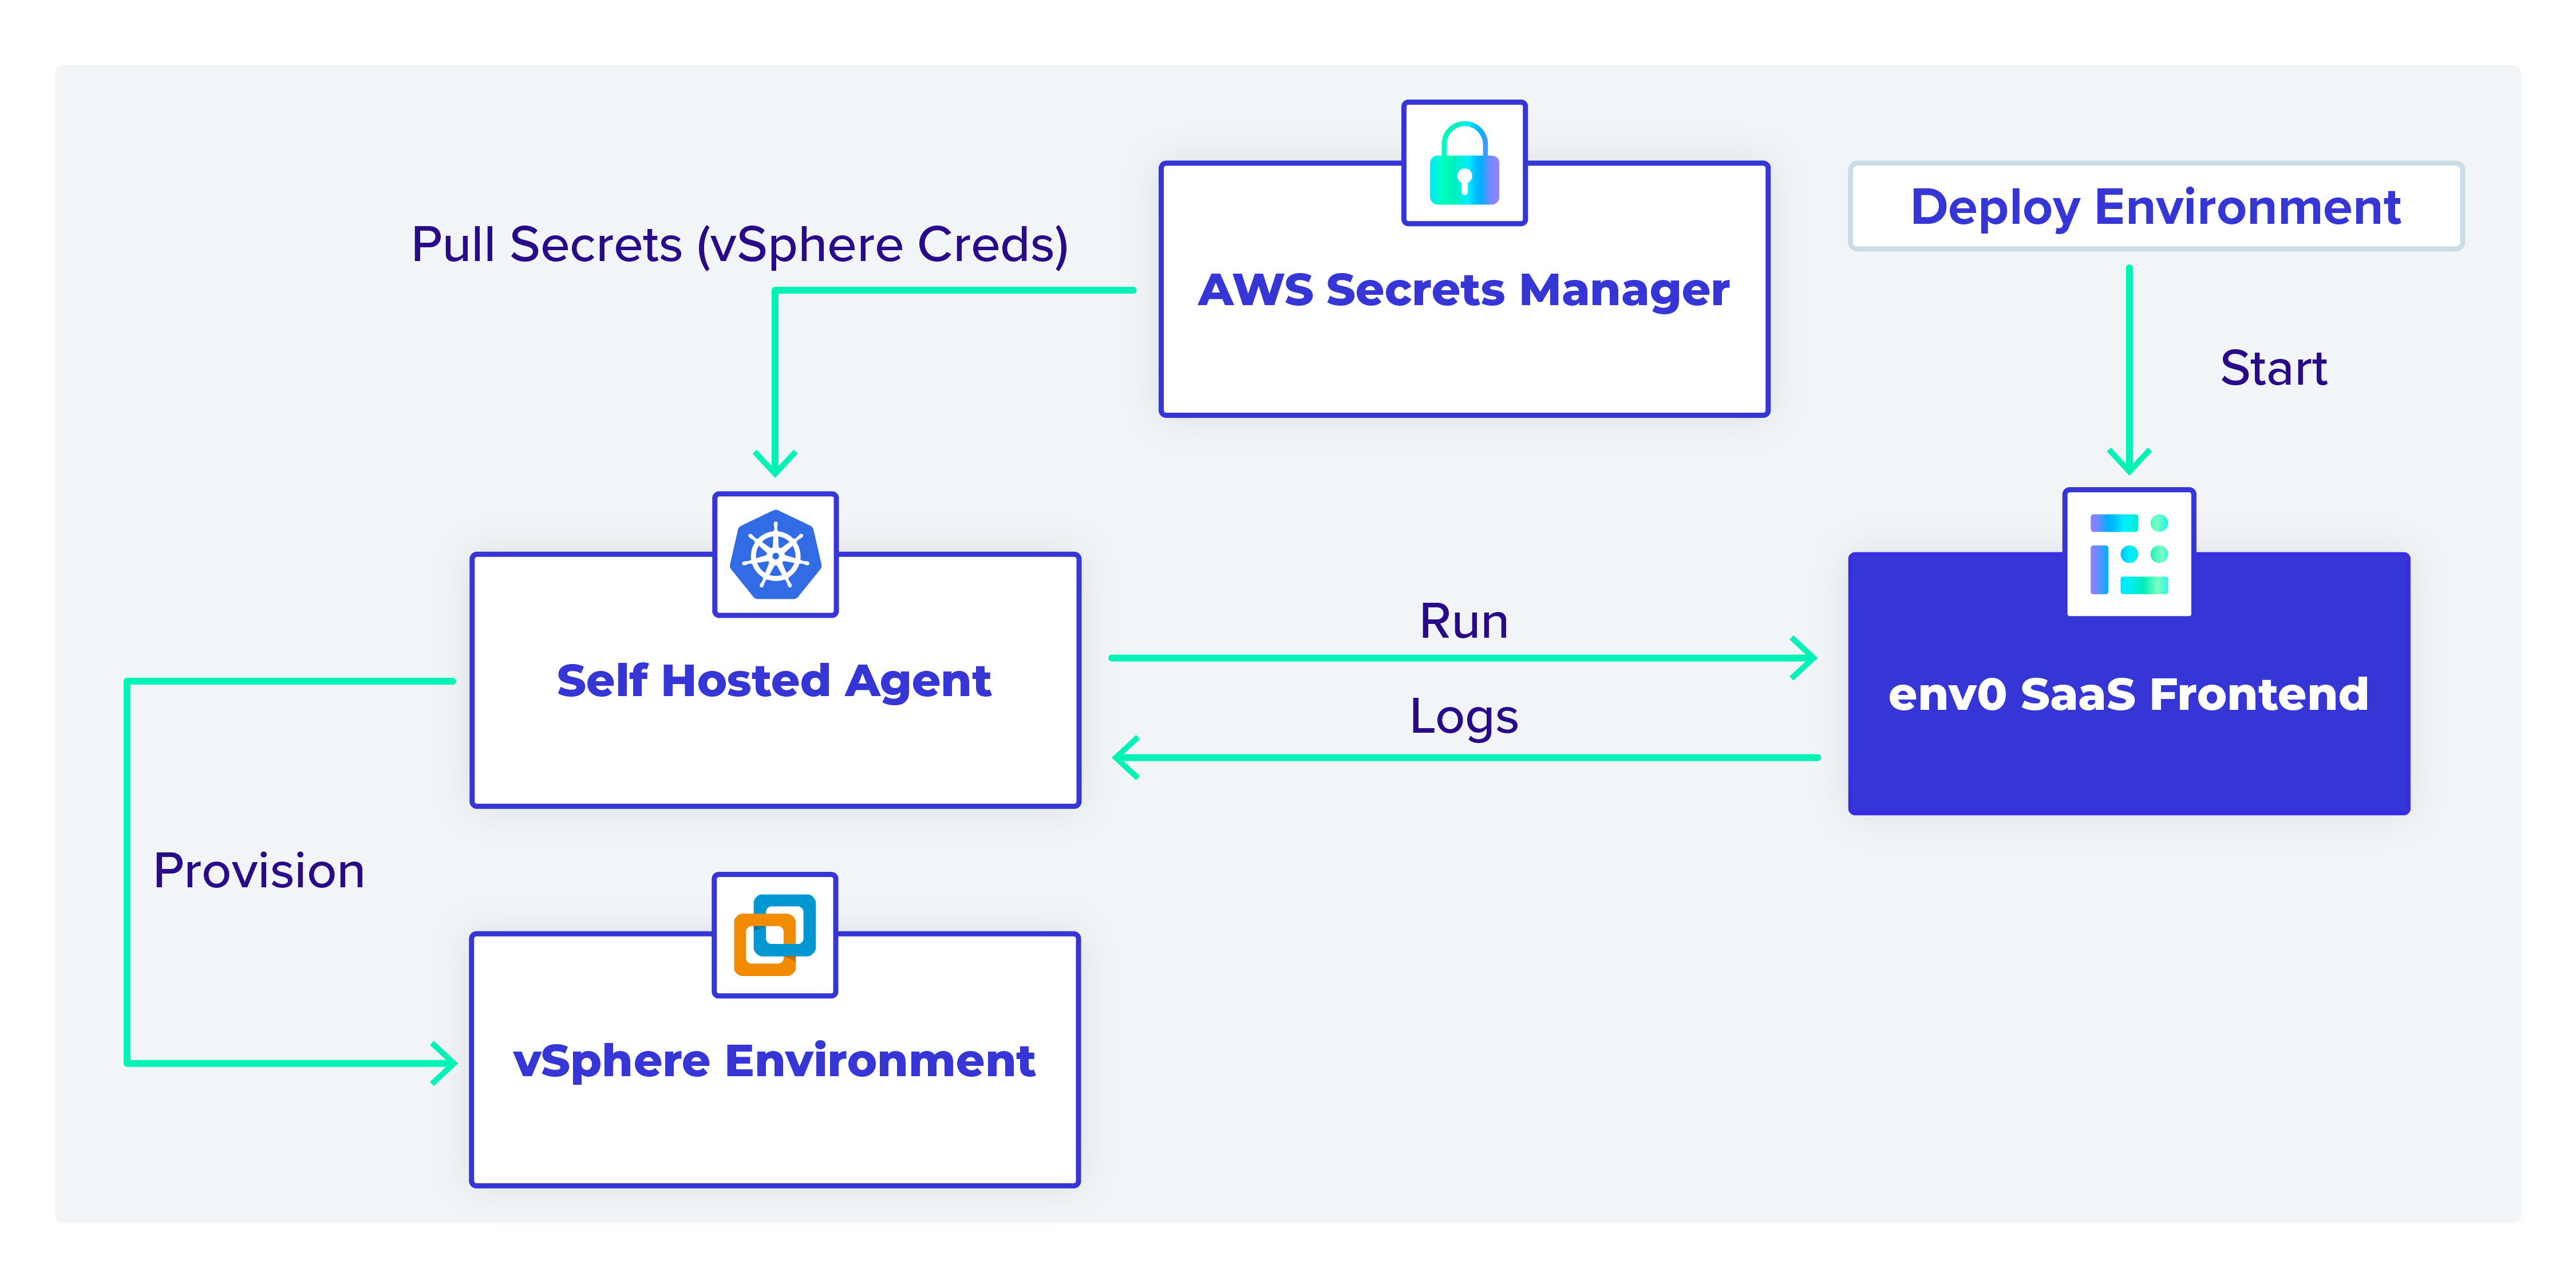
The workflow
In this example, the self-hosted agent interacts with AWS Secrets Manager, the env0 SaaS backend, and the vSphere environment.
As shown in the diagram above, we can deploy an environment from the env0 SaaS backend. The self-hosted agent pods query for any deployment jobs. When they find one, they start the provisioning process.
The AWS credentials needed to access AWS Secrets Manager are stored in a Kubernetes secret in the self-hosted agent’s namespace.
The self-hosted agent reads the necessary vSphere credentials stored as plaintext (not K/V) secrets in AWS Secrets Manager. These are needed to access vSphere and provision the virtual machine (VM).
Self-hosted Kubernetes agents setup
Let’s take a look at our setup for the agents.
Requirements
- A Kubernetes k3s cluster at version: v1.21.4+k3s1
- Helm
- Kustomize
Repository
TL;DR: You can find the repo here.
env0 organization
When you enable self-hosted agents, you automatically enable them for your whole organization. If you are going to use both SaaS and self-hosted agents, then it’s recommended that you create a new organization just for the self-hosted agents.
The agent still reports back to the SaaS and you will see deployments running in the UI. However, please note that sensitive variables are no longer stored in env0’s environment and are your responsibility moving forward.
You will need to contact the env0 team with your organization name or ID to get set up with self-hosted agents. Once they finish the work in the backend, you will see a screen like the one below under the Organization Settings and the Agents tab.
Click the download button to download your [.code]customer_values.yaml[.code] file. Mine is called [.code]tekanaid_values.yaml[.code]. Yours will be different. Add this file to your repo and make sure to add it to [.code].gitignore[.code] so it’s not checked into Git, as it contains sensitive information.

Create an AWS user
Since we are now responsible for hosting our own secret variables, we need to find a place for them. For this post, we will use AWS Secrets Manager. However, we first need to create an AWS user with credentials to pass it to our helm installation for the agent.
The self-hosted agents support AWS, Azure, GCP, and HashiCorp Vault as secrets stores. You can find out more about secrets management in the documentation.
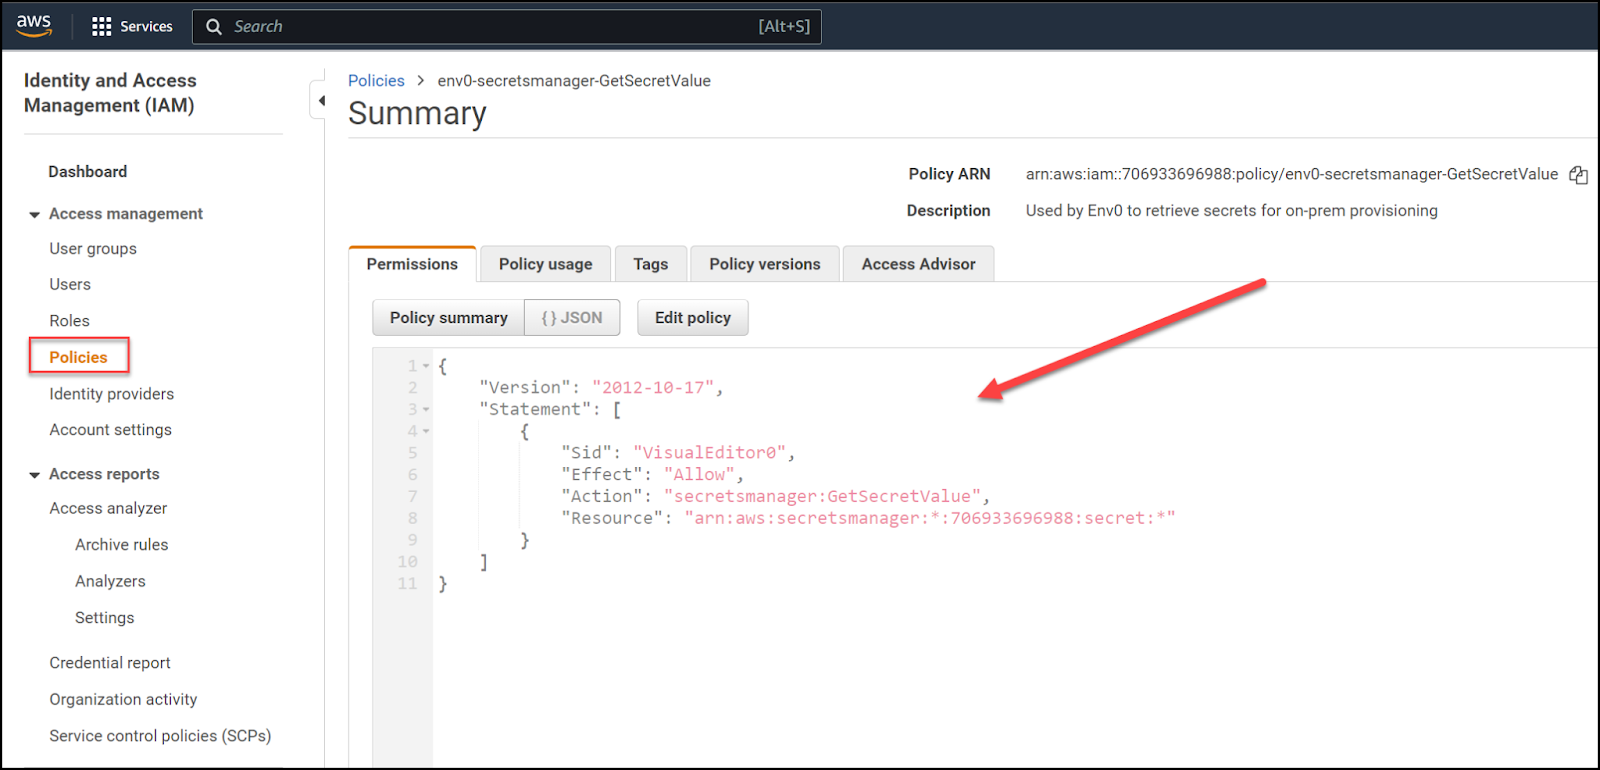
First, create an IAM policy with the following JSON config:
{
"Version": "2012-10-17",
"Statement": [
{
"Sid": "VisualEditor0",
"Effect": "Allow",
"Action": "secretsmanager:GetSecretValue",
"Resource": "arn:aws:secretsmanager:*:706933696988:secret:*"
}
]
}
This policy allows the agent to retrieve secrets from AWS Secrets Manager.
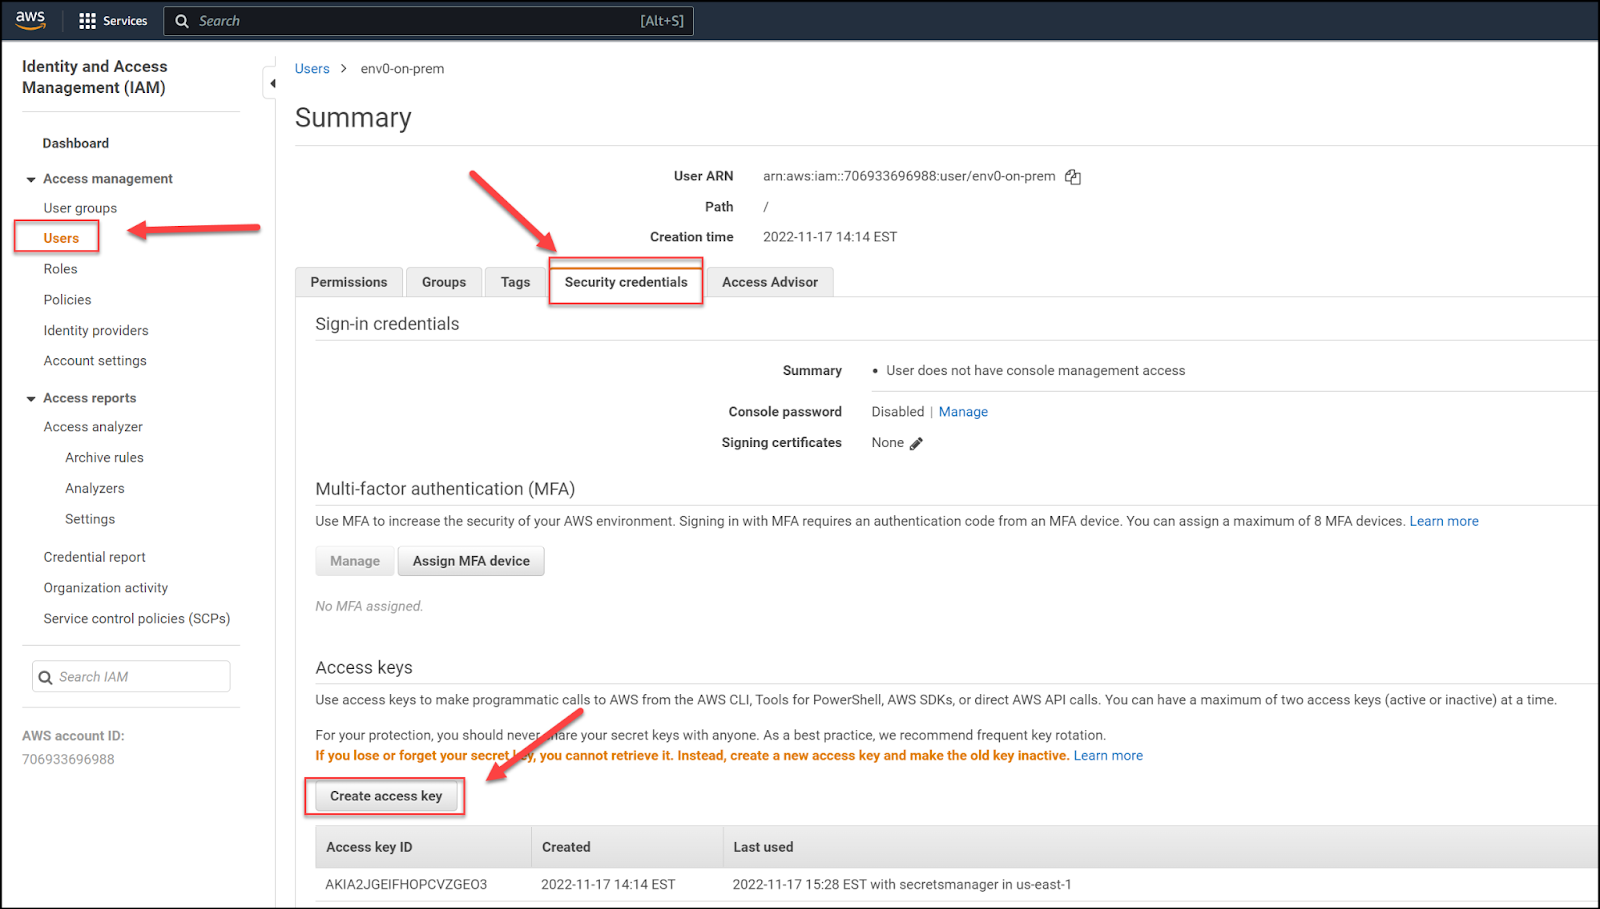
Then create a user and directly attach the policy you just created.
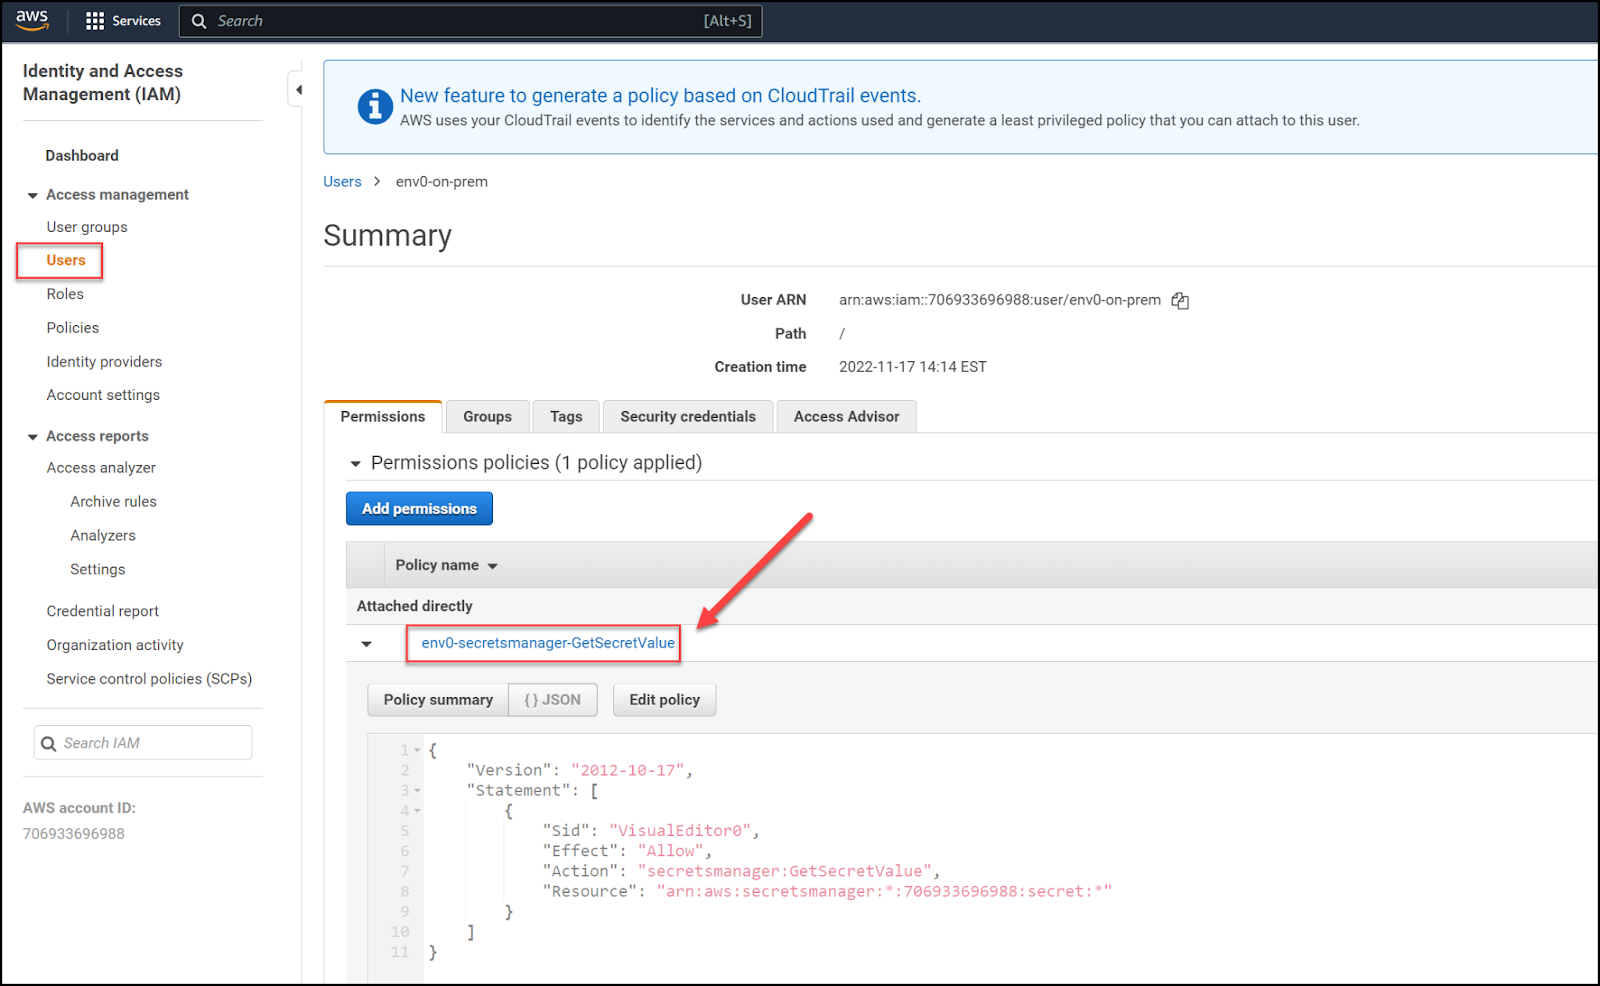
Make sure you create programmatic credentials and save the Access Key ID and Secret Access Key. You will need to base64 encode them in the next section.
Base64 encode the AWS credentials
Now run this command in a Linux environment:
echo -n '<ACCESS_KEY_ID>' | base64
echo -n '<SECRET_ACCESS_KEY>' | base64
Take the output of each and place them in the file called [.code]values.customer-example.yaml[.code] replacing the <base64_encoded> field:
customerAwsAccessKeyIdEncoded: <base64_encoded>
customerAwsSecretAccessKeyEncoded: <base64_encoded>
Now change the name of the file appropriately. In my case, I named it [.code]values.tekanaid.yaml[.code]. You can find more about this file in the folder structure section below.
Folder structure
Below is an image of the folder structure in our repo. The Terraform configuration is stored in a [.code]Terraform[.code] folder that we will visit later on.
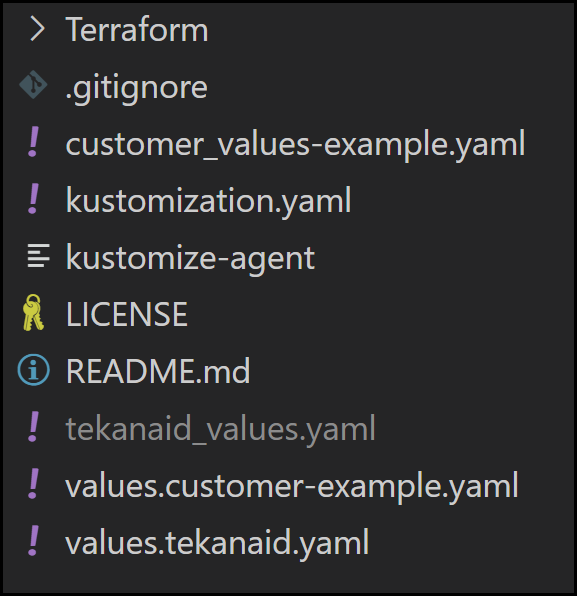
Here is a summary of what each file does:
- [.code]tekanaid_values.yaml[.code]: holds the Helm values configuration for the agent to connect back to the env0 backend. This is the file you downloaded earlier. Yours will have a different name. (Don’t make changes to this file)
- [.code]customer_values-example.yaml[.code]: is an example of [.code]tekanaid_values.yaml[.code] since I don’t check [.code]tekanaid_values.yaml[.code] into Git
- [.code]values.tekanaid.yaml[.code]: this is also a configuration file that holds helm values. It too is sensitive and not to be checked into Git. You can see an example in [.code]values.customer-example.yaml[.code]
- [.code]values.customer-example.yaml[.code]: is an example of [.code]values.tekanaid.yaml[.code]
- [.code]kustomize-agent[.code]: an executable script to run [.code]Kustomize[.code] to patch the PVC (Persistent Volume Claim)
- [.code]kustomization.yaml[.code]: a patch configuration to update the PVC
Installation
Let’s get started with the installation of the self-hosted agent in our Kubernetes cluster. Run the three commands below to install using Helm.
helm repo add env0 https://env0.github.io/self-hosted
helm repo update
helm upgrade --install --create-namespace env0-agent env0/env0-agent \
--namespace env0-agent -f tekanaid_values.yaml -f values.tekanaid.yaml \
--post-renderer ./kustomize-agent
Notice the last command uses a post-renderer with [.code]Kustomize[.code] to patch the PVC to allow us to work in our k3s cluster. The patch is found in the [.code]kustomization.yaml[.code] file. You can view the content of this file below:
resources:
- env0.yaml
patches:
- patch: |-
- op: replace
path: "/spec/accessModes"
value: ["ReadWriteOnce"]
target:
kind: PersistentVolumeClaim
- patch: |-
- op: replace
path: "/spec/resources/requests/storage"
value: "10Gi"
target:
kind: PersistentVolumeClaim
The reason for the patch is to allow us to work with access mode of [.code]ReadWriteOnce[.code] instead of [.code]ReadWriteMany[.code] that is found in the original Helm chart intended for production environments. [.code]ReadWriteMany[.code] allows multiple pods and nodes to write to the same PVC. This requires a system such as NFS which we don’t have in our k3s cluster.
We also reduced the size of the PVC from the original of 300 GB to 10 GB.
Note that the PVC is used to store the state files of our Terraform deployments.
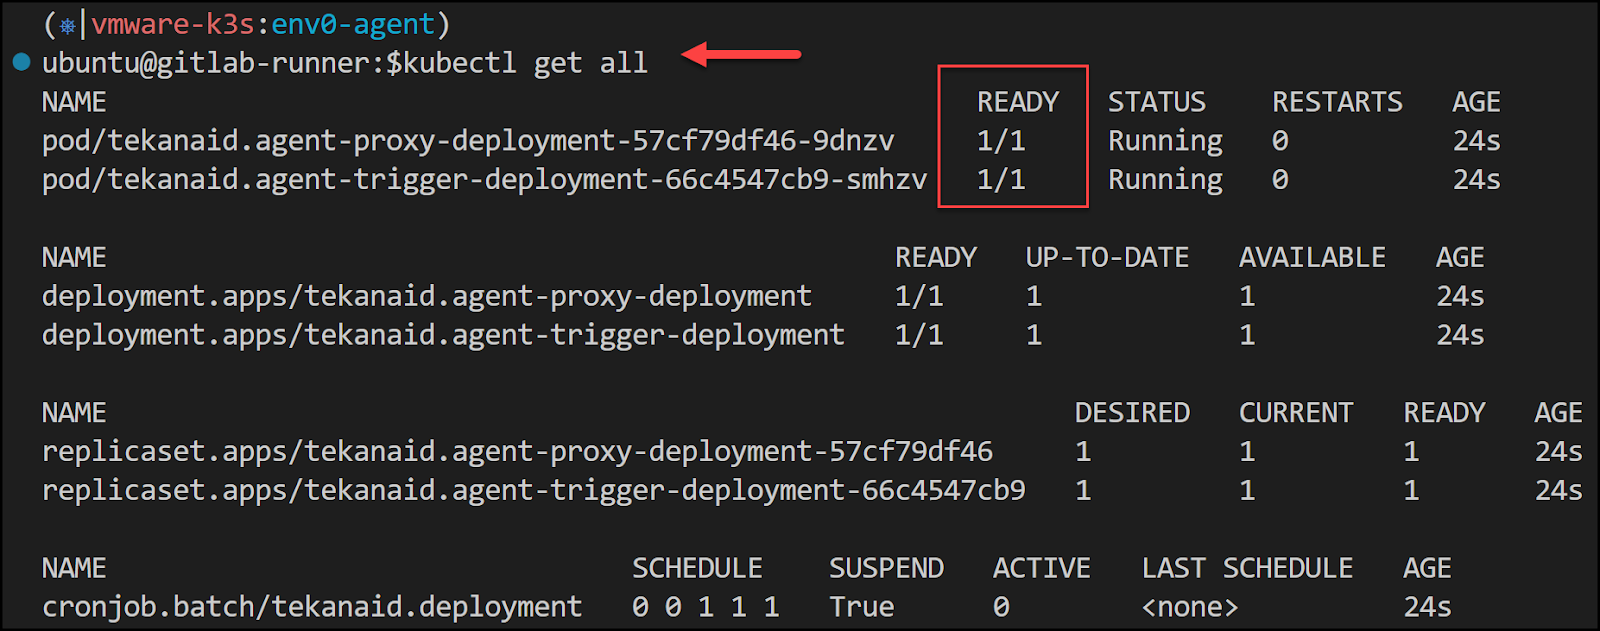
You should now have a namespace called env0-agent with a few pods. It would look like this:
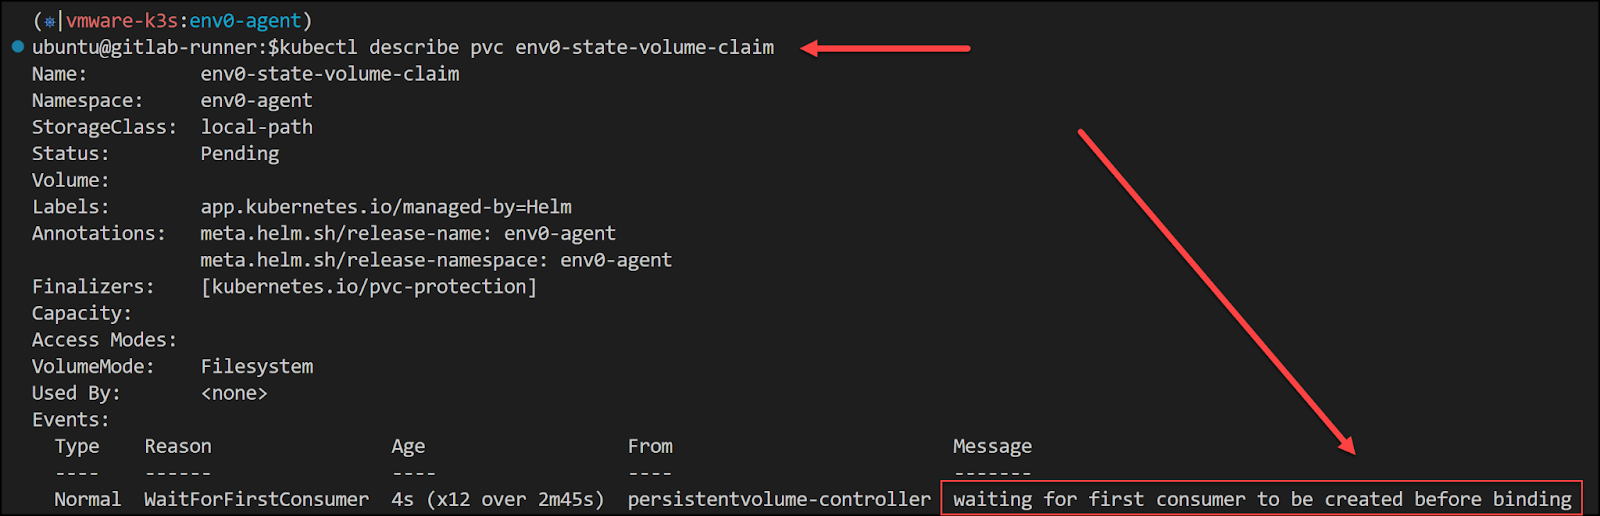
The PVC will show pending:

When you describe the PVC, you will see that it’s waiting for the first consumer before binding. This is normal so let’s just keep going.
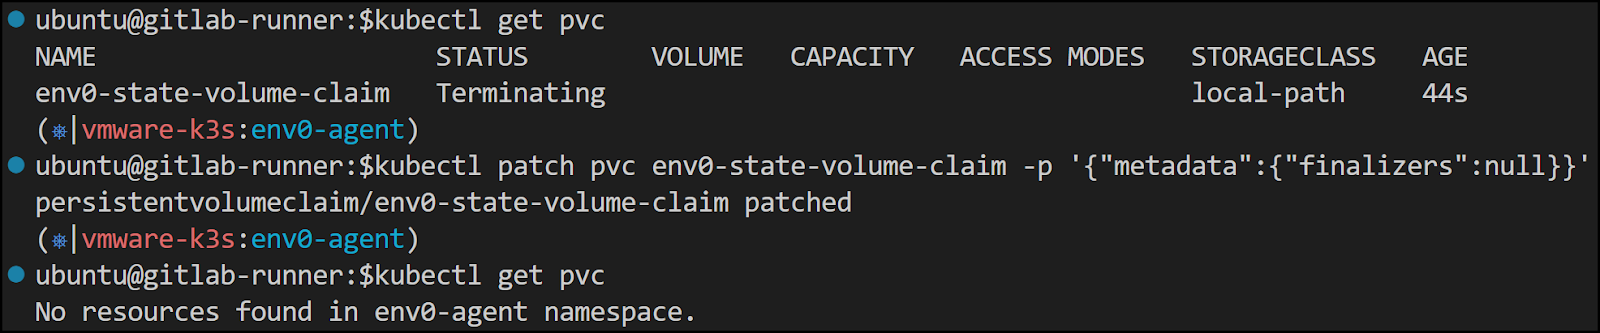
Forcing the deletion of the PVC
If at some point you need to delete the Helm installation, you may run into an issue where you use [.code]helm delete env0-agent[.code] only to find that the PVC is stuck in a terminating state. To get past this, you can run this command:
kubectl patch pvc env0-state-volume-claim -p '{"metadata":{"finalizers":null}}'
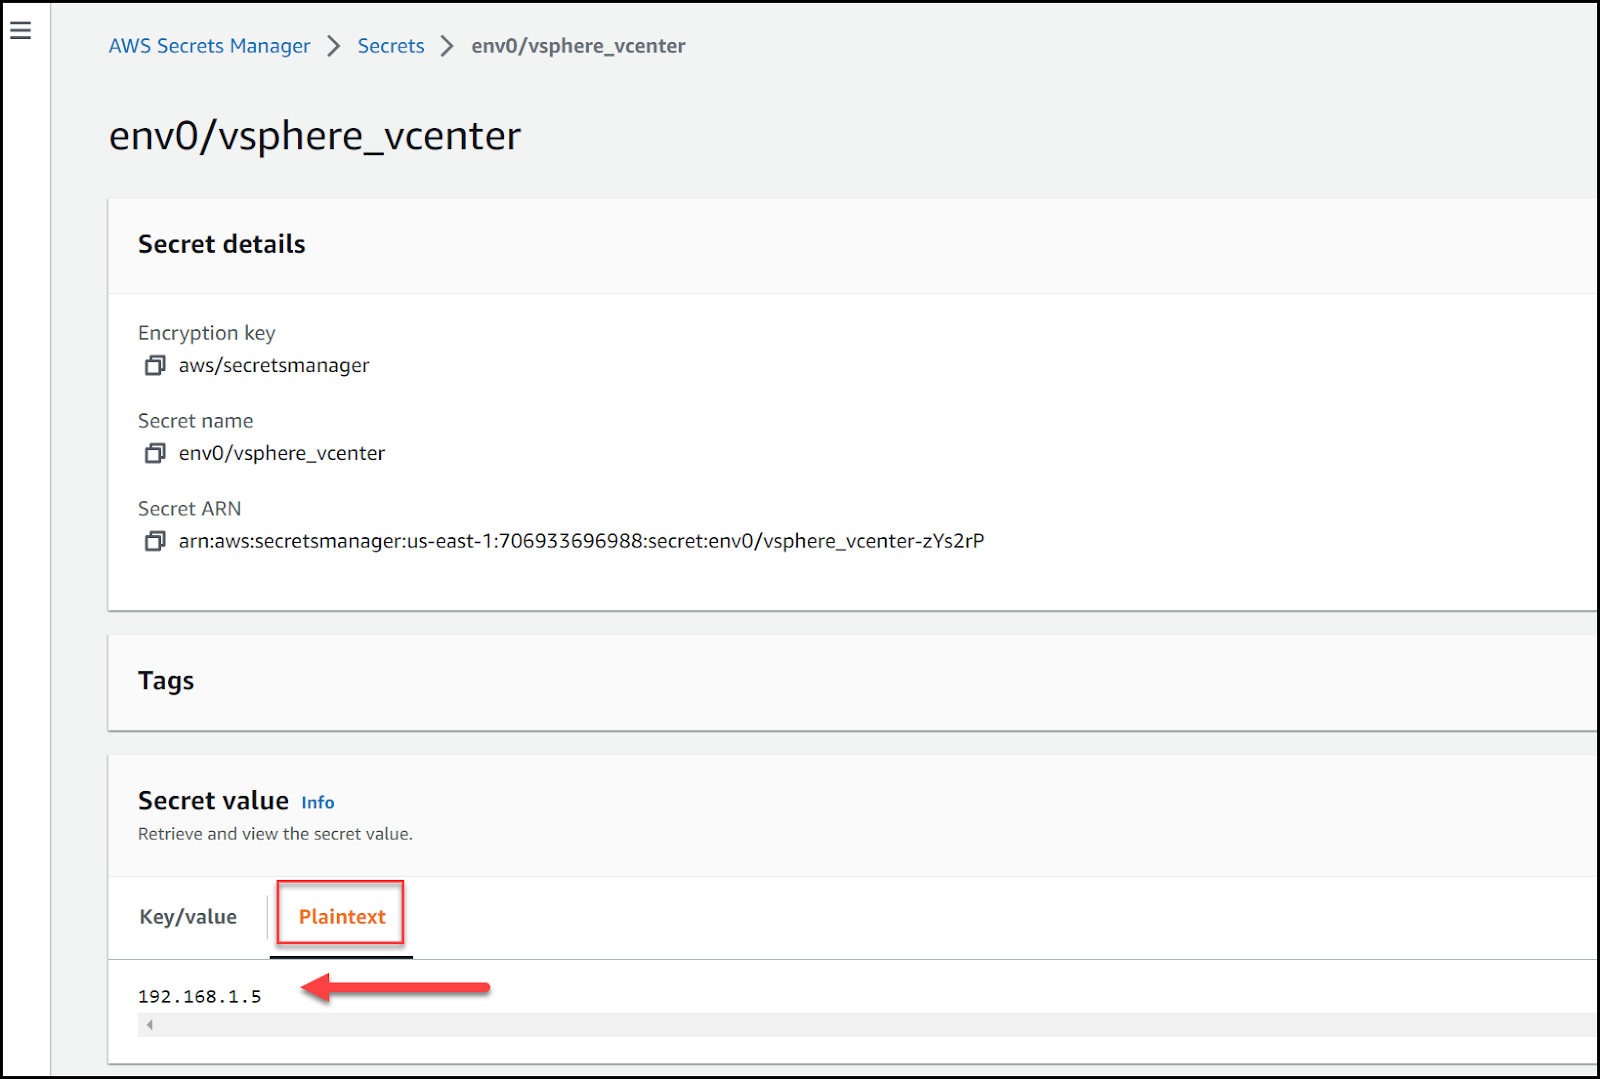
Adding vSphere credentials to AWS Secrets Manager
Create three secrets in AWS Secrets Manager and call them the following:
- env0/vsphere_password
- env0/vsphere_user
- env0/vsphere_vcenter

Make sure to create plaintext secrets in AWS Secrets Manager and not Key/Value pairs. Below is an example of my vcenter IP stored as plaintext in the secret called [.code]env0/vsphere_vcenter[.code]
Start the deployment
Let’s now go back to the env0 UI to get things ready to provision a VM.
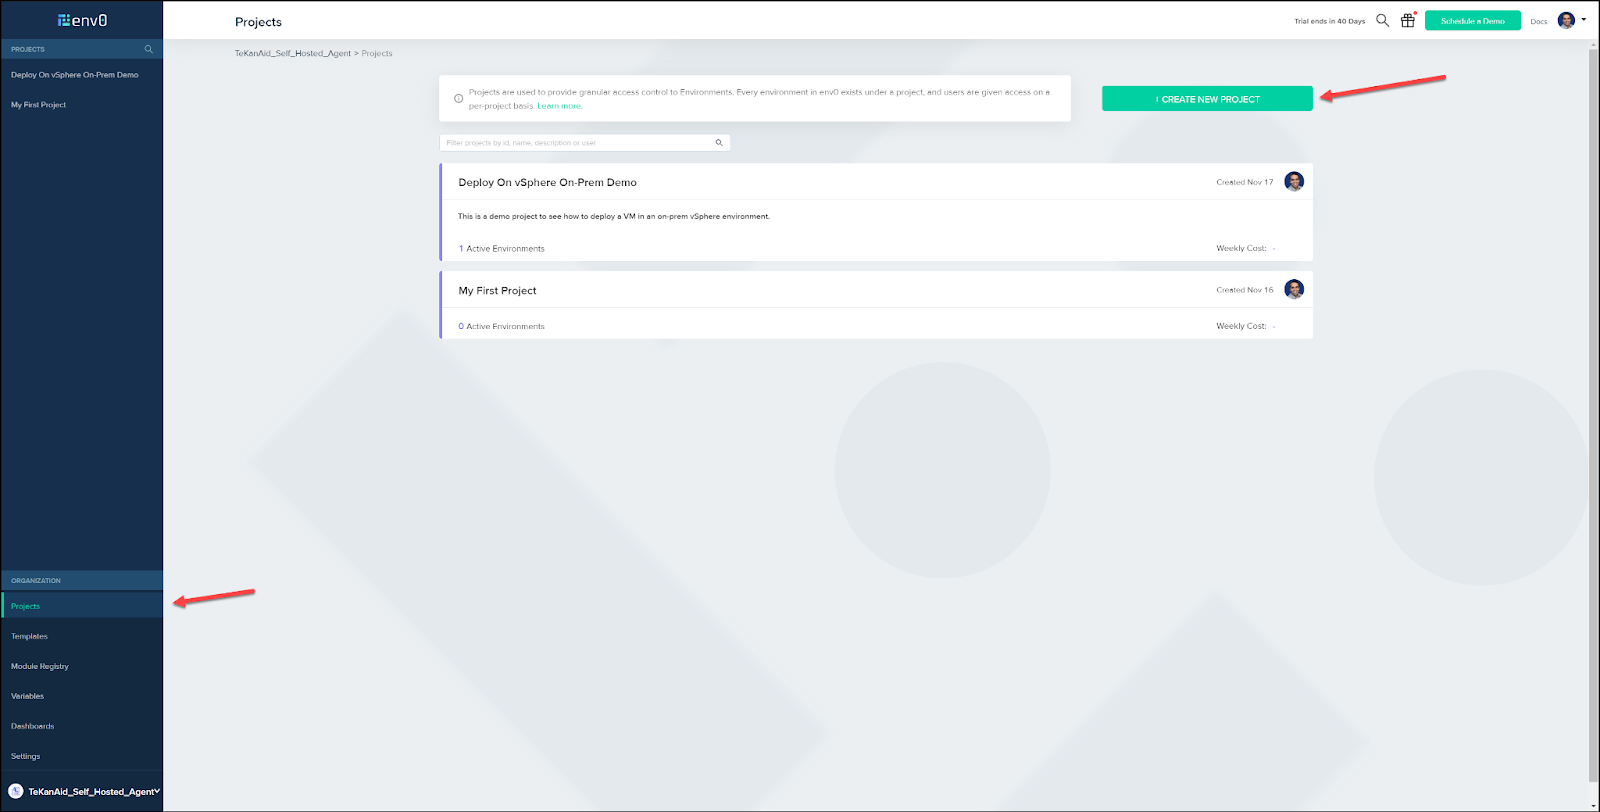
Create a project
Head over to the Projects tab in your organization and click on the CREATE NEW PROJECT button.
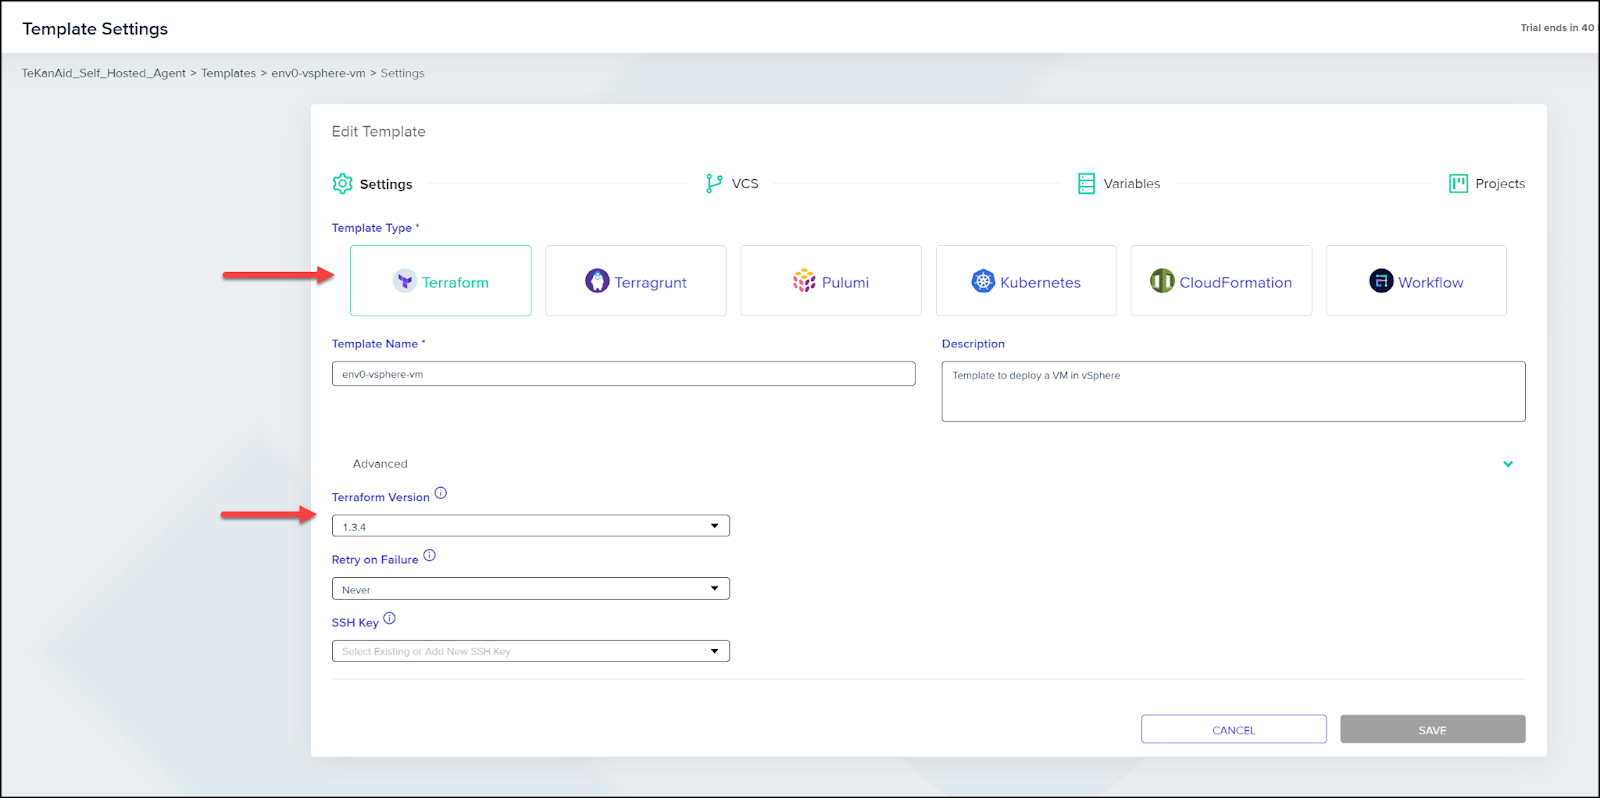
Create a template
Then head over to the Templates tab in your organization and create a new template. Select the template type: Terraform. Give the template a name and a description then specify the Terraform version.
Connect VCS
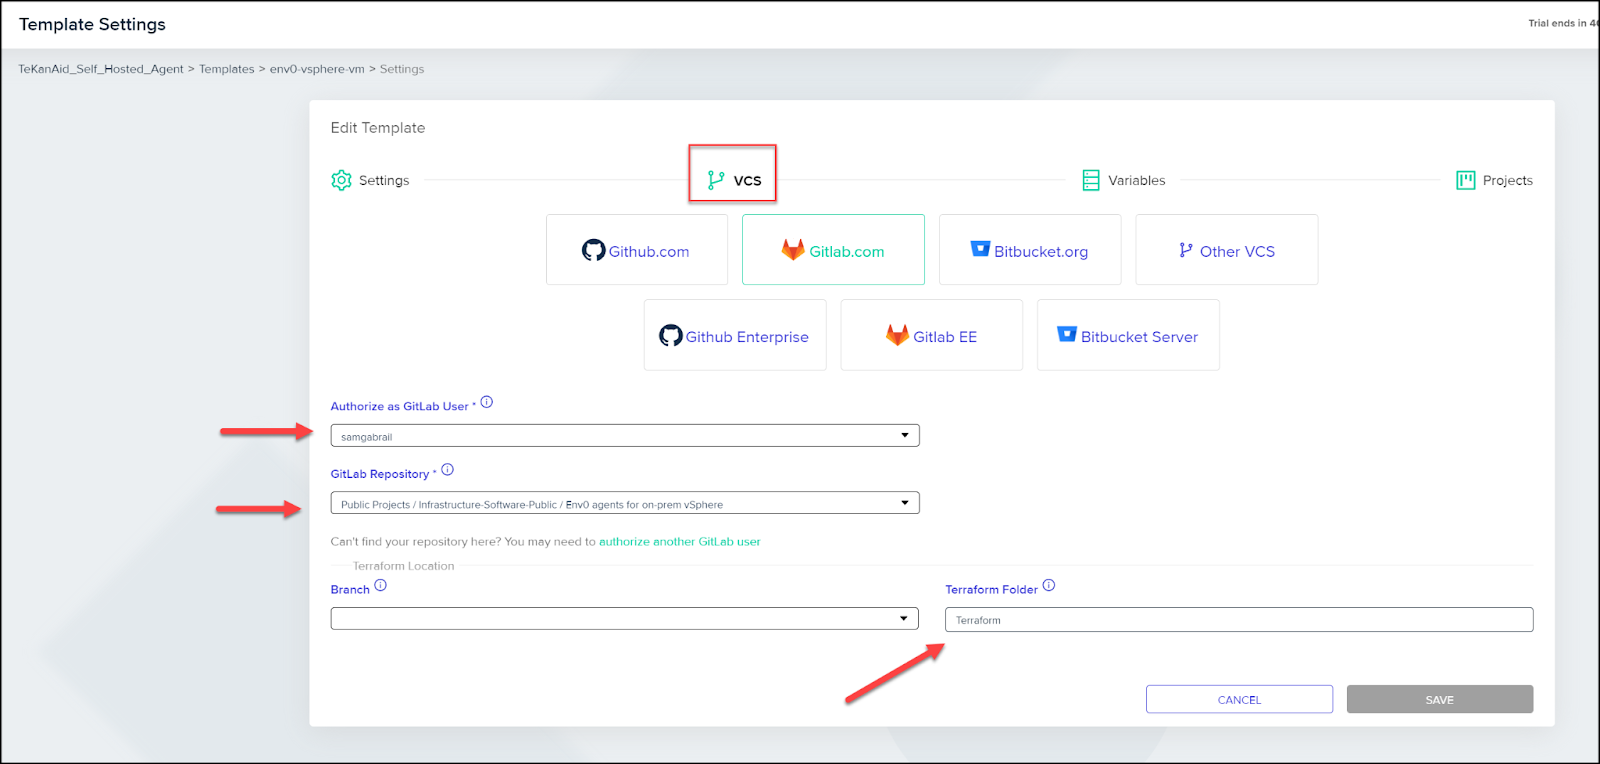
In the VCS tab, connect your repo from your version control system. You can see I’m using GitLab. Choose your authorized GitLab user along with the repo. Select the Terraform folder where the Terraform configuration code lives inside of the repo.
Add variables
You can add variables at different levels:
- Template
- Project
- Environment
- Organization
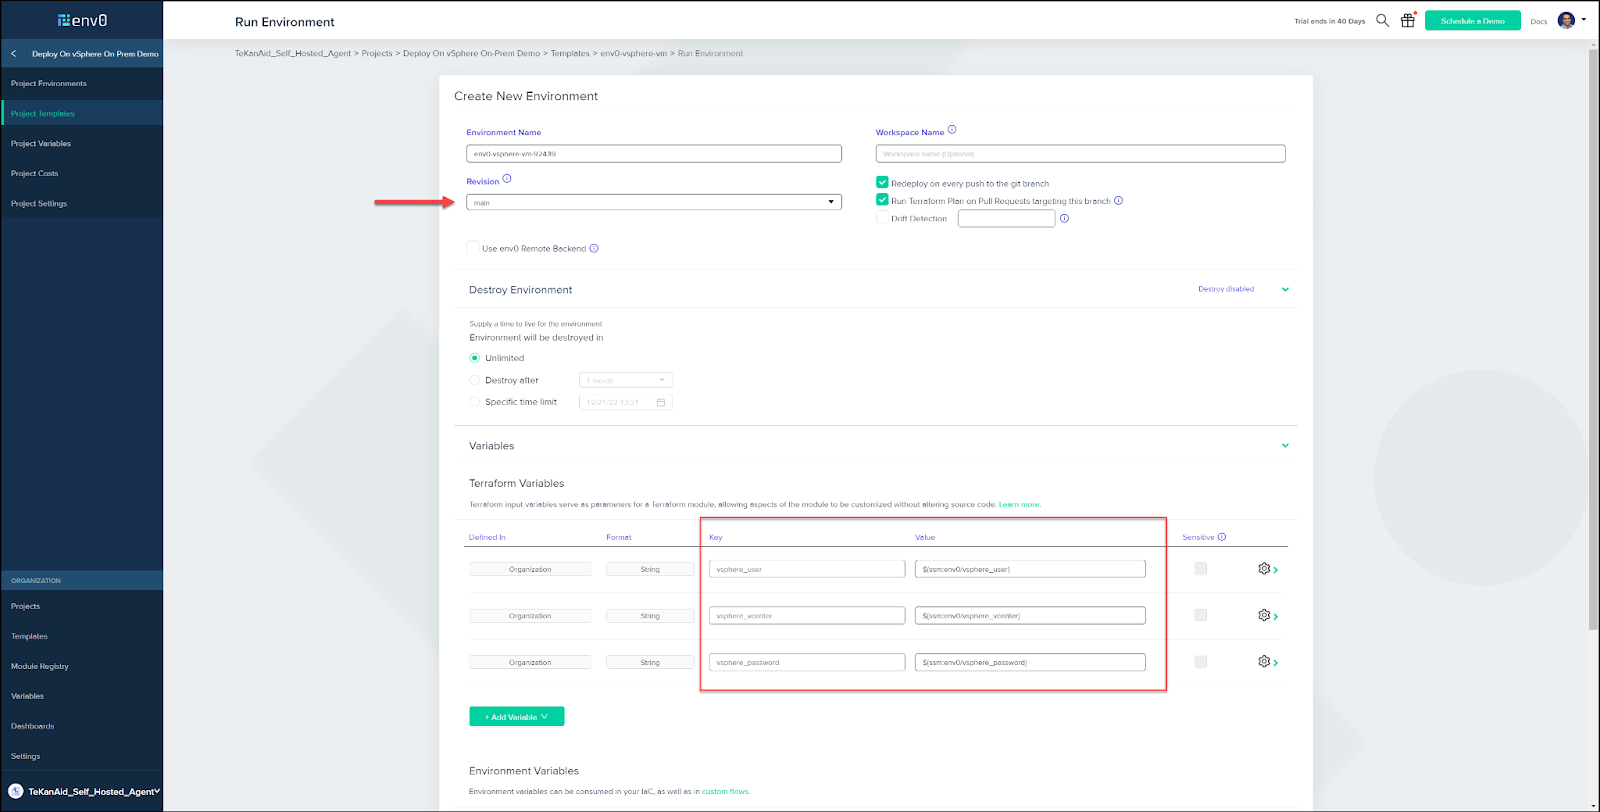
I added my vSphere variables at the organization level to use them in multiple projects. They conveniently get added in my template as shown below.
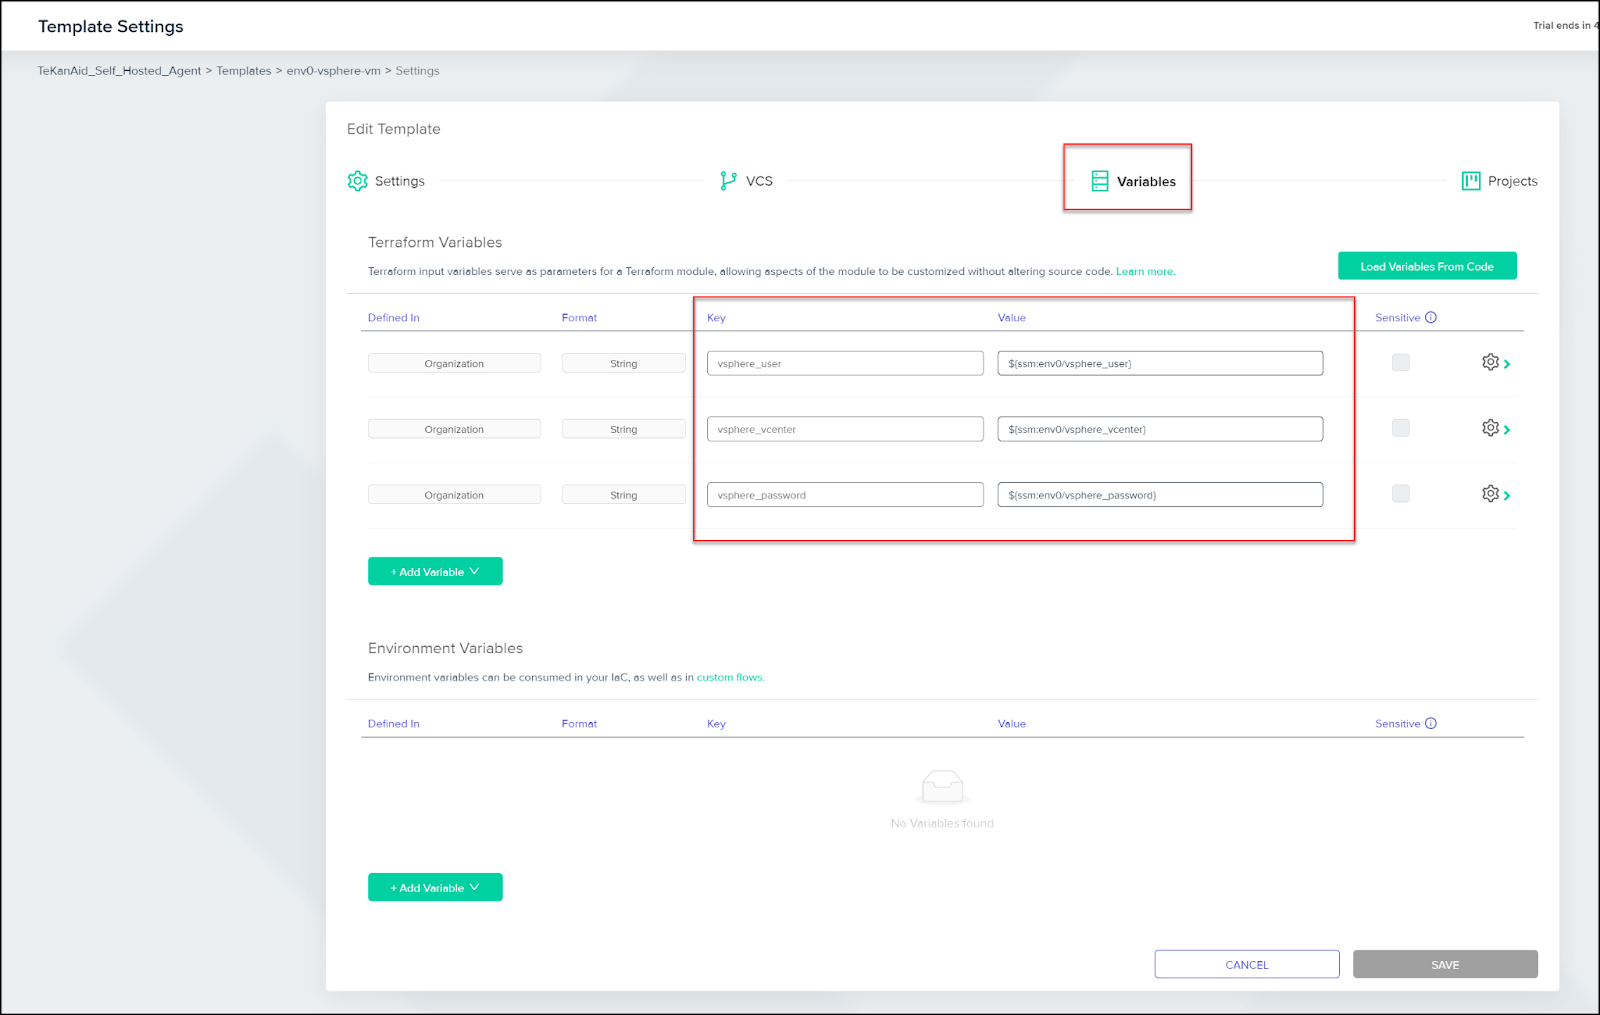
Notice the sensitive secrets reference format used for the AWS Secrets Manager:
General format:
${ssm:<secret-id>}
My variables:
vsphere_user: ${ssm:env0/vsphere_user}
vsphere_vcenter: ${ssm:env0/vsphere_vcenter}
vsphere_password: ${ssm:env0/vsphere_password}
Add the template to project
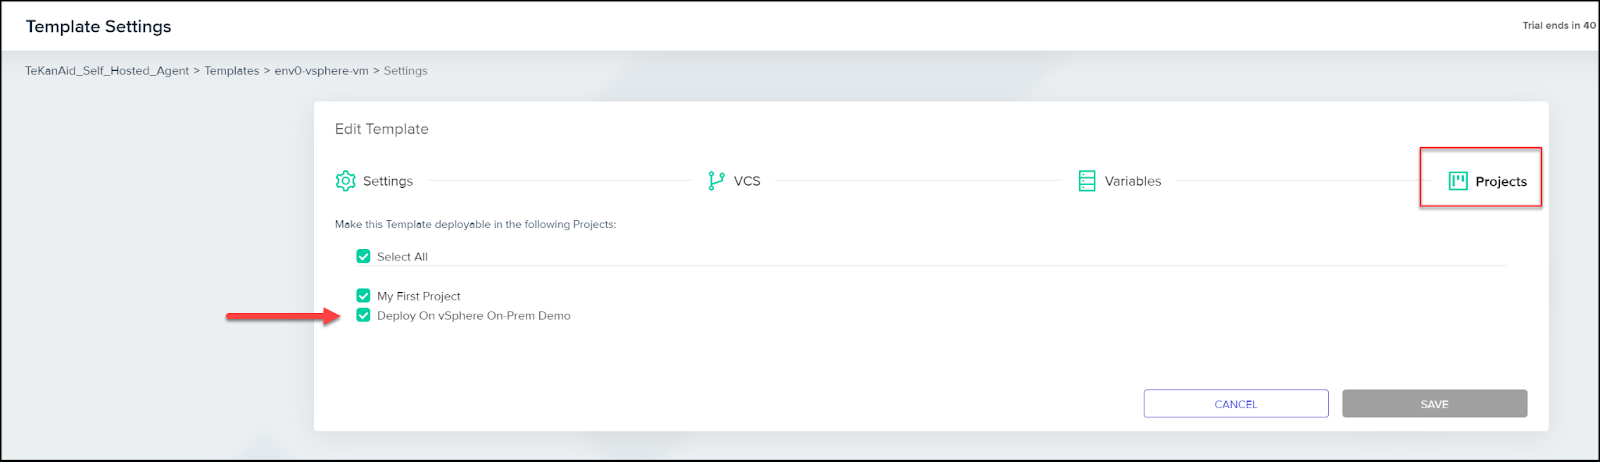
Finally, make this template deployable in your project by selecting your project.
Deploy an environment
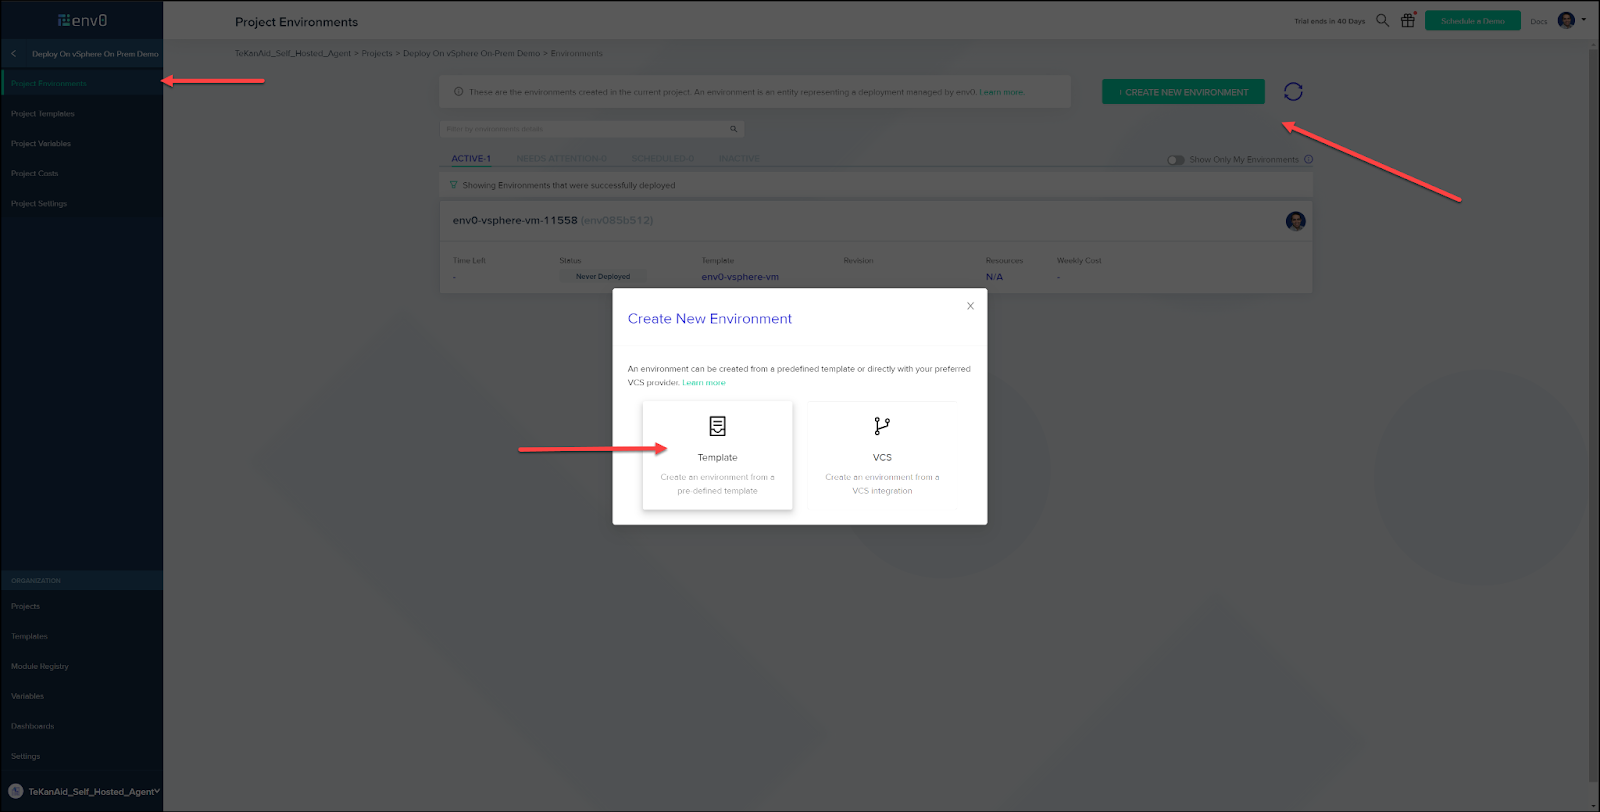
Create a new environment based on a template by going to your project and clicking the CREATE NEW ENVIRONMENT button.
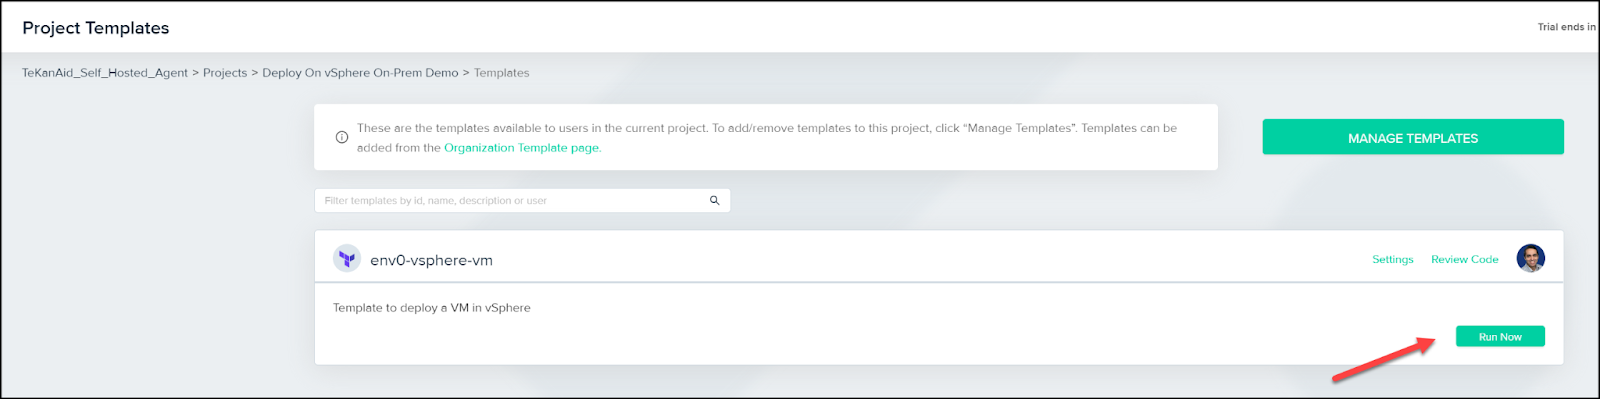
This will take you to the Project Templates where you can click on the Run Now button.
Now you can choose a few options such as Drift Detection and if you would like the environment to be destroyed at a certain time.
Make sure to choose your branch in the repo under the Revision heading. Also, verify that the variables were copied correctly from the template. When all looks good, click the Run button.
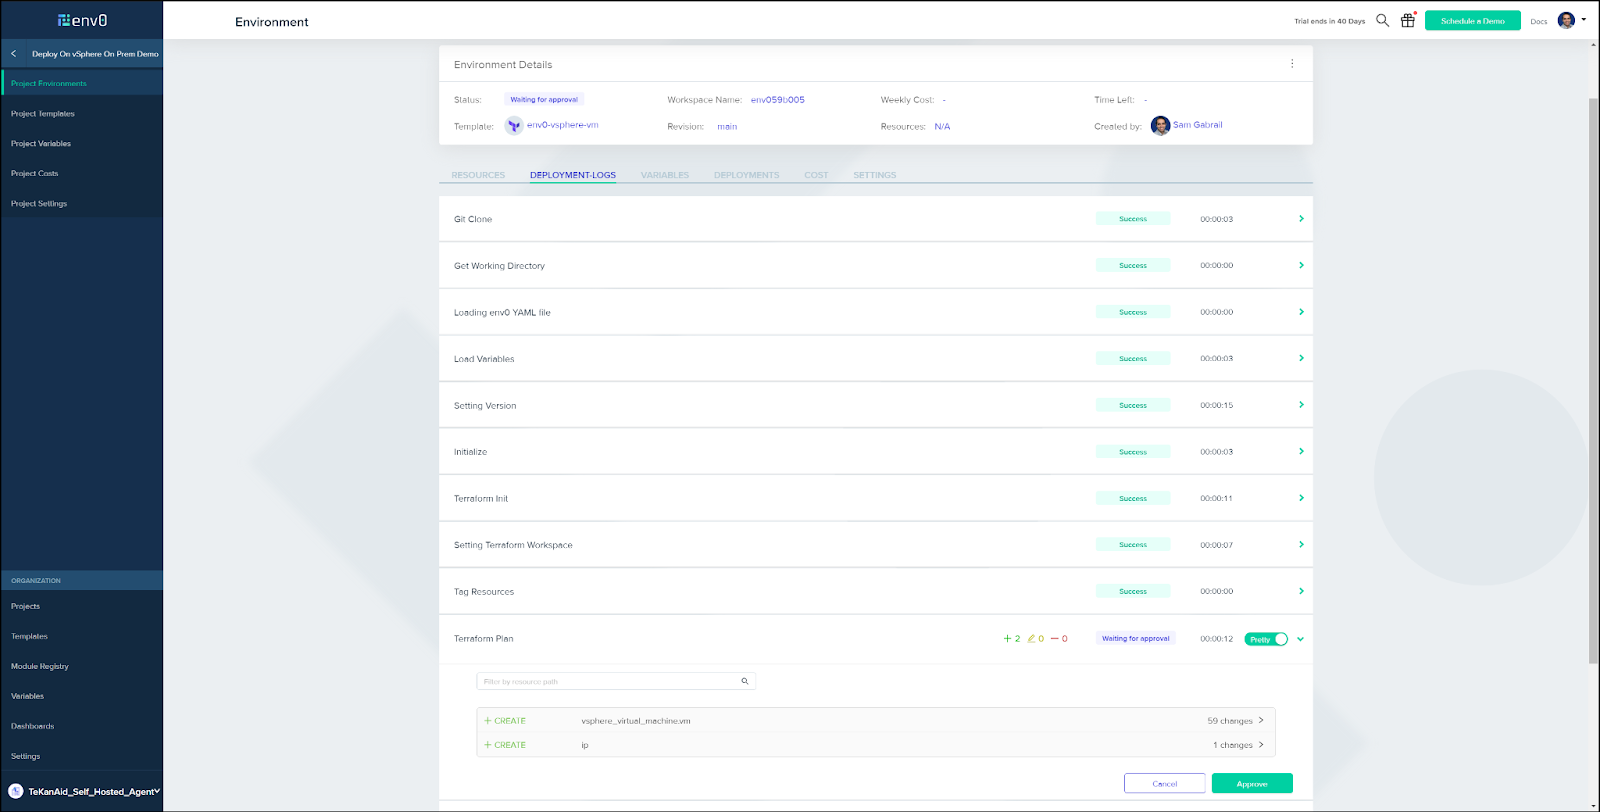
Approval
After a couple of minutes you should see the env0 UI show some activity and then await approval to apply the Terraform configuration. As you can see below, we are creating a virtual machine in vSphere and the IP address will show up in the output. Go ahead and click on Approve to proceed.
Deployment complete
After a few minutes, you will see that the deployment successfully completed and get the output to the vSphere VM.
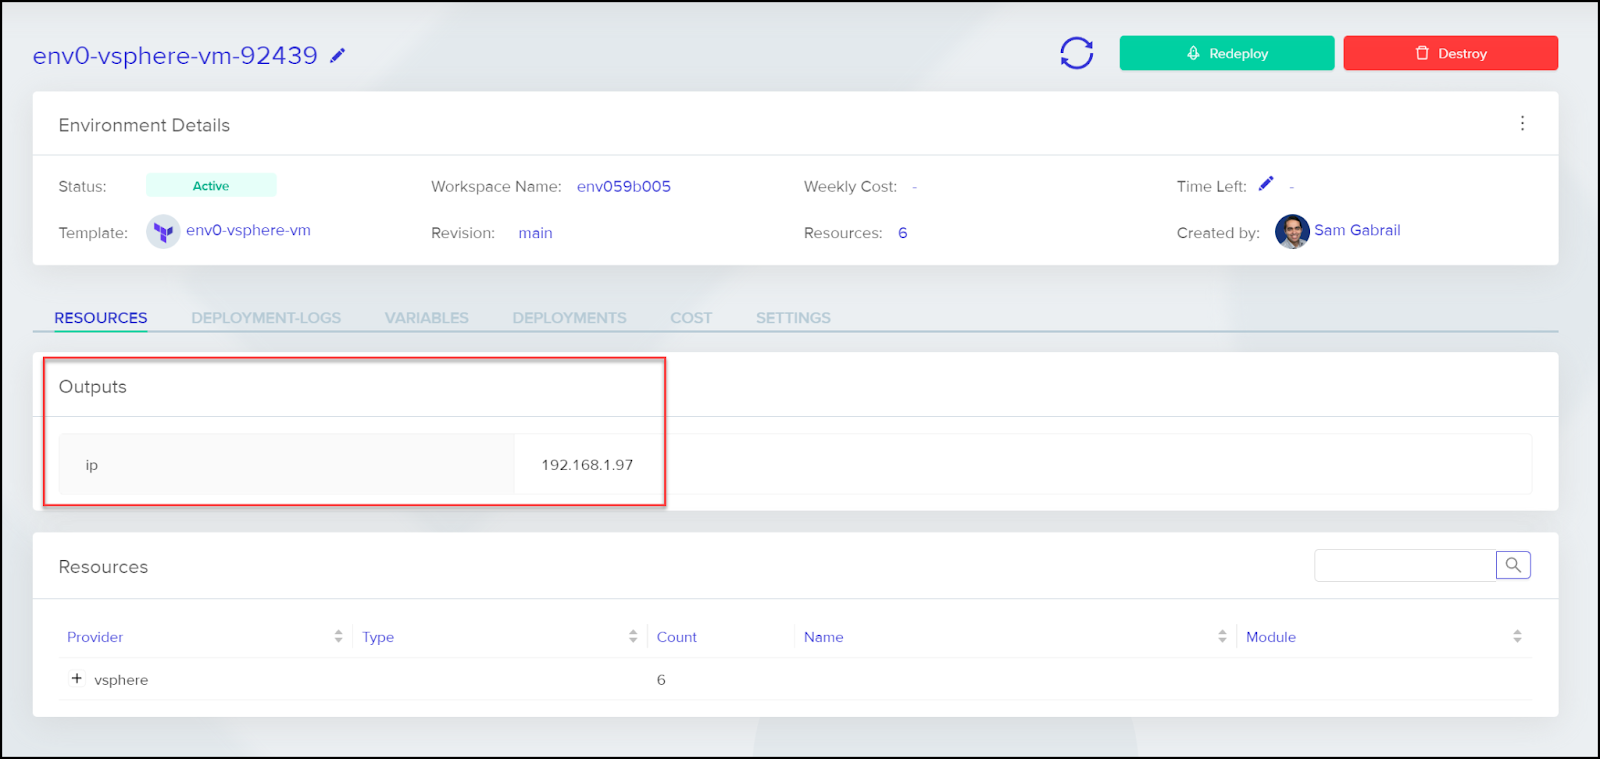
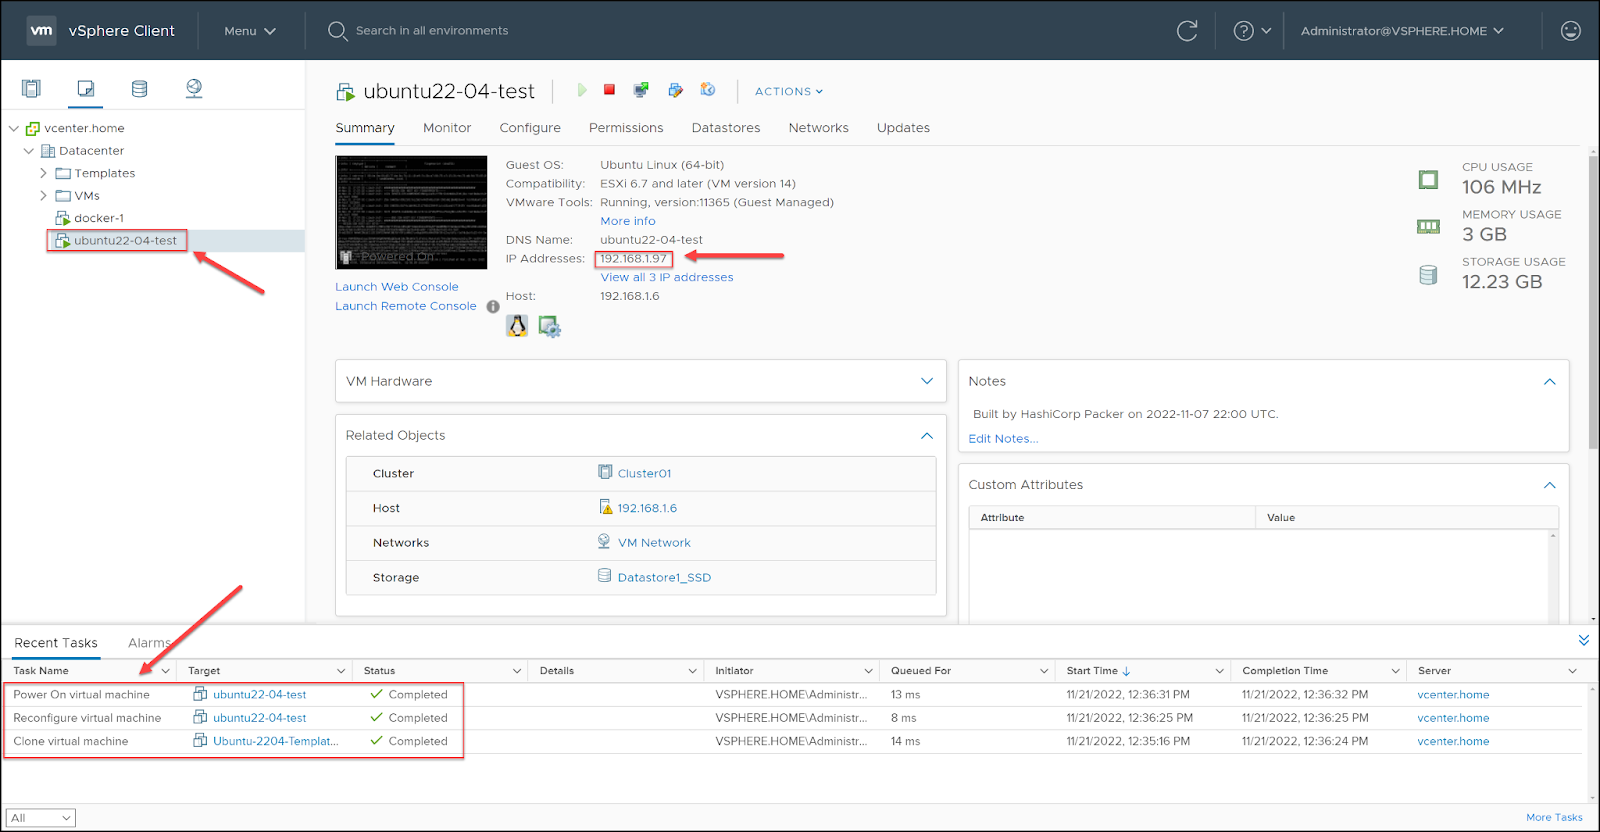
You can also see the VM created in the vSphere Client UI.
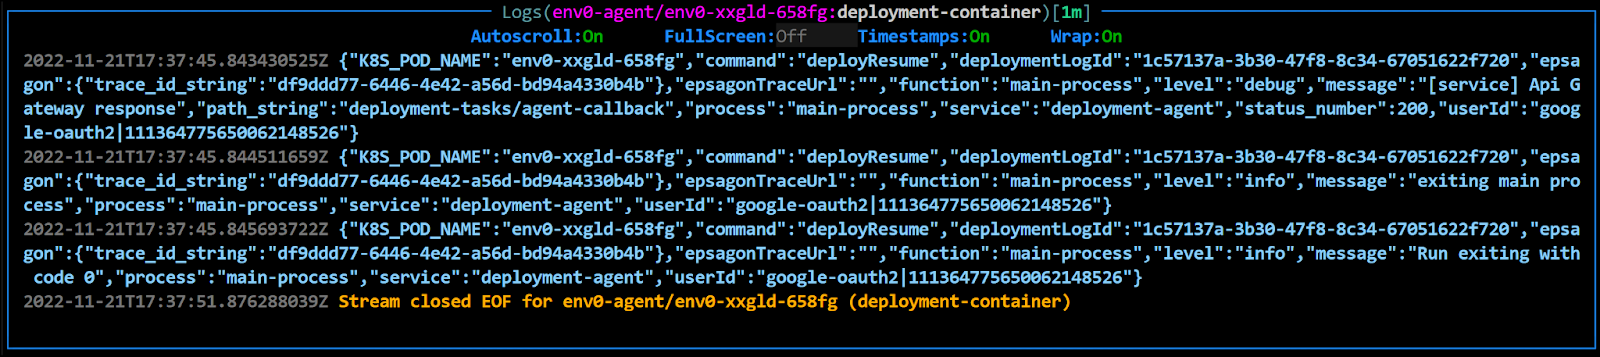
Deployment container logs
If you’re interested in seeing the logs from the agent’s deployment container, below is an example.
Terraform configuration
Now let’s take a step back and check the Terraform configuration that allowed us to provision a VM in VMware vSphere by cloning a VMware template. This template was created using HashiCorp Packer. If you’re interested in finding out how this template was created, check this post called HashiCorp Packer to Build a Ubuntu 22.04 Image Template in VMware vSphere here.
Prerequisites
The following is required to follow along:
- Terraform v1.3.4 (you can set this version in your env0 template)
- Access to a vSphere instance (tested on vSphere v6.7)
Configuration
Let's take a look at the most important configuration pieces needed.
Folder structure
Below is the structure within the Terraform folder in our repo.
[.code]main.tf[.code] file
Let's explore the [.code]main.tf[.code] file.
The first section of the file defines the required vSphere provider along with the credentials needed to access vSphere. There is also a locals variable definition that gets used in the [.code]metadata.yaml[.code] and [.code]userdata.yaml[.code] templates.
terraform {
required_providers {
vsphere = {
source = "hashicorp/vsphere"
version = "2.2.0"
}
}
}
provider "vsphere" {
user = var.vsphere_user
password = var.vsphere_password
vsphere_server = var.vsphere_vcenter
allow_unverified_ssl = true
}
locals {
templatevars = {
name = var.name,
ipv4_address = var.ipv4_address,
ipv4_gateway = var.ipv4_gateway,
dns_server_1 = var.dns_server_list[0],
dns_server_2 = var.dns_server_list[1],
public_key = var.public_key,
ssh_username = var.ssh_username
}
}
The second section of the [.code]main.tf[.code] file has a bunch of data blocks to retrieve existing data in vsphere. You'll see that we capture the following to use in generating the VM:
- datacenter
- datastore
- cluster
- network
- template
data "vsphere_datacenter" "dc" {
name = var.vsphere-datacenter
}
data "vsphere_datastore" "datastore" {
name = var.vm-datastore
datacenter_id = data.vsphere_datacenter.dc.id
}
data "vsphere_compute_cluster" "cluster" {
name = var.vsphere-cluster
datacenter_id = data.vsphere_datacenter.dc.id
}
data "vsphere_network" "network" {
name = var.vm-network
datacenter_id = data.vsphere_datacenter.dc.id
}
data "vsphere_virtual_machine" "template" {
name = "/${var.vsphere-datacenter}/vm/${var.vsphere-template-folder}/${var.vm-template-name}"
datacenter_id = data.vsphere_datacenter.dc.id
}
In this third and last section, we use a [.code]vsphere_virtual_machine[.code] resource to build our VM. Notice how we use the info from the data blocks retrieved earlier. We also feed the [.code]local.templatevars[.code] variables into the [.code]metadata.yaml[.code] and the [.code]userdata.yaml[.code] templates. We will take a look at these templates next.
resource "vsphere_virtual_machine" "vm" {
name = var.name
resource_pool_id = data.vsphere_compute_cluster.cluster.resource_pool_id
datastore_id = data.vsphere_datastore.datastore.id
num_cpus = var.cpu
num_cores_per_socket = var.cores-per-socket
memory = var.ram
guest_id = var.vm-guest-id
network_interface {
network_id = data.vsphere_network.network.id
adapter_type = data.vsphere_virtual_machine.template.network_interface_types[0]
}
disk {
label = "${var.name}-disk"
thin_provisioned = data.vsphere_virtual_machine.template.disks.0.thin_provisioned
eagerly_scrub = data.vsphere_virtual_machine.template.disks.0.eagerly_scrub
size = var.disksize == "" ? data.vsphere_virtual_machine.template.disks.0.size : var.disksize
}
clone {
template_uuid = data.vsphere_virtual_machine.template.id
}
extra_config = {
"guestinfo.metadata" = base64encode(templatefile("${path.module}/templates/metadata.yaml", local.templatevars))
"guestinfo.metadata.encoding" = "base64"
"guestinfo.userdata" = base64encode(templatefile("${path.module}/templates/userdata.yaml", local.templatevars))
"guestinfo.userdata.encoding" = "base64"
}
lifecycle {
ignore_changes = [
annotation,
clone[0].template_uuid,
clone[0].customize[0].dns_server_list,
clone[0].customize[0].network_interface[0]
]
}
}
[.code]metadata.yaml[.code] template file
Cloud-init uses this file to define the instance we're creating. We can configure the network interface, the hostname, the instance-id, the disks, and so on. Notice the [.code]${variable_name}[.code] syntax. This is used to receive variables from the [.code]local.templatevars[.code] variable we fed into the template.
local-hostname: ${name}
instance-id: ubuntu-${name}
network:
version: 2
ethernets:
ens192:
dhcp4: false
addresses:
- ${ipv4_address}/24
gateway4: ${ipv4_gateway}
nameservers:
search: [home]
addresses: [${dns_server_1}, ${dns_server_2}]
growpart:
mode: auto
devices: ['/dev/sda2']
ignore_growroot_disabled: true
wait-on-network:
ipv4: true
[.code]userdata.yaml[.code] template file
This file is used by cloud-init to configure users' SSH names, keys, and so on. Furthermore, you can install packages here. We install the tree package to show this functionality.
users:
- name: ${ssh_username}
ssh-authorized-keys:
- ssh-rsa ${public_key}
sudo: ['ALL=(ALL) NOPASSWD:ALL']
groups: sudo
shell: /bin/bash
packages:
- tree
[.code]output.tf[.code] file
In this file we display the output IP for our VM.
output "ip" {
value = vsphere_virtual_machine.vm.guest_ip_addresses[0]
}
Variables files
We split the variable assignment files into two files:
[.code]terraform.tfvars[.code] (holds sensitive variables—not checked into Git)
[.code]vars.auto.tfvars[.code] (holds non-sensitive variables—checked into Git)
[.code]terraform.tfvars[.code] file
You won't find this file in the Git repo because it contains sensitive information about my vSphere instance. I added it to [.code].gitignore[.code]. I created an example file called [.code]terraform-example.tfvars[.code]. Please rename this file to [.code]terraform.tfvars[.code] and populate it with your values. Here it is below:
vsphere_user = "<your_vsphere_user>"
vsphere_password = "<your_vsphere_password>"
vsphere_vcenter = "<your_vcenter_ip>"
[.code]vars.auto.tfvars[.code] file
This file assigns values to the different variables to build our VM. The variables are self explanatory.
cpu = 4
cores-per-socket = 1
ram = 4096
disksize = 100 # in GB
vm-guest-id = "ubuntu64Guest"
vsphere-unverified-ssl = "true"
vsphere-datacenter = "Datacenter"
vsphere-cluster = "Cluster01"
vm-datastore = "Datastore1_SSD"
vm-network = "VM Network"
vm-domain = "home"
dns_server_list = ["192.168.1.80", "8.8.8.8"]
name = "ubuntu22-04-test"
ipv4_address = "192.168.1.97"
ipv4_gateway = "192.168.1.254"
ipv4_netmask = "24"
vm-template-name = "Ubuntu-2204-Template-100GB-Thin"
[.code]variables.tf file[.code]
This is where you declare/define all the variables. Since it’s a large file, it’s not included here, but you can find it in the repo.
Wrapping up
In this blog post, we demonstrated how to use an existing vSphere template built by Packer to create a VM with Terraform. This was all done using env0’s self-hosted Kubernetes agents. Both the Terraform state file and our vSphere secrets/credentials are managed by us and not by env0. Furthermore, the self-hosted agent communicates with the env0 SaaS backend outbound so no need to open any inbound firewalls. This setup is what many organizations look for to adhere to compliance regulations.